

Creating customized neon indicators historically wants Noble gases and glassblowing, however because of LEDs it is rather a lot simpler to do it your self!
Posted on January 30, 2019
by
Alec Richter
We’ve been performing some Spring cleansing and renovating within the Inventive Workplace; desks are transferring round, backgrounds are getting arrange, and recording areas are being finalized. A part of that growth was determining the right way to beautify the principle set, and by probability a really useful YouTube video was the spark we wanted: a neon signal of the MatterHackers brand. Determining how this could all go collectively did take some trial and error, however if you happen to comply with alongside you’ll discover the steps I took that truly labored.
To begin off, listed below are the supplies and instruments that this venture wanted:
Supplies:
A design to comply with – I’ll get into extra element on what you want for this.
- Acrylic sheet – That is the background for the signal. The acrylic makes the neon look likes it’s floating and provides it extra depth, however you might simply as simply use a sheet of plywood as a substitute.
- Printed brackets – I made a pair fundamental brackets at particular angles and a few brackets in a selected form to carry the neon lights.
- Neon LED lights – It’s like rope lights however higher! Due to how they’re designed, you get a a lot better subtle gentle, so you may’t even inform these are simply comprised of a bunch of LEDs. Big tip: don’t get AC powered Neon LEDs. In what I discovered, AC powered lights solely mean you can reduce them each 20 inches; reduce between there and also you get an extended lifeless part. DC powered LEDs had a wide range of reduce lengths, nevertheless it was rather a lot simpler to seek out one I might reduce each inch. This is the precise itemizing I bought from for this venture.
- Energy provide -The outline of the Neon LEDs had a really useful one, so I went with that; 12V 120W.
Instruments:
- Sizzling glue gun/sizzling glue – To stick the brackets to the acrylic. This will likely not work as nicely for a wooden backing, so it’s possible you’ll need to use screws.
- Tremendous glue – To stick the sections of LED too small to make use of brackets
- Soldering iron, solder, and wires – to attach every part of LED into one full circuit.
- Sharp knife – artwork knife, razor blade, exacto knife, no matter you could have that’s sharp and you may management.
- Mounting {hardware} – I used drywall screws and anchors, however relying on the place and what you might be mounting towards will decide what you want.
Drill and drill bits – to make room for the standoffs for mounting.
Designing the template
Earlier than you dive too deep into this, you’ll want to determine what sort of signal you need to make. After all, I did a MatterHackers brand, however the important thing factor to recollect when designing your signal is to consider how every part will join to one another: the place are the road breaks going to be, the place will separate islands join to one another, and many others. The neon gentle is versatile, however not tremendous versatile; don’t anticipate to make a pointy 90° flip, reasonably a gradual bend. To extra carefully replicate the MatterHackers brand, it labored greatest to create lineart of it – principally simply the define – and use that as the bottom reasonably than making the emblem one strong shade.

Designing the brackets
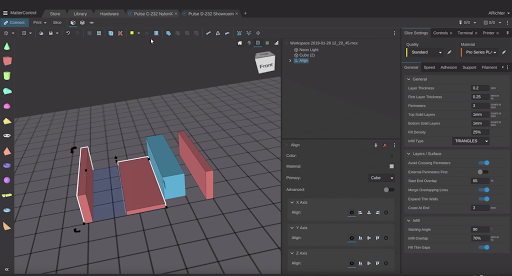
Wanting on the MatterHackers brand, there are a number of angles and straight strains, and never a number of pure curves. This meant it was vastly vital to maintain the lights straight alongside every path as a result of any waviness to it will be extremely apparent. Initially, I solely made brackets for the corners and you might inform – it was a catastrophe. On the second try, principally your complete signal was supported by brackets, which made meeting rather a lot simpler too. Whereas designing the brackets, I used MatterControl to first do a mockup of the final form of the sunshine and made the bracket to suit round it. I received fortunate and had the primary try match actually snugly on the sunshine however to not such a level that it was stressing the 3D prints. In the long run I had three types of brackets: straight sections, 120° sections, and one giant circle for the circle of the emblem (with a small cutout for wires to go by). Within the video you’ll in all probability see the opening by all of the brackets, and that’s as a result of I initially meant to make these use screws, however surprisingly sizzling glue held on approach stronger than I anticipated and so they weren’t vital. If as a substitute I wished to make use of a wooden backing, then they’d undoubtedly turn out to be useful.
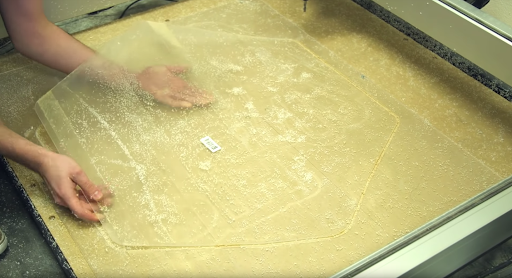
Designing and reducing the acrylic
We took the graphic create because the template and expanded the border of it ever so barely to have a little bit of destructive house across the signal. This additionally gave me a vector file I might make the most of to chop it out. I’ve a number of instruments at my disposal. Not a number of energy instruments however a ton of computerized instruments like 3D printers and CNCs. For me, it was rather a lot simpler to create a vector file from the unique design and reduce it out utilizing a Shapeoko XXL and a ½” bit than it was to attempt to freehand it utilizing my nonexistent jigsaw or bandsaw. Use the instruments you could have accessible to you to chop this half completed, whether or not it’s reducing out a bit of plastic or making a pleasant picket background.
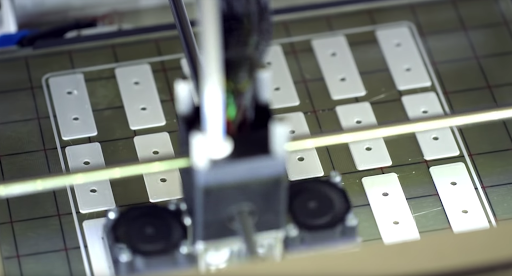
Printing the brackets
That is the straightforward half. I might advocate printing with as many perimeters as you may since these must flex a tiny bit with out breaking. I printed mine with 4 perimeters at 30% infill and I used to be capable of get the brackets printed out in about eight hours on the Pulse XE.
Setup for meeting
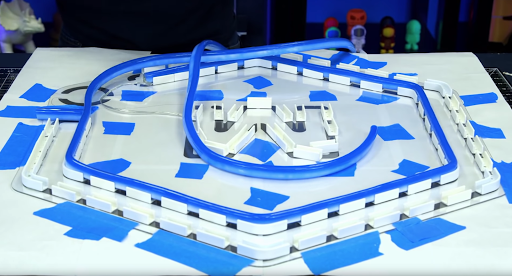
Begin by printing out the design and tape all of the items again collectively into one massive template. You’ll need to be as exact with this as you may, as a result of this might be your information in assembling the signal. I simply used no matter tape was closest, which was blue tape, and started working taping every web page collectively like an enormous puzzle. You’ll then need to lay your acrylic sheet on prime of the paper and finalize your spacing across the edges, then tape the acrylic to the paper so it doesn’t slip.
Take your brackets and lay them out over your complete signal. Examine for anyplace that appears prefer it would possibly want extra assist or the place it’d profit from a constraint to maintain its form. It’d be helpful to take an image of it at this level, as a result of simply transferring across the neon gentle will get in the way in which of the brackets.
Minimize off an finish piece of sunshine from both finish of the LEDs; 5 inches ought to be sufficient. You’ll use this as a ruler so you may get on the finish of an entire part of LED to keep away from lifeless zones. It doesn’t matter the place you chop by for this piece, simply watch out with the fragile strip of LED on the within, you need to take away that in a single piece; don’t rip your ruler in half.
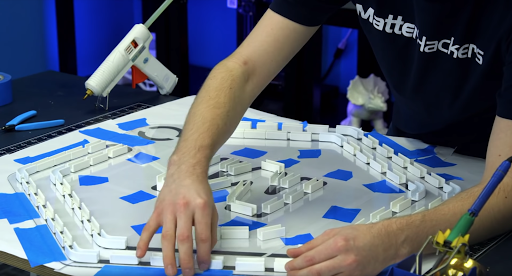
Meeting
Choose one main part of lighting and begin there. As soon as your glue gun is sizzling and prepared, put a glob of glue onto the again of the bracket and press it onto the trail of your signal. Begin with issues like corners and distinctive shapes earlier than doing lengthy straghtaways; you don’t need to put a straight piece too near a nook and never have sufficient room. Ensure you don’t go overboard with the glue – you simply need sufficient to squish between the bracket and the acrylic, however not a lot that it oozes out. It’s high-quality if it does, however your signal will look messier on a more in-depth inspection.
Maintain the “ruler” over the top of the neon gentle, matching up the solder factors of the sunshine to the ends of the ruler and begin marking the place every part ends (or each different, no matter works). When you’ve received an honest size measured, weave the complete size of sunshine by the brackets till you attain a degree the place they will’t make the flip as cleanly as you’d like (in my case the nook on the ends of the hexagon) and discover the reduce line closest to the place you need to finish the lights. Fastidiously press your knife into the sheathing, being light sufficient to not reduce by or scratch the strip inside. You’re first checking that your ruler was on the mark and that there’s certainly the top of a piece the place you marked it and never proper by an LED. When you can see that your mark was correct and there’s a reduce line seen, reduce alongside it and separate the 2 sections. Repeat this for the remainder of the lengths of sunshine on this part: threading it, lining it up, and reducing it off.
After you have all of your unfastened sections, rigorously tin the contacts every strip, and reduce,strip, and tin quick lengths of wire to bridge the hole between every part of LED. If the size of LED is just too quick to comfortably slot in a bracket (as within the bracket will crowd that space), I discovered that superglue holds the lights onto the acrylic rather well. It’s principally a everlasting resolution, so attempt to design your approach round this gap if you happen to can keep away from it (nevertheless it’s not such as you’d take aside your lovely signal when it’s completed, proper?) Repeat this for the remainder of the signal. There’s going to be a number of reducing, stripping, and soldering, however it should all be value it ultimately.
Mounting
Like I discussed earlier than, I wished this mounted on the wall within the background of our movies, so I wanted to do greater than an image hanging hook and name it good. After doing some research, I used to be reminded of how glass is historically mounted on partitions: a gap by the glass, a standoff that screws into the wall, and a cap that threads into the standoff and thru the glass. Making a cap that has screws on it’s doable however would take some work to get tolerances down, however a easy friction match relying the layer strains can be simple sufficient. With half an hour’s work I modeled a standoff across the drywall anchors and the screws it got here with.
- Standoff – thick sufficient on the backside of the opening to provide the screw sufficient plastic to press towards, holes large sufficient for it to simply go by however not sloppily, and a small gap on the underside to suit the drywall anchor (since they don’t press in fully flush with the wall).
- Insert – thick sufficient to have sufficient plastic for the screw to press towards, sufficient house between the insert and standoff to assist the acrylic
- Caps – Simply sufficient tolerance to press into the insert and never fall out, however simple to pry out if I must entry the screws once more.
After some experimentation with reducing holes in some scrap acrylic, I discovered that beginning with a pilot gap and instantly transferring to the complete dimension drill bit shattered chunks out of the acrylic, progressively growing the dimensions of the bit prompted some chipping, and taping each side of the acrylic and taking it simple nonetheless shaped micro-fractures within the acrylic. With one final try earlier than breaking out the soldering iron once more and melting the holes in it, I attempted a spade bit. It was good. Taking it simple I used to be capable of carve by the acrylic rather a lot gently than a daily bit, after which I might clear up the opening with a daily bit to get it to the proper dimension.
With the signal on the wall, I took an extended part of wire and fed it behind the show shelf to the ability provide down under, reduce it, stripped it, and inserted it into the ability provide with its protecting case. All that was left was to show it on, and it really labored!
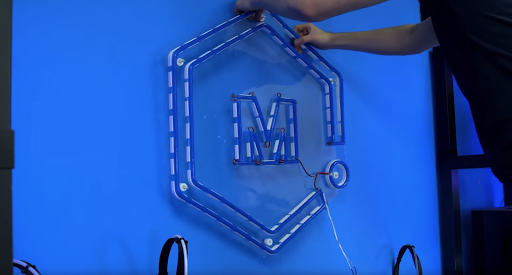
So whereas this text is verbose, from begin to end, I actively labored on the MatterHackers neon signal for under 5 or 6 hours, and that was nonetheless with trial and error going into it. I hope this provides you some concepts of an indication you need to create, massive or small. Both approach, I’d like to see what you give you.
Glad printing!