

The Radiomaster T8L doesn’t have a built-in display screen — however don’t let that idiot you. You’ll be able to nonetheless entry nearly all the identical settings you’d anticipate from higher-end radios. You simply configure it by way of the WebUI (Net Configuator) as a substitute. On this tutorial, I’ll stroll you thru how to connect with the webUI, setup switches and channels, ExpressLRS settings, receiver binding, and firmware updating.


New to FPV? Take a look at my purchaser’s information on radio transmitters: https://oscarliang.com/radio-transmitter/
For under $35, the T8L radio is arguably the most cost effective price having radio in 2026, get it right here:
Hook up with Net Configurator
Earlier than plugging within the USB cable, it is advisable to boot the radio into VCP mode first. Right here’s how:
- Maintain down the “M” button and energy button for 3 seconds to show it on
- Now you can launch the buttons.
- Join the USB-C cable
- Open the Radiomaster Net UI: https://radiomaster-rc.github.io/RM-Net-Web page/Connection.html (I made a shortened URL, simpler to recollect: https://bit.ly/t8l-config)
- Choose the COM port and click on Join
As soon as linked, you’ll see the complete configuration interface.


Overview of the Net Configurator Settings
Now let’s undergo the vital sections you have to.
Swap Configuration (System)
Beneath the System web page, you’ll be able to change how switches behave.
For instance, you’ll be able to flip a momentary swap right into a 2-position swap. I usually arm my drones utilizing a swap on the top-right nook, however the T8L doesn’t have a latching swap there. As an alternative, it solely has a momentary button—so I reconfigured it to behave like a 2-position swap.
Right here’s the way it works:
- Press the button as soon as → HIGH
- Press it once more → LOW
There’s no bodily indication of the swap place, however the radio gives audio cues if you press it:
- 1 beep = LOW
- 2 beeps = HIGH
To set this up, go to the System tab and alter the Key Mode Setting for SA or SD from “Click on” to “Single”. This makes the momentary swap behave like an ordinary toggle swap.

As an alternative of “Single”, you can even set it to “Double”, which turns the button right into a 3-position swap.
This provides you flexibility though the bodily switches are easy.
Channel Setup
Contained in the Channels tab, you’ll be able to:
- Remap channels (AETR or different layouts)
- Reverse channels
- Add deadband
- Regulate trims
- Set subtrim
- Verify radio mode (Mode 1 / Mode 2)

For instance, in the event you’re flying Mode 2, you’ll see:
All clearly mapped (in Channel Mapping).
Usually, you don’t want to alter something right here. However you’ll be able to allocate switches to totally different channels right here in order for you. Or if the sticks strikes the unsuitable course — you’ll be able to reverse it right here.
Betaflight Modes Setup
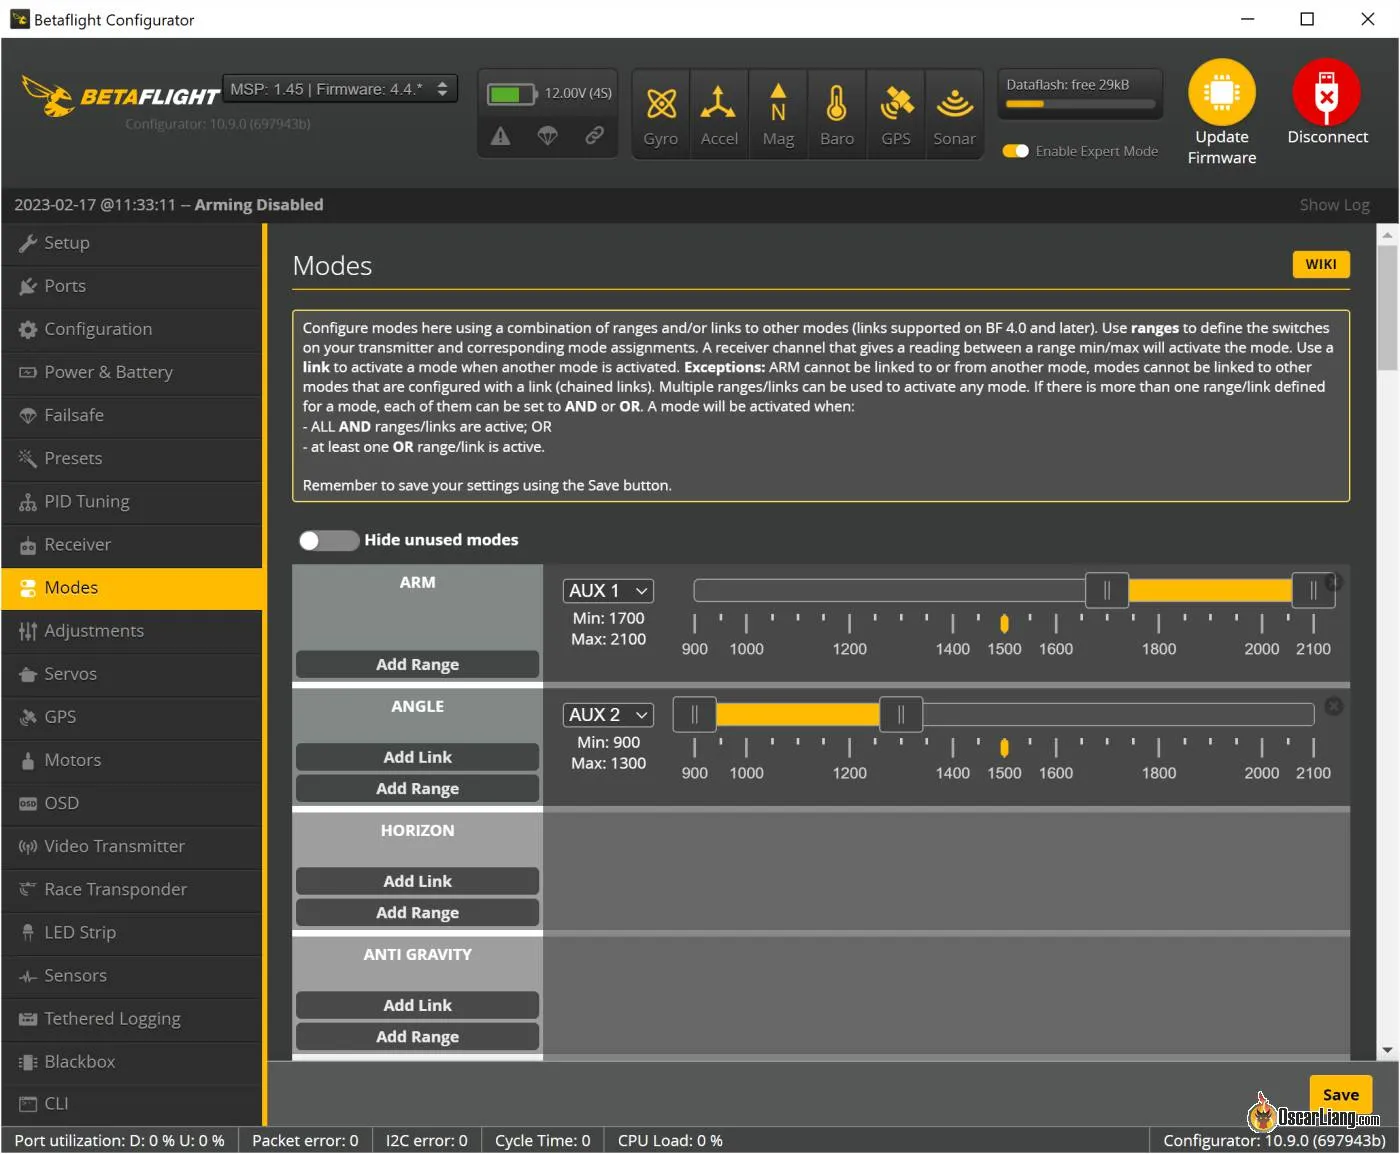
When you setup the switches within the radio, you’ll be able to go to Betaflight Configurator’s Modes tab, to assign these switches to the modes you wish to use. For example, to arm the quad, activate Angle mode and beeper, and many others.
I’ve a information on the right way to to do in a bit extra element: https://oscarliang.com/betaflight-modes/
ExpressLRS Settings (Energy & Packet Charges)

Contained in the RF Setting tab, you can see the identical settings in ExpressLRS LUA script:
- TX Energy: Set your max energy (e.g., 100mW, or in case you are flying tiny whoop in the home, 10mW or 25mW is normally sufficient, decrease energy saves battery).
- Dynamic Energy: When enabled, the radio robotically adjusts energy based mostly on sign power to save lots of battery. Not required, however may be helpful.
- Packet Charge: Set your packet fee relying in your wants:
- Greater packet fee = decrease latency
- Decrease packet fee = higher vary
- Select what matches your flying type, 250Hz is an effective center floor and that’s what I personally use on most of my quads.
- Telem Ratio: that is how usually telemetry knowledge is shipped, simply depart it at “STD” (customary).
- Swap Mode: Set it to Vast.
- Hyperlink Mode: Set it to Regular.
- Mannequin Match: Prevents by chance binding to the unsuitable mannequin. Except what you’re doing, simply depart it OFF.
- Bind: You’ll be able to put radio in Bind mode.
- WiFi Connectivity: You’ll be able to allow WiFi mode right here,
If you wish to study extra about what these settings imply in additional particulars, take a look at my ExpressLRS information: https://oscarliang.com/setup-expresslrs-2-4ghz/#ELRS-LUA-Script-Settings
Learn how to Bind to ELRS Receiver
Methodology 1: Utilizing Bind Phrase
You should use bind phrase for binding:
- Allow Wi-Fi below the RF Settings tab
- Hook up with the radio’s Wi-Fi hotspot in your telephone, or laptop computer
- Open 10.0.0.1 in your browser
- Enter your binding phrase within the internet UI, and click on Save
Now repeat this and enter the identical bind phrase within the receiver. That’s it.
Methodology 2: Utilizing the Bind Button
If for some motive you can not put a bind phrase within the drone’s receiver, you should use the bind button.
The T8L has a devoted bind button, it places the radio in Bind mode. (or you are able to do this within the Net configurator).
To place the receiver in bind mode, you merely plug and unplug the battery 3 instances.
WiFi Mode (For Firmware Updates)
For those who allow WiFi, you’ll be able to replace ExpressLRS firmware by way of:
- ELRS Configurator
- Browser-based replace
This makes firmware updates simple — no must open the radio.
Gimbal Rigidity Adjustment
You’ll be able to alter how tight or free the gimbals really feel following this diagram.

If they’re nonetheless not free sufficient, you’ll be able to substitute the gimbal springs that include the radio. Take a look at how I did it in my T8L assessment: https://oscarliang.com/radiomaster-t8l/

Gimbal Calibration

When utilizing the radio for the primary time, it’s best to calibrate the gimbals. You must also repeat it in case your sticks don’t middle correctly (when the sticks are in middle place, they need to learn 0):
- Go into the Calibration tab within the Net Configurator
- Comply with the on-screen directions
- Middle all sticks first, click on Verify Middle Level
- Now transfer sticks totally in all instructions (do that very gently, don’t push the sticks exhausting or it’ll break the calibration), keep within the corners for not less than 0.5 to 1 second.
- Click on Full
FPV Simulators
The T8L was plug and play for me.
Merely energy on the radio, join it to your PC with a USB-C cable, and launch your simulator (Liftoff, Uncrashed, TrypFPV, Velocidrone, and many others.). It must be instantly acknowledged as “Radiomaster SIM” controller, with out putting in any drivers.
You must calibrate the controller contained in the sim when utilizing it for the primary time.
Firmware Improve
There’s additionally a firmware replace part in WebUI.

You need to obtain the firmware file from RadioMaster’s web site first (if there’s a new firmware).
Right here you’ll be able to:
- Replace radio firmware
- Replace Inner ELRS module
- Replace sensor
For those who by chance enter firmware replace mode and can’t get out of it (When powered on, two blue LED flashing and the radio is caught), it is advisable to return to the Net Configurator, and click on “Exit Firmware Replace”.

Setting Backup and Restore
There is no such thing as a strategy to backup or restore settings robotically. You need to depend on the nice outdated “screenshots” methodology.
Guide


Closing Ideas
The Radiomaster T8L is without doubt one of the most reasonably priced ELRS radios on the market, and regardless of not having a display screen, it’s surprisingly succesful. For those who’re a newbie, this setup methodology is definitely simpler than navigating complicated radio menus. For those who’re skilled, you’ll respect how clear and direct the WebUI method is.