

30.8K
Betaflight can appear intimidating at first look — there are such a lot of tabs, settings, and unfamiliar phrases. However don’t fear — there are solely a handful of choices you really want to configure to get your drone flying. Explaining each characteristic in Betaflight would take hours, so on this information, I’ll concentrate on the important setup steps you want after constructing or shopping for your first FPV drone.


Among the hyperlinks on this web page are affiliate hyperlinks. I obtain a fee (at no further price to you) in case you make a purchase order after clicking on one in every of these affiliate hyperlinks. This helps assist the free content material for the group on this web site. Please learn our Affiliate Hyperlink Coverage for extra data.
Betaflight is the preferred flight controller firmware for FPV drones. In case you’re new to FPV, try my overview of flight controller firmware to study the way it compares to different choices: https://oscarliang.com/fc-firmware/#Betaflight
The place to Get Betaflight Configurator

Betaflight Configurator is the software program used to configure and flash firmware to your flight controller.
Now you can entry it straight in your internet browser — no set up wanted: https://app.betaflight.com/
Be aware: The Betaflight Configurator internet app solely works in Google Chrome and different Chromium-based browsers reminiscent of Microsoft Edge or Vivaldi. It’s not suitable with Firefox, Safari, or Opera.
In case you want the normal desktop model, you’ll be able to obtain and set up it from GitHub: https://github.com/betaflight/betaflight-configurator/releases/newest
The net model is usually the best to make use of because it doesn’t require set up or guide updates — it’s at all times the most recent launch. That mentioned, there are a couple of instances the place it’s your decision the desktop model, reminiscent of:
- Your drone makes use of an previous model of Betaflight firmware, and also you want an identical Configurator model.
- You don’t have entry to the web or want a standalone setup.
Configurator Choices

Earlier than connecting your flight controller, let’s regulate a couple of preliminary Configurator settings to make your workflow smoother.
Click on Choices within the left-hand panel.
Listed here are a couple of suggestions:
- Reopen final tab on join – robotically opens the final tab you used everytime you reconnect to the flight controller.
- Digital connection mode – enables you to discover and study Betaflight Configurator with no need an actual flight controller related.
- Allow Darkish Theme – simpler on the eyes, particularly for lengthy setup periods.
- Change language – swap to your most popular language for higher readability.
Updating Firmware
You don’t should replace the firmware immediately.
In case you bought your flight controller following my suggestions, it ought to already include Betaflight pre-installed. Whereas there is likely to be a more moderen model obtainable, updating isn’t vital except the brand new launch consists of particular options or bug fixes you need.
In case your drone is flying superb and also you’re new to Betaflight, it’s finest to carry off on updating for now — flashing new firmware can erase all of your present settings, which means you’d should arrange the drone once more from scratch.
In case you do resolve to replace, comply with this step-by-step tutorial to flash it: https://oscarliang.com/flash-update-betaflight/
Connecting Your Drone to the Laptop

Join your drone to your laptop utilizing a USB cable — be sure you’re plugging into the precise flight controller, not the DJI Air Unit or different elements. There is no such thing as a have to plug within the battery.
In case your laptop doesn’t acknowledge the flight controller, double-check that you simply’re utilizing a knowledge cable, not a charge-only cable.

In Betaflight Configurator:
- Click on “Choose your system”, then “I can’t discover my USB system”.
- A pop-up will seem displaying obtainable COM ports.
- Choose the one that claims “Betaflight”.
Tip: In case you’re uncertain which COM port is the appropriate one, unplug the USB cable and reconnect it — the proper port is the one which seems whenever you reconnect.
In case you can’t discover the COM port or nonetheless can’t join, you’ll have a driver subject in your laptop. Observe this information for an answer: https://oscarliang.com/fc-driver-issues-flash-firmware/.
Interface Defined
When you click on Join, you’ll be greeted by a 3D mannequin of your drone on the Setup tab.

Let’s stroll by the interface and what it’s best to take note of:
- Firmware Model and Goal – Exhibits which model of Betaflight and goal board are presently put in in your FC.
- Voltage Studying – Shows the voltage detected by the FC. If no LiPo battery is related, it’ll present the USB voltage.
- Sensor Icons (Prime Bar) – The lit-up icons signify energetic sensors in your flight controller.
- If an icon is pink, it signifies a possible subject (e.g., a pink GPS icon means it hasn’t acquired a satellite tv for pc repair but).
- For primary flying, all you really want is the Gyro — the opposite sensors merely present further options or flight modes.
On the left-hand panel, you’ll see all of the obtainable tabs. To maintain issues easy, we’ll solely configure the important settings — simply sufficient to get your drone off the bottom. When you acquire extra expertise, you’ll be able to discover the extra tabs for superior options.
Earlier than continuing, click on Allow Professional Mode within the top-right nook. This unlocks further tabs and superior choices which can be hidden by default. You don’t essentially want to alter them proper now, however it’s helpful to have them seen — in any other case, you would possibly surprise later why sure settings are lacking.
In case you see a pop up warning reminiscent of “The accelerometer is enabled however not calibrated”, don’t fear. Merely place your drone on a stage floor and click on Calibrate Accelerometer within the Setup tab to repair it.

Presets Tab

I like to leap to the Presets tab first as a result of that is the place it’s best to create a backup earlier than making any adjustments in Betaflight.
There are a number of methods to again up your Betaflight configuration (defined right here: https://oscarliang.com/backup-restore-betaflight-config), however the simplest way is to easily click on the “Save Backup” button within the Presets tab.
In addition to backups, the Presets tab can also be the place the web group shares their tunes, charges, and OSD layouts. You’ll be able to discover and apply these presets straight from inside Betaflight. Be taught extra about how they work right here: https://oscarliang.com/betaflight-presets/
Setup Tab

The Setup tab is the primary tab you’ll see in Betaflight Configurator.
Right here you’ll be able to confirm your flight controller’s orientation. Maintain your drone in your hand with the digicam dealing with away from you, click on “Reset Z Axis”, then gently tilt the drone round. You need to see the 3D mannequin on display screen transfer precisely as your drone strikes — which means your accelerometer is working appropriately.

Fast Tip: If the 3D mannequin doesn’t match your drone’s actions, strive putting it on a wonderfully stage floor and click on “Calibrate Accelerometer.” You often solely want to do that as soon as when establishing a brand new drone.
If the 3D mannequin nonetheless doesn’t transfer appropriately, it’s probably your FC is mounted within the unsuitable orientation — for instance, the other way up or dealing with sideways (the arrow on the FC ought to level ahead). You’ll be able to repair this in two methods:
- Bodily rotate the flight controller to the proper orientation, or
- Within the Configuration tab, regulate the Board Sensor Alignment (Yaw offset) by setting it to 90°, 180°, or 270° till it matches appropriately.
Ports Tab
The Ports tab is the place you configure all of the peripherals (exterior units) related to your flight controller through UART ports.
Every UART has two connections:
- TX = Transmit
- RX = Obtain
You’ll see these labeled in your FC as TX1/RX1, TX2/RX2, and so forth — every pair represents one UART.
In case you purchased a BNF (Bind-N-Fly) drone, the Ports tab might be already configured appropriately, and also you don’t want to alter something right here. Nevertheless, in case you’re constructing a drone from scratch, listed here are the 2 important configurations it is advisable know:
- Receiver Setup:
- In case you’re utilizing a serial receiver (reminiscent of ExpressLRS or Crossfire), allow “Serial RX” on the UART your receiver is related to.
- Video System Setup:
- For digital FPV programs like DJI or Walksnail, choose “VTX (MSP + DisplayPort)” below Peripherals for the UART related to your video transmitter (this additionally allows MSP robotically).
- For analog FPV programs, in case you’ve related the SmartAudio or IRC Tramp wire for VTX management, choose both “VTX (TBS SmartAudio)” or “VTX (IRC Tramp)” below Peripherals.

Fast Tip: In case you’re utilizing DJI or Walksnail, there’s an excellent simpler manner — go to the Presets tab and apply the preset referred to as “OSD for FPV.WTF, DJI O3, Avatar HD” (simply search “DJI”). It will robotically configure the Ports and OSD tab for you.
![]()
![]()
Professional Tip: At all times click on “Save and Reboot” (backside left of the display screen) after making adjustments. In case you swap to a different tab or shut Betaflight with out saving, your adjustments will probably be misplaced.
Configuration Tab
The Configuration tab accommodates your drone’s core system settings — issues like replace frequencies, sensors, and flight options. You’ll be able to go away most choices at their default values, however there are a couple of vital settings it’s best to evaluation and regulate if wanted.

1. System Configuration
Gyro Replace Frequency: This determines how briskly gyro samples are taken. The worth is dependent upon the precise gyro used in your flight controller and is often fastened, so that you don’t want to alter it.
PID Loop Frequency (Looptime): This controls how briskly the PID calculations are carried out. The quickest looptime you should utilize is when it matches your gyro replace frequency (for instance, in case your gyro replace frequency is 8K, the utmost PID loop frequency could be 8K. Nevertheless, increased looptime means extra CPU load, so relying in your flight controller’s processing energy and what number of options you’ve enabled, it’s not at all times finest to max it out.
Common guideline:
- F4 FC: 4kHz
- F7 / H7 FC: 4kHz or 8kHz
- BMI270 gyro: Set PID Loop Frequency to three.2 kHz regardless the processor as a result of this gyro solely helps 3.2kHz Gyro replace fee).
Everytime you improve PID Loop Frequency or allow extra options, keep watch over the CPU Load indicator on the backside of the display screen — Betaflight 4.5 recommends protecting it under 75%. Excessively excessive CPU load may cause instability to the flight controller. To cut back CPU load, both decrease the PID Loop Frequency or disable pointless options and sensors.

You too can allow or disable onboard sensors right here:
- Accelerometer: All flight controllers have accelerometer, so you’ll be able to safely go away it enabled. Your drone can nonetheless fly with out it, however flight modes like Angle Mode, Horizon Mode, and GPS Rescue require it.
- Barometer / Magnetometer: Just some flight controllers have these sensors onboard, so allow these in case your FC truly has them and you intend to make use of altitude maintain or GPS options.
2. Personalization
Give your drone a reputation below Personalization. This title seems in your OSD and in your CLI backup recordsdata, which makes it simpler to establish totally different quads later.
3. Arming Angle
The Arming Angle is a security characteristic that stops your drone from arming when it’s in an uncommon orientation. By default, it’s set to 25°, which means in case your drone is tilted greater than 25° from stage (assuming your accelerometer is calibrated), you received’t have the ability to arm.
In case you set this worth to 180°, it successfully disables this restriction, permitting you to arm no matter orientation — even the other way up. This may be useful in some conditions, for instance in case your drone lands on uneven floor or will get caught in a tree; you’ll be able to re-arm and attempt to shake it free.
4. Options
Allow solely the options you propose to make use of. At minimal, make certain OSD is enabled — it’s important for seeing flight information like battery voltage, flight time, and warnings in your goggles.
5. DShot Beacon
I at all times suggest enabling DShot Beacon. It turns your motors into audible beepers (after they’re not spinning), which helps you find your drone after a crash — particularly in case you don’t have a bodily buzzer. You’ll be able to study extra about which Beacon Tones and choices to make use of right here: https://oscarliang.com/dshot-beacon/
As soon as set, click on Save and Reboot.
Voltage Calibration

Earlier than you fly, it’s vital to verify Betaflight is studying your battery voltage precisely.
- Measure your battery voltage utilizing a multimeter or battery checker.
- Plug the battery into your drone (take away the propellers first for security).
- In Betaflight Configurator, test the voltage studying on the prime bar (highlighted in pink).
If the voltage reported in Betaflight doesn’t match your measured voltage, you’ll have to calibrate the voltage sensor.
How you can calibrate:
- Go to the Energy & Battery tab.
- Click on the Calibration button (backside proper).
- Enter the measured voltage within the pop-up field, then click on Calibrate.
- Apply the brand new voltage scale — and that’s it!
Your voltage readings ought to now match your precise battery voltage.

Failsafe Tab

The Failsafe tab controls how your drone behaves if it loses connection together with your radio — making it some of the vital security settings in Betaflight.
⚠️ If the Failsafe tab is lacking, allow Professional Mode first to make it seen.
For an in depth clarification of how Failsafe works, try my full tutorial: https://oscarliang.com/setup-failsafe/.
Minimal Advisable Setup:
- In case you don’t have GPS, set the failsafe Stage 2 motion to “Drop”.
- When failsafe triggers (e.g. RC sign is misplaced), the drone will pause briefly to see if the sign returns, then disarm the motors and drop safely to the bottom.
- That is safer than letting the drone fly away uncontrollably.
- In case you do have GPS, think about using GPS Rescue mode as a substitute, which makes the drone robotically return towards the takeoff level. I’ve a tutorial on easy methods to Setup GPS Rescue in Betaflight: https://oscarliang.com/setup-gps-rescue-mode-betaflight/
As soon as completed, click on Save and Reboot.
Receiver Tab

The Receiver tab enables you to configure and confirm that your radio receiver is working appropriately together with your flight controller.
Setting Up Receiver
In case you’re utilizing an ExpressLRS or Crossfire receiver:
- Receiver Mode: Serial (through UART)
- Serial Receiver Supplier: CRSF
- Allow Telemetry
Binding the Receiver
As soon as your settings are right, bind your receiver to your radio transmitter.
After binding, it’s best to see the channel bars and the 3D mannequin within the configurator transfer whenever you transfer your sticks.

If the unsuitable channels reply (e.g., roll strikes whenever you throttle), strive a special Channel Map. It’s often both AETR1234 or TAER1234. Nonetheless unsuitable? How you can Configure Channel Map Correctly: https://oscarliang.com/channel-map/
Troubleshooting No Stick Response
If the channels aren’t responding in any respect:
- Is the receiver certain to the transmitter? (do you see a stable inexperienced LED on receiver?)
- Is the receiver soldered to the proper UART pins (TX/RX)?
- Have you ever enabled Serial RX for the proper UART within the Ports Tab?
- Have you ever chosen the proper RX protocol (CRSF for ExpressLRS/Crossfire)?
Checking Channel Midpoints and Endpoints
As soon as your sticks are transferring appropriately, confirm the midpoints and endpoints for the primary 4 channels (Pitch, Roll, Yaw, and Throttle):
- Midpoints (don’t contact the sticks): ~1500 (it’s okay to have some jitters, if it fluctuates barely between 1498–1502, you’ll be able to repair it by coming into 2 within the RC/Yaw deadband)
- Endpoints (push the sticks to the perimeters): ~1000 (low) and ~2000 (excessive). Small variations are completely superb (e.g., 988 or 2012).

In case your midpoints or endpoints are off, comply with this information to repair them: https://oscarliang.com/adjust-tx-channel-mid-end-point/.
Understanding Stick Thresholds
- Stick Low Threshold: Defines how low the throttle stick should go for the FC to acknowledge it’s absolutely down. This impacts arming conduct and parameters like PID_MIN_THROTTLE.
Keep away from setting it precisely to 1000, even when your throttle can go that low — set it round 1010–1050 is a safer wager. - Stick Heart: At all times 1500.
- Stick Excessive Threshold: Defines when the throttle stick is taken into account absolutely raised. The default worth of 1900 is ok and doesn’t have an effect on stick vary and flight efficiency.
Be aware: Stick thresholds usually are not the identical as stick endpoints — they merely inform Betaflight easy methods to interpret stick positions for sure features (e.g., arming, OSD menu). Due to this fact you’ll be able to simply go away these settings at default.
Modes Tab

The Modes tab enables you to assign radio switches to activate totally different flight modes and features reminiscent of:
- Arming (required to take off)
- Angle Mode (self-leveling)
- Beeper (discover your drone)
- Flip Over After Crash (a.okay.a. Turtle Mode)
You’ll find an in depth clarification of every mode right here: https://oscarliang.com/betaflight-modes/
How you can assign a swap:
- Setup the switches in your radio first (you’ll be able to assign switches to channels 5 to 12): https://oscarliang.com/setup-switch-mixes/
- Click on “Add Vary” on the specified mode.
- Flip the swap in your radio — Betaflight will robotically detect it.
- Regulate the slider vary to outline when the mode is energetic.
- Flip the swap once more — the yellow marker ought to transfer beneath the slider. Be sure that it falls inside the energetic vary when the mode is ON.
- Click on Save to substantiate your setup.

Motors Tab

The Motors tab is used to check and configure your motors and ESCs.
⚠️ Security First: At all times take away all propellers earlier than testing motors in Betaflight.
ESC/Motor Protocol
The one setting you often want to alter right here is the ESC/Motor Protocol. For any trendy ESC, DShot is beneficial. The quantity after DShot signifies the communication pace and will match your PID Loop Frequency:
- DShot600 for 8KHz
- DShot300 for 4KHz
- DShot150 for 2KHz
Additional Studying: ESC Protocols and Firmware Overview
In your first flight, you’ll be able to go away all different motor tab settings at their default values.
Click on Save and Reboot, then return to the Motor Tab to check your setup.
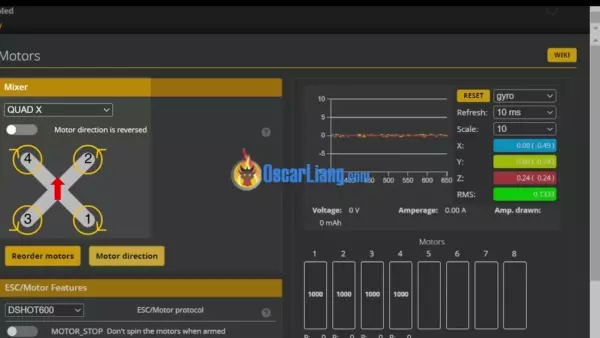
Testing Motors
Verify the next:
- Do the motors spin? Use the grasp slider or check them individually.
- Are they within the right order?
- Do they spin within the right route?
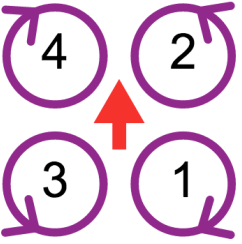
The proper motor order and route (default “props in” configuration):
- motor 1 at rear proper, spins clockwise
- motor 2 at entrance proper, spins counter clockwise
- motor 3 at rear left, spins counter clockwise
- motor 4 at entrance left, spins clockwise
If the motor order is unsuitable, click on “Reorder Motors” and comply with the on-screen directions.
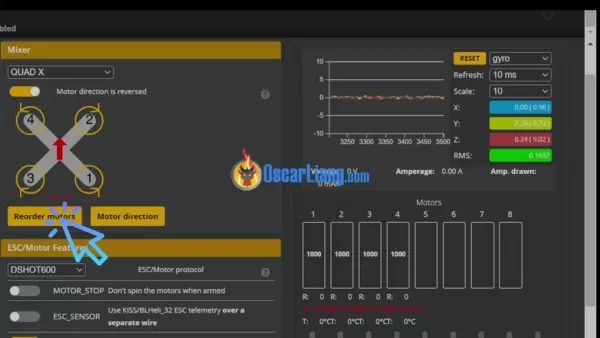
If any motors spin within the unsuitable route, click on “Motor Path” to reverse them.
Additional Studying: the default configuration known as props in, however when the motor rotation is reversed it’s referred to as props out. Be taught the variations right here: https://oscarliang.com/reversed-motor-prop-rotation-quadcopter/
OSD Tab

The OSD tab enables you to select which flight information seem in your goggles — reminiscent of battery voltage, timer, GPS coordinates, distance to dwelling, pace, altitude, flight mode and so forth.
Video Format
- For digital FPV programs (DJI, Walksnail, HDZero): Set Video Format to HD for proper font sizing and format.
- For analog FPV programs: Choose Auto, or select PAL/NTSC if you already know your digicam format.

Including and Positioning OSD Components
On the left, you’ll discover a checklist of accessible OSD parts. To allow one, tick the field within the first column (every column belongs to a special OSD profile). The ingredient will seem within the preview space — drag and drop it wherever you favor.
The 2 will need to have parts are battery voltage and warnings, the remaining are as much as you.
Instance OSD Format
As an alternative of manually positioning every ingredient, you’ll be able to paste this configuration into the CLI tab. That is my very own OSD format for a DJI freestyle quad (with out GPS):
set osd_vbat_pos = 2497set osd_link_quality_pos = 2081set osd_rssi_dbm_pos = 2049set osd_tim_2_pos = 3567set osd_flymode_pos = 3535set osd_throttle_pos = 3407set osd_current_pos = 3438set osd_mah_drawn_pos = 2529set osd_craft_name_pos = 3083set osd_gps_speed_pos = 1449set osd_warnings_pos = 14677set osd_avg_cell_voltage_pos = 2519save
It appears like this.

In case you want extra data I’ve a complete tutorial going by each side of Betaflight OSD: https://oscarliang.com/betaflight-osd/.
PID Tuning Tab

The PID Tuning tab means that you can fine-tune your quad’s flight conduct and make it fly precisely the way you need.
At first look, this tab can look intimidating, however you don’t want to alter something to your first flights — the default Betaflight tune works very nicely for a variety of FPV drones. Once you’re able to dive deeper, try my detailed information on PID tuning: https://oscarliang.com/fpv-drone-tuning/
Charges and Expo (Rateprofile Settings)

The primary factor price experimenting with as a newbie are charges and expo — these management how your drone responds to stay actions.
- Decrease charges → smoother, extra exact management (nice for cinematic flying or rookies).
- Greater charges → faster, extra responsive really feel (superb for freestyle or racing).
There’s no common “finest” fee — it’s fully private choice and is dependent upon your flying type.
If you need some tips about easy methods to tune your charges, right here is my tutorial: https://oscarliang.com/charges/#Understanding-Precise-Charges
Video Transmitter Tab
In case you’re utilizing DJI or Walksnail, you’ll be able to skip this tab — it solely applies to analog.
The Video Transmitter tab enables you to configure your VTX by loading a VTX Desk. This lets you change channels and energy ranges by your OSD menu.
There are 3 ways to load a VTX Desk:
- Choose a VTX Desk Preset within the Presets tab
- Load a JSON file within the Video Transmitter tab
- Paste a code snippet within the CLI tab (my most popular technique)
You’ll be able to often discover the proper JSON file or CLI snippet in your VTX’s product web page. If not, test the producer’s web site or just seek for it on-line.
Professional Ideas
How you can Cease Your Drone Beeping on the Bench
In case your drone retains beeping when related through USB, it’s probably as a result of your radio is off and the FC doesn’t detect a sound radio hyperlink. To repair this, go to the Configuration Tab → Beeper Configuration, and disable the “USB” possibility.
Security Checks Earlier than Maiden Flight
Earlier than flying your drone for the primary time, it’s important to check your failsafe. In case your failsafe is ready to “Drop”, the motors ought to disarm instantly when sign is misplaced. You do not need the drone to behave unexpectedly within the occasion of a failsafe.
- Take away all propellers for security.
- Plug within the battery, flip in your radio, and arm the quad — the motors ought to begin spinning.
- Now flip off your radio to simulate sign loss.
- The motors ought to cease spinning inside a few seconds.
- In the event that they proceed spinning, revisit your failsafe settings, and reset them to default if vital.
Different Betaflight Tutorials
Betaflight may be overwhelming at first, however when you’ve mastered the fundamentals from this information, you’ll be able to discover its superior options. Listed here are some helpful tutorials to proceed your studying journey:
Remaining Ideas
Betaflight doesn’t should be sophisticated. By understanding simply the core setup steps coated on this information, you’ll acquire the boldness to setup your FPV drone and begin flying with ease. When you’re comfy, experiment, discover, and benefit from the freedom FPV provides!
Glad flying!
Edit Historical past
- Dec 2017 – Article created
- Jul 2018 – Up to date directions
- Sep 2018 – Added “How you can Replace” and new tutorial hyperlinks
- Jan 2021 – Up to date for Betaflight 4.2
- Oct 2022 – Up to date for Betaflight 4.3
- Jan 2023 – Up to date for Betaflight 4.4
- Nov 2025 – Up to date for Betaflight 2025.12