

In the event you’re new to FPV, the NewBeeDrone Hummingbird V4 is a wonderful tiny whoop to start out with. After spending time flying it, I can confidently say: this drone flies fantastically—but it surely has one weak point that holds it again from being the proper newbie quad—the battery connector. Luckily, this may be simply addressed, and I’ll present you the way later on this assessment. Let’s dive into the small print and assist you to determine if the Hummingbird V4 is the fitting drone for you.

Be taught extra about tiny whoops and advisable components right here: https://oscarliang.com/best-tiny-whoop/
The place to Purchase
You may get your Hummingbird V4 from these retailers:

Contained in the field, you’ll discover the next equipment:
- One set of spare propellers
- Prop elimination instrument
- Spare screws and rubber grommet equipment
Be aware: Batteries will not be included. You’ll must buy your personal 1S 300mAh LiHV batteries with PH2.0 connectors: https://oscarliang.com/product-qifg
Hummingbird V4 Specs
- Drone Dimension: 65mm
- Flight Controller: Hummingbird V4 AIO FC
- Receiver: ExpressLRS 2.4GHz SPI (built-in into the FC)
- VTX: SmartMax 25mW / 100mW / 400mW switchable (built-in)
- Body: Cockroach V3 65mm Extremely Mild
- Motors: Hummingbird 0702 30,000KV
- Propellers: Azi Tri-Blade 31mm
- Digital camera: BeeEye Digital camera
- Cover: Goober V2
- Battery Connector: PH2.0
- Advisable Battery: 1S 300mAh LiHV
- Weight (with out battery): 19.35g

What’s New In comparison with the Hummingbird V3?
NewBeeDrone has made a number of notable enhancements over the Hummingbird V3 (full assessment right here: https://oscarliang.com/newbeedrone-hummingbird-v3/):
- Lighter: V4 is roughly 2g lighter than V3
- Extra energy: VTX max output elevated from 25mW to 400mW
- Increased motor KV: Upgraded from 25,000KV to 30,000KV
Nearer Look
The propellers and cover are available in random colours for a little bit of shock—mine arrived in a translucent white, which appears modern and clear.
The body and cover are created from sturdy plastic, and so they’re among the many most crash-resistant supplies obtainable within the tiny whoop class. The digicam angle is adjustable from 5° to 55°, providing nice flexibility relying how briskly you need to fly. It is a beginner-friendly function that makes the Hummingbird V4 extra adaptable in comparison with many different widespread whoops in the marketplace.
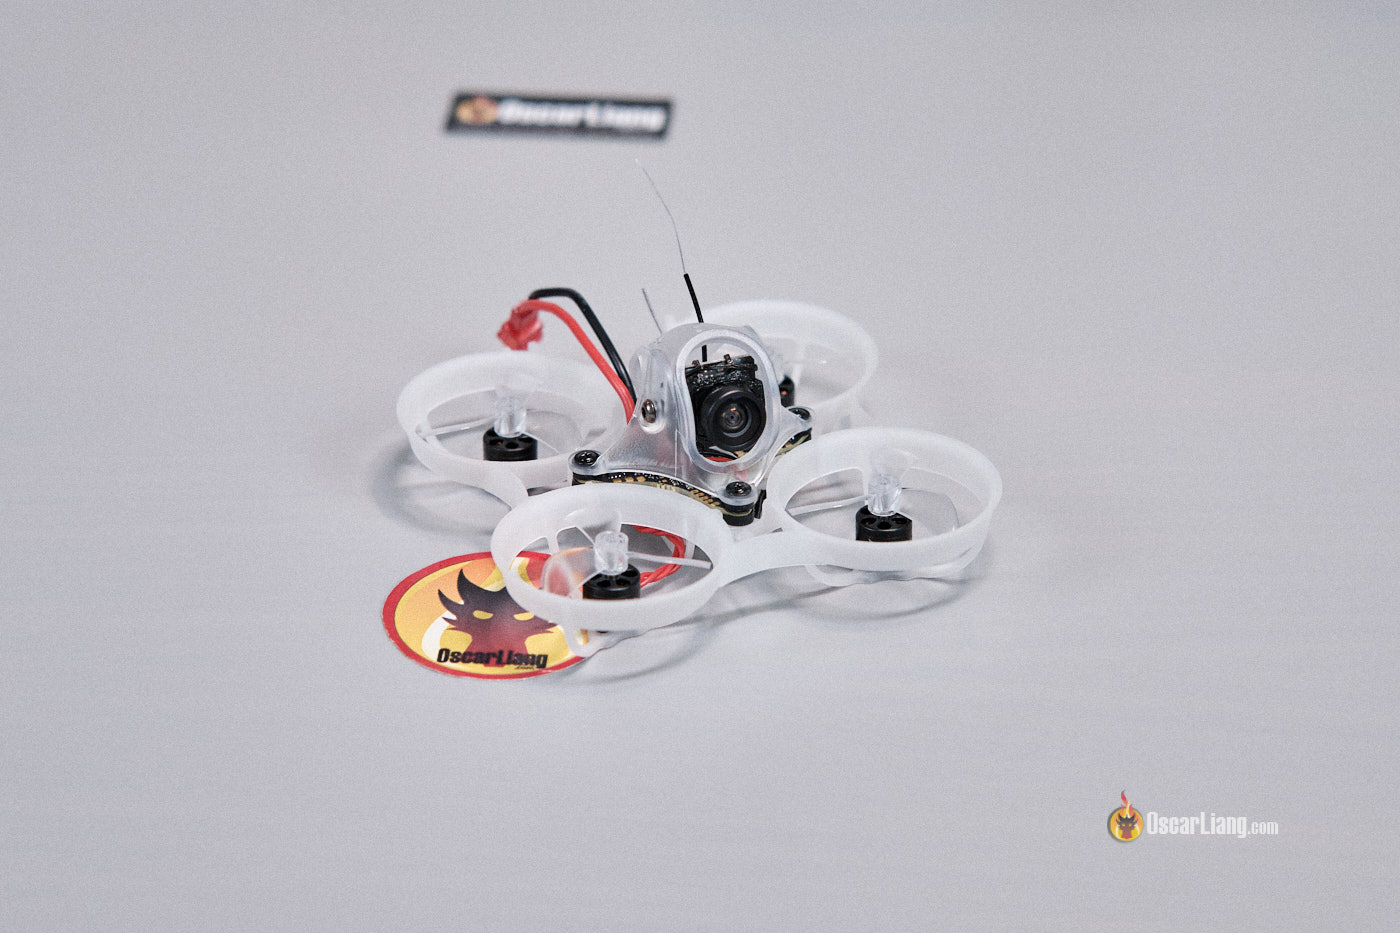
The flight controller options 4 shiny RGB LEDs, one on every edge, which may be personalized to show numerous patterns. This makes the drone stand out in low-light environments—good for racing with pals, the place the lights may be personalized and assist differentiate between pilots.

Each the radio receiver and VTX are built-in into the flight controller, and the digicam plugs instantly into the FC as properly. The motors are plug-and-play, that means no soldering is required anyplace on this drone. This makes repairs and half replacements extremely straightforward. Do word, nonetheless, that the digicam and motor have particular connectors that aren’t appropriate with parts from different manufacturers, so replacements should come from NewBeeDrone.


Behind the cover, you’ll discover two antennas: an extended one for the receiver and a shorter one for the VTX.

Outdated PH2.0 Battery Connector
Sadly, the Hummingbird V4 nonetheless ships with PH2.0 battery connector, which feels outdated in 2025. Most fashionable 1S batteries and chargers now use BT2.0 or A30 connectors, which give decrease inside resistance, diminished voltage sag, higher energy supply, and in the end longer flight occasions. Contemplating the V4 now runs on 30,000KV motors—very power-hungry by nature—making this older connector wrestle much more.
Whereas the PH2.0 connector won’t be a giant deal for freshmen who received’t instantly discover efficiency variations, you’ll ultimately outgrow it. Upgrading later to higher batteries will price extra in the long term.
I raised this similar concern in my Hummingbird V3 assessment, and it’s disappointing that it hasn’t been addressed. That mentioned, the repair is easy—I swapped the connector myself in underneath 10 minutes. I had no selection anyway, since I now not personal any batteries with PH2.0 connectors.
In the event you’re in the same place, I like to recommend getting a BT2.0 U Cable, which can also be appropriate with A30 batteries: https://s.click on.aliexpress.com/e/_DDTv0pr


Flight Efficiency
The very first thing I seen when flying the Hummingbird V4 indoors was how clean and predictable it felt. Proper out of the field, this quad flew fantastically—no PID tuning required. Management felt locked in, with glorious throttle response and nimble dealing with. Even utilizing inventory charges and PIDs, I felt completely answerable for the drone. For freshmen, that is precisely what you need: a drone that flies nice with minimal setup.
After upgrading to a BT2.0 connector, I used to be getting about 3:00 to three:half-hour of flight time utilizing a 1S 300mAh battery. That’s pretty typical for 1S whoops. With the inventory PH2.0 connector, you’ll be able to count on a shorter flight time (round 2.5 minutes) and early low-voltage warnings, as a result of worse voltage sag.
I additionally appreciated the huge digicam angle adjustability. In the event you’re simply beginning out, I like to recommend setting the angle between 10° and 15°—good for gradual, exact flying in tight indoor areas.
Room for Enchancment
Apart from the battery connector, there are just a few different areas the place the Hummingbird V4 may very well be improved.
The Goober V2 cover is powerful and crash-resistant, but it surely provides little to no digicam safety. The lens stands out past the cover, making it susceptible to direct impacts. This appears like a design oversight. In the event you are inclined to fly aggressively or crash regularly (let’s be sincere—everybody does with a whoop!), that is one thing to be careful for. A easy repair is so as to add a few small items of froth subsequent to the lens as bumpers.

The digicam mount additionally makes use of a 3D-printed insert that doesn’t lock the lean angle in place. After a tough crash, the digicam angle would possibly shift, which may be disorienting. A locking mechanism can be a pleasant contact in future variations.
One other level: the onboard ExpressLRS receiver is SPI-based. This isn’t excellent, particularly contemplating NewBeeDrone already launched the RaceSpec V2 with a more recent flight controller that makes use of a UART-based ELRS receiver. That mentioned, this possible isn’t a dealbreaker. For most individuals, it’s merely not essential to replace the firmware on the FC or receiver—and by the point it’s good to, you’ll in all probability have moved on to a different higher and newer whoop anyway.

Methods to Setup for First Flight
The FC comes with Betaflight 4.5.1, and the FC goal is HUMMINGBIRD_F4_V4, authentic CLI Diff may be discovered right here. ESC firmware is Bluejay, 0.19, 48kHz (O-H-10).
Firstly, bind the receiver, go to the Receiver tab in Betaflight, and enter your bind phrase there. Alternatively, click on “Bind Receiver” button on the backside., then go to ExpressLRS LUA script in your radio and allow Bind mode. Observe this information if you happen to don’t understand how: https://oscarliang.com/bind-expresslrs-receivers/#Technique-1-Bind-Button-in-Betaflight-Configurator
For maiden flight, listed below are the Betaflight configurations:
- Load ExpressLRS Preset
- Set Your Charges
- Set Arm change, angle mode change, turtle mode change
- Set OSD (disable “Core Temperature” underneath warnings, exchange RSSI with RSSI_dBm)
- Modify your VTX channel and energy (25mW to 400mW) primarily based in your flying atmosphere.
Last Verdict
The NewBeeDrone Hummingbird V4 is a wonderful beginner-friendly tiny whoop. It’s light-weight, responsive, well-tuned proper out of the field, and performs fantastically indoor. The plug-and-play design means minimal soldering is required—solely the battery connector if you happen to select to improve it—making repairs and upkeep easy, even for freshmen.
You may get your Hummingbird V4 from these retailers:
Nonetheless, the continued use of the PH2.0 connector in 2025 is a severe disadvantage. In the event you determine to choose up this whoop, I extremely advocate swapping it out with a BT2.0 U cable and utilizing A30 or BT2.0 batteries.
For skilled pilots searching for most efficiency, you would possibly need to think about extra highly effective alternate options just like the NewBeeDrone RaceSpec V2 or BetaFPV Meteor65 Air. Try my suggestions right here: https://oscarliang.com/best-tiny-whoop/