

Why is it Totally different?
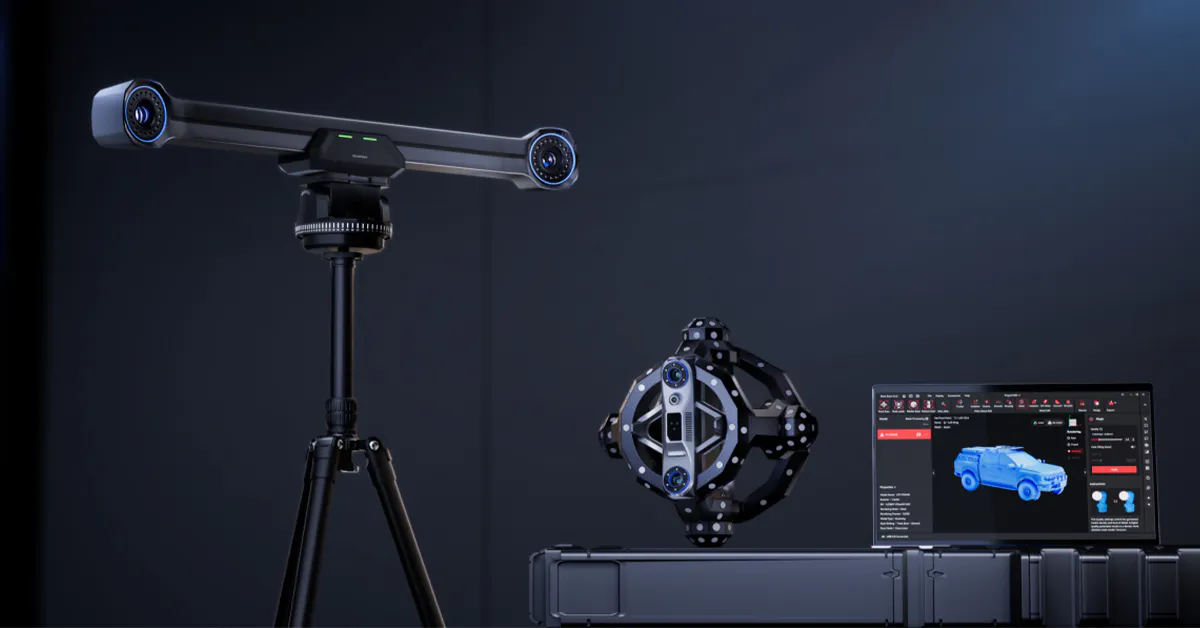
Wanting on the picture above, you possibly can inform right away that this isn’t your common consumer-grade 3D scanner. It options this lengthy gadget that resembles the face of a Hammerhead Shark, and a spaceage-looking, orb-like contraption.
The sharky bit is definitely the tracker, and the orb-thing, is the scanner itself. The orb is product of carbon fiber, and is roofed in markers.
This dual-component setup is designed for environment friendly 3D scanning. The tracker module with stereo infrared cameras screens the marker-covered scanner’s place, permitting for real-time spatial monitoring.
This eliminates the necessity to place markers straight on the thing. The scanner captures geometry utilizing structured blue-laser mild, whereas the tracker ensures exact alignment and diminished drift. Advantages embrace quicker setup, simplified workflow, and dependable scanning of complicated or reflective surfaces. As a result of the tracker solely must see the scanner (not the thing) the Trackit permits correct, markerless scanning even in confined or partially occluded environments.
Now, this idea isn’t a brand new one. These kind of “exterior in” 3D scanners with their exterior monitoring sensors have been round for some time in industrial purposes.
They often retail for over $50,000 USD.
So for the primary time, any such scanner tech is now accessible to shoppers who don’t want to promote a kidney to purchase one.
That’s the important purpose why the Revopoint Trackit is completely different. As a result of it’s reasonably priced.
Specs
So now you understand why it’s completely different (and the way it works), let’s check out the specs earlier than we crack the field open and take a look at what’s included.
| Class | Specification |
|---|---|
| Scanning Know-how | Blue laser (30 cross traces + 1 single line), marker-free with exterior optical tracker |
| Single-Body Accuracy | As much as 0.02 mm |
| Level Spacing (Decision) | As much as 0.05 mm |
| Scan Velocity | 1,500,000 factors/second |
| Working Distance (Scanner) | 200 – 400 mm |
| Seize Space @ 200 mm | 160 × 70 mm |
| Seize Space @ 400 mm | 320 × 215 mm |
| Output Codecs | PLY, OBJ, STL, ASC, 3MF, GLTF, FBX |
| Tracker Working Distance | 1.5 – 4.0 m |
| Monitoring Body (Min / Max) | 1304 × 1067 mm @ 1.5 m / 3260 × 2845 mm @ 4 m |
| Monitoring Quantity | 11 m³ |
| Volumetric Accuracy (System) | 0.02 mm + 0.04 mm × L (m) |
| Really helpful Half Dimension Vary | 0.01 – 6 m |
| Weight (Scanner / Tracker) | 1.2 kg / 2.0 kg |
| Dimensions (Scanner / Tracker) | 295 × 295 × 205 mm / 686 × 106 × 111 mm |
Beginning with the highest of the desk we will see it has two blue laser modes, being 30 cross traces (for quick scanning of bigger areas) and a single line mode, for scanning deep holes and different awkward options. You may see each modes at work within the video under.
By way of accuracy and scanning space, the Trackit delivers a single-frame accuracy of 0.02 mm with level spacing right down to 0.05 mm, capturing as much as 1.5 million factors per second. Its working distance ranges from 200 to 400 mm, with a subject of view increasing from 160 × 70 mm at shut vary to 320 × 215 mm at full attain.
The TrackitTrackit system can deal with components starting from a number of centimetres as much as round six metres in dimension. Its exterior tracker defines the working quantity, capturing a body of about 1.3 × 1.1 metres at 1.5 metres distance, and increasing to roughly 3.3 × 2.8 metres when moved again to 4 metres, giving an total monitoring quantity of 11 cubic metres.
In plain phrases, the farther you pull the tracker again, the bigger the thing you possibly can scan, though the volumetric accuracy follows the components 0.02 mm + 0.04 mm per metre, that means greater scans lose a contact of precision over distance.
This makes it perfect for inspection duties, reverse engineering, or the seize of bigger objects for varied digitization wants. It’s perfect for detailed automotive duties of all sizes, starting from engine elements, proper as much as the total automobile itself. Though relying on the scale of the automobile and the gap of the tracker, you would possibly want to maneuver the automobile a bit, scan it in components, and merge the components within the software program.
PC Necessities
In case you have learn our earlier evaluate for the Revopoint MetroX, you’ll know that the MetroX had some fairly excessive PC necessities for a “client” grade metrology scanner.
Effectively, the PC necessities for the Trackit are even increased.
And whereas there was some flexibility for the MetroX (we all know as a result of we examined it), the necessities for the Trackit are pretty inflexible. For instance, the MetroX requires the minimal of a Corei7 processor and optionally available GPU. We used a more moderen technology i5 with no GPU, and it nonetheless labored OK.
You gained’t get away with such modifications with the Trackit nonetheless. We bought a brand new laptop computer simply to run the Trackit someplace in between the minimal and beneficial necessities.
The official necessities for the Trackit are under.
| Class | Minimal Requirement | Really helpful Requirement |
|---|---|---|
| Working System | Home windows 10 / 11 (64-bit) | Home windows 10 / 11 (64-bit) |
| Processor (CPU) | Intel Core i7 thirteenth Gen / AMD Ryzen 7 7000 sequence or above | Intel Core i9 twelfth Gen or higher |
| Reminiscence (RAM) | 32 GB or increased | 64 GB or increased |
| Graphics (GPU) | NVIDIA GeForce RTX 3060 (8 GB VRAM) | NVIDIA GeForce RTX 4060 (8 GB VRAM) or higher |
| Storage | SSD beneficial | NVMe SSD high-speed storage |
| USB Interface | USB 3.0 port or increased | A number of USB 3.0/3.1 ports beneficial |
| Different | Secure energy provide, devoted GPU drivers updated | Similar as minimal + high-performance cooling and twin monitor setup beneficial |
We used a 2024 Asus TUF Gaming laptop computer, with thirteenth gen Core i7, RTX 4060 (8gb) and we upgraded it with 64gb of RAM, simply to make sure.
We are able to safely say that this setup is greater than satisfactory for the Trackit, and scanning was as easy as butter. Extra on that later.
Three Methods to Scan
The Revopoint Trackit permits for 3 ways of scanning objects inside the Revo Observe software program.
Observe Scan
The primary mode is Observe Scan, and makes use of the large monitoring module. This makes use of the blue laser mild modes, and is for precision scanning of each giant and small objects.
In Observe Scan mode, the half to be scanned is positioned between the tracker and the scanner. On this mode, the tracker have to be stored stationary, and there have to be a line of sight between each of the tracker’s “eyes” and the shifting scanner.
Multi Place Scan
Multiposition Scan Mode enables you to scan the massive objects from completely different angles or orientations by repositioning the tracker, then robotically align and merge the partial scans right into a single full 3D mannequin.
Marker Scan
The third and closing scanning technique is the extra conventional method of scanning, and is mainly the standalone mode, utilizing the scanner with out the separate tracker.
That is perfect for smaller objects, and as you possibly can guess from the identify, requires using markers.
Testing The Trackit
Earlier than scanning with the Trackit, each the scanner and tracker should be calibrated, by use of the tripods, gimbals and calibration plate. It’s a reasonably laborious job, and we don’t have the house to enter particulars on the way it all works right here. However you possibly can see this video from the corporate for an concept of how calibration works.
After calibrating the Trackit (not straightforward because of the excessive temperatures on this a part of the world), it was time to place the Trackit by way of its paces.
I arrange the tracker, and put a raised plywood platform in entrance of it, the place I might place the objects to be scanned.
Take a look at 1 – Impromptu Cat Scan (Monitoring Scan / Cross Lasers)
Earlier than getting right into a correctly correct scanning session, I made a decision to only scan some random objects to see how effectively the monitoring system labored.
In earlier opinions, I’ve talked about how troublesome it’s to scan stay animals, as a consequence of their lack of cooperation, and because of the problem of carrying {hardware} to a sleeping animal with out waking it.
I had no such points this time, as my cat randomly flopped onto my scanning platform and refused to maneuver, whereas I used to be in search of one thing to scan.
I assumed this was her method of volunteering, so I quietly grabbed the Trackit and launched a scan in Observe Scan mode (with blue crossed lasers).
OK so it wasn’t a correct take a look at, and I solely scanned half my cat (I didn’t need blue laser mild getting in her face). However one factor that was instantly noticeable was how easy the scanning course of was.
Retaining one eye on my laptop computer to see how shortly the information was being captured, I may see the purpose cloud turning inexperienced in a short time, indicating that the scan was good high quality. It took simply ten seconds to scan half of the cat.
After my first fast impromptu take a look at, I eliminated the undesirable visitor from the scanning desk, and located one thing extra applicable to scan.
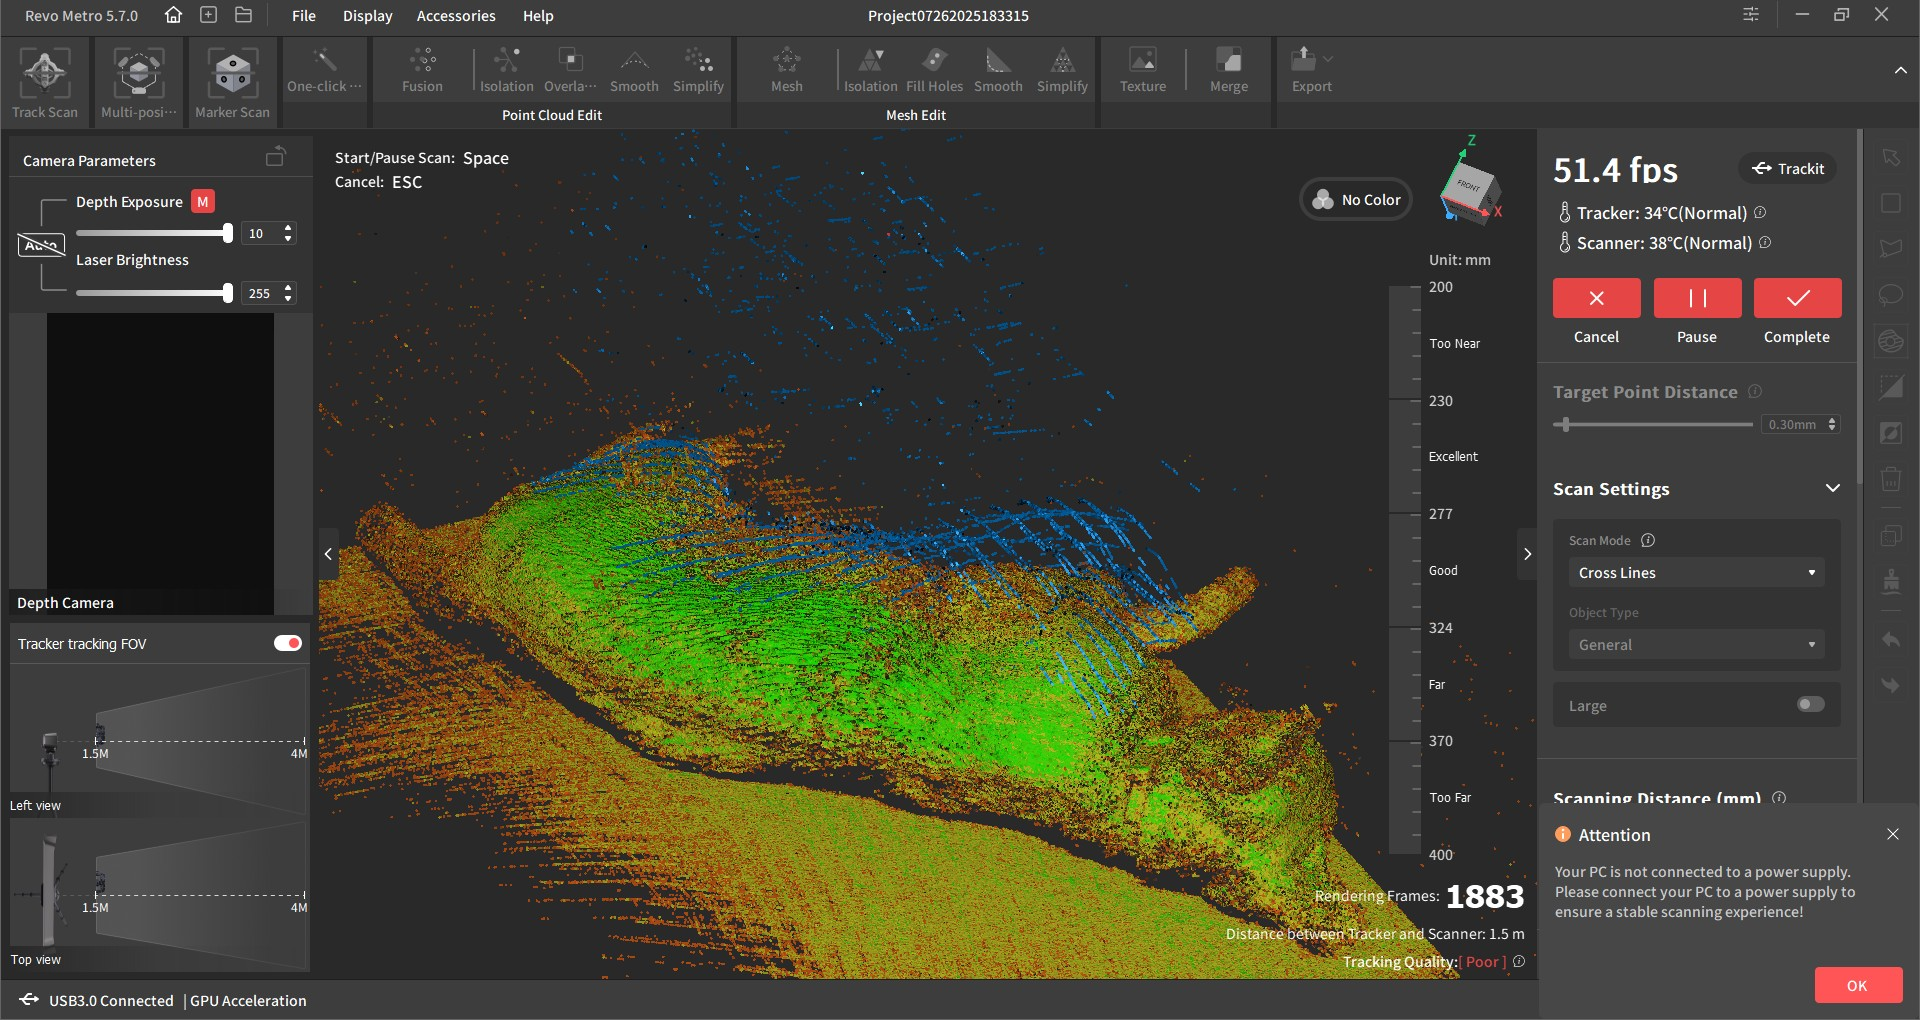
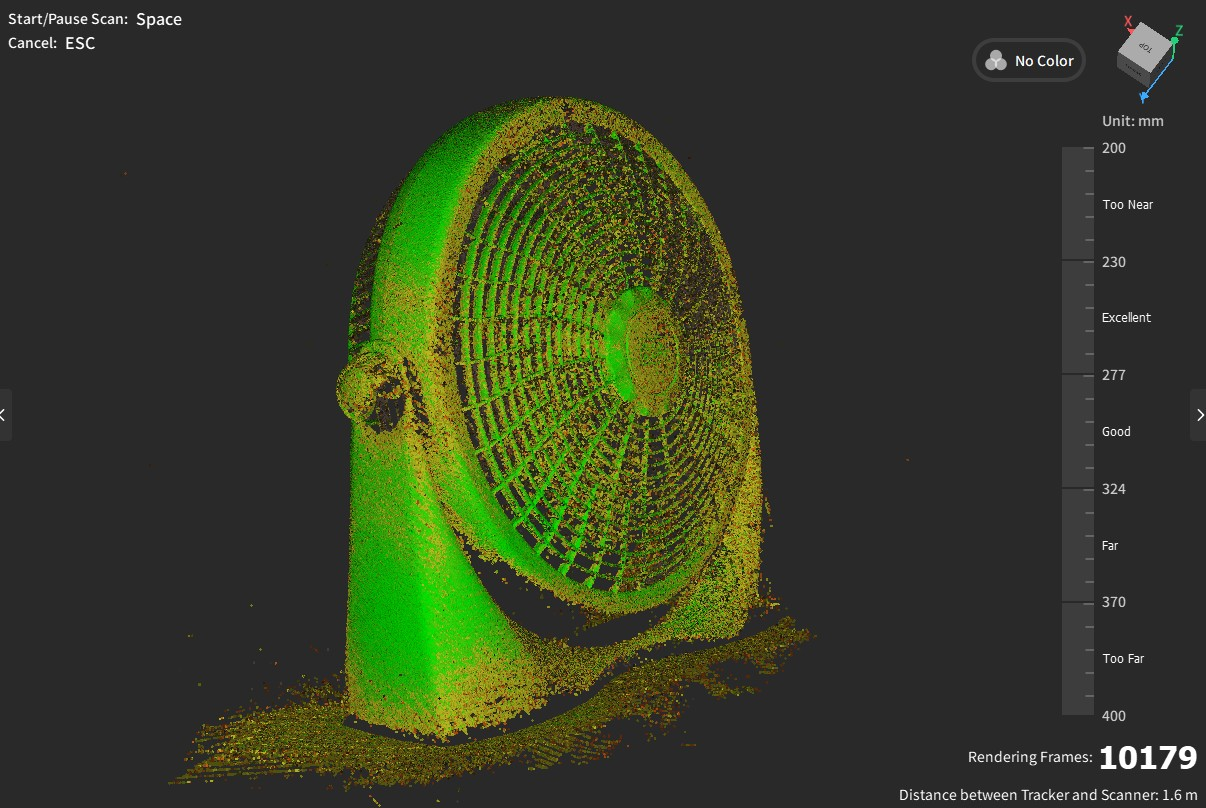
Take a look at 2 – Massive Fan (Monitoring Scan / Cross Lasers)
With the cat eliminated, I put a 16 inch flooring fan on the platform. I figured this might be take a look at, as it’s matte black plastic, and has some fascinating geometry (plenty of gaps within the fan housing). It’s additionally fairly a big merchandise.
I started the scan, and was fairly shocked at how briskly it was to seize giant areas in a rough first go. I managed to get a big a part of the primary geometry in underneath a few minutes.
I paused the scan utilizing the play/pause button on the scanner unit, and went to take a look at the scan on the laptop computer. It was clear that there was quite a bit lacking from the scan, regardless of the fast first go, so I unpaused the scanner, and resumed, trying to get all the surfaces and angles that I had beforehand missed.
This was train in learn how to keep the monitoring, because the tracker flashes two large purple lights every time the monitoring drops. Often in Revoscan software program, it’s important to stare on the laptop display and look forward to the “monitoring misplaced” message to seem.
This message nonetheless seems on this model of Revo Observe, however the large lights on the tracker actually assist lots, particularly in case your eyesight isn’t pleased with squinting at a laptop computer display. If the tracker lights are inexperienced, then the tracker can “see” the scanner”. If it’s purple, you simply have to maneuver it again into the road of sight.
I spent one other 10 minutes scanning the fan, simply to hold on getting a really feel for it and seeing what it may do. The primary uncooked scan was not good, however this was because of the place of the platform which didn’t give me a lot house to maneuver round behind with the scanner. There are additionally some bits on the decrease rear that have been obscuring the road of sight between the tracker and scanner, so that they weren’t captured.
After watching some movies from Revopoint, I’ve discovered that it’s higher to face the thinnest aspect of an object in direction of the tracker first, so it causes much less of an obstruction when scanning the rearmost areas furthest from the tracker.
General, for a second try at scanning with the Trackit, I used to be more than happy with the outcomes (particularly the fan grille), and had discovered a number of tips to make sure future scans could be higher.
Take a look at 3 – Cat Feeder (Monitoring Scan / Cross Lasers)
Having received a feed for the scanner and level cloud technology, it was time to try a scan and switch it right into a mesh. For this take a look at, I used an automated cat feeder. It had good geometry and didn’t want any spray because it has a largely matte black end.
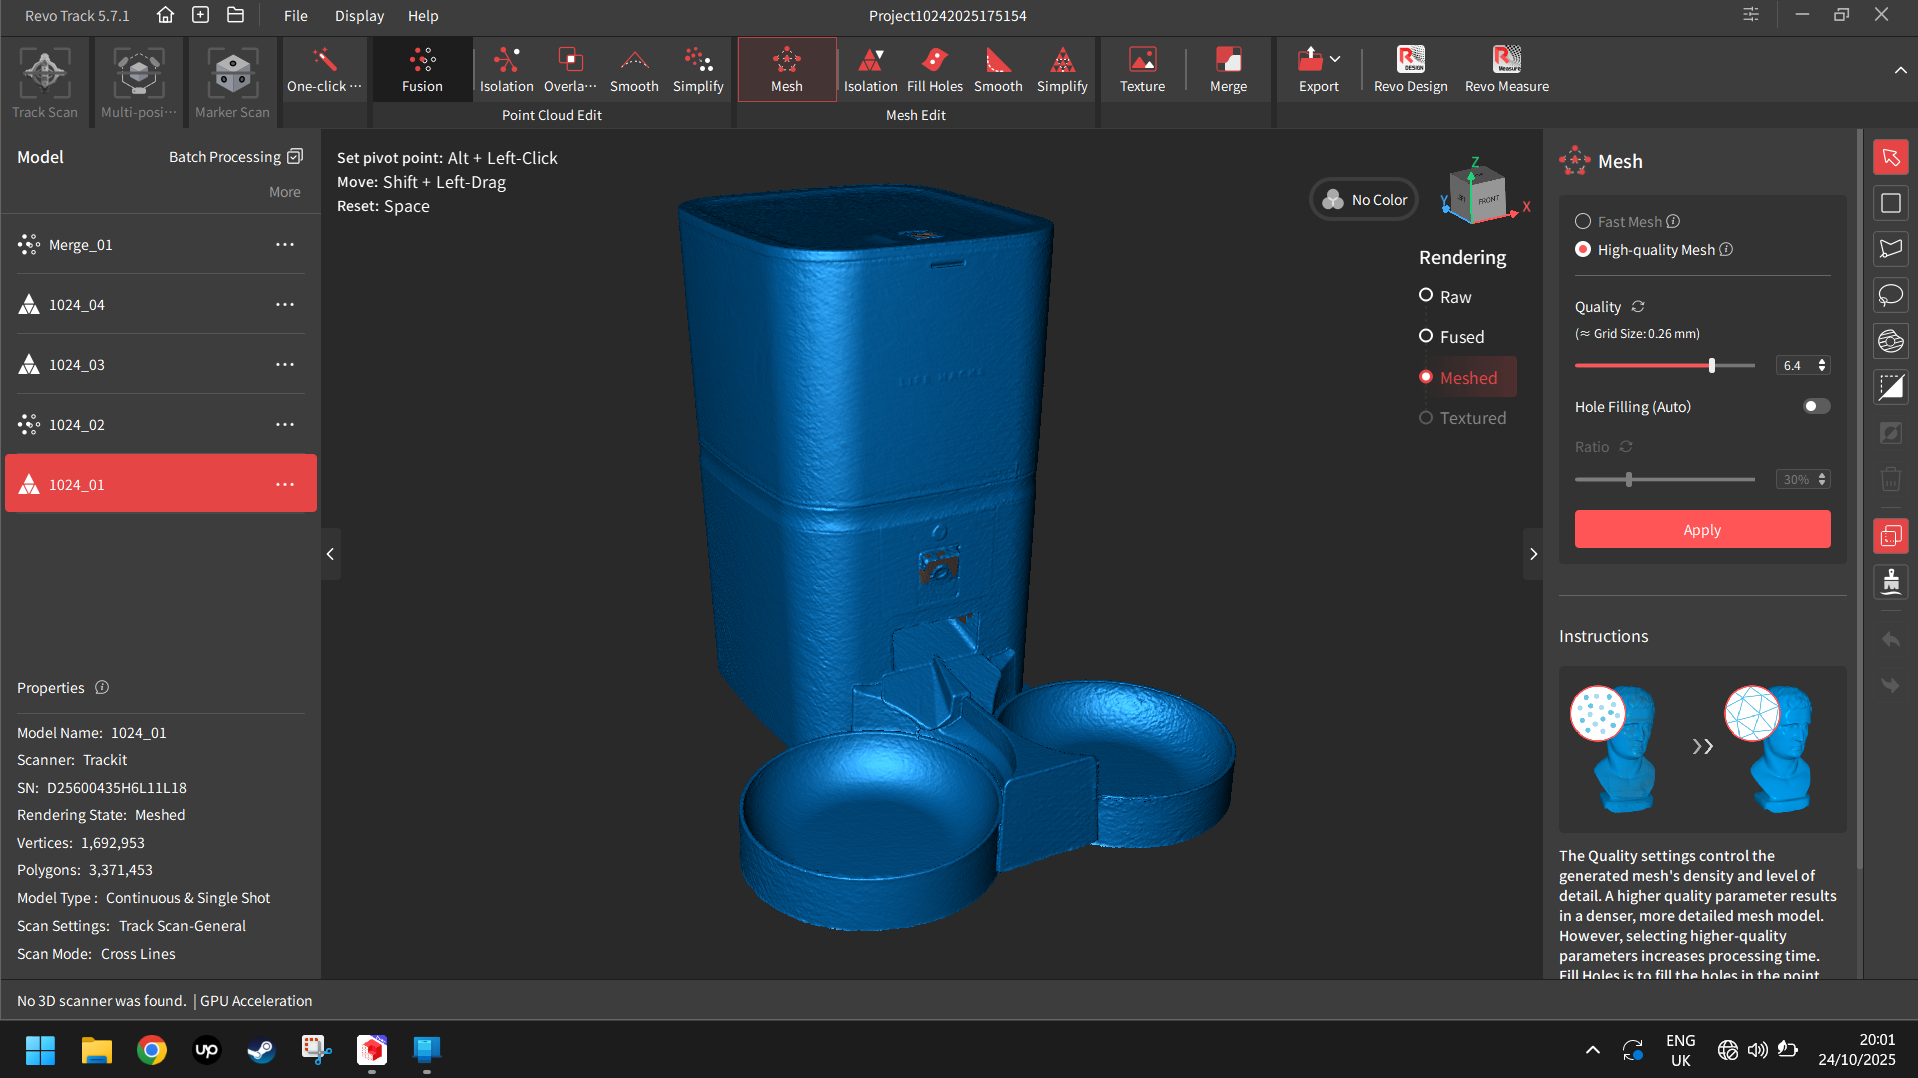
Throughout this take a look at, I began experimenting with the Goal Level Distance. By default it’s set to 0.2mm At this worth, the scan can typically require a number of passes to be able to get the purpose cloud to show inexperienced (indicating scan). Nonetheless, cranking that distance to between 0.8mm and 1.2mm actually speeds issues up. At this setting, I discovered that I may seize bigger areas with one or two passes. For an object this dimension and this degree of element, it was completely effective.
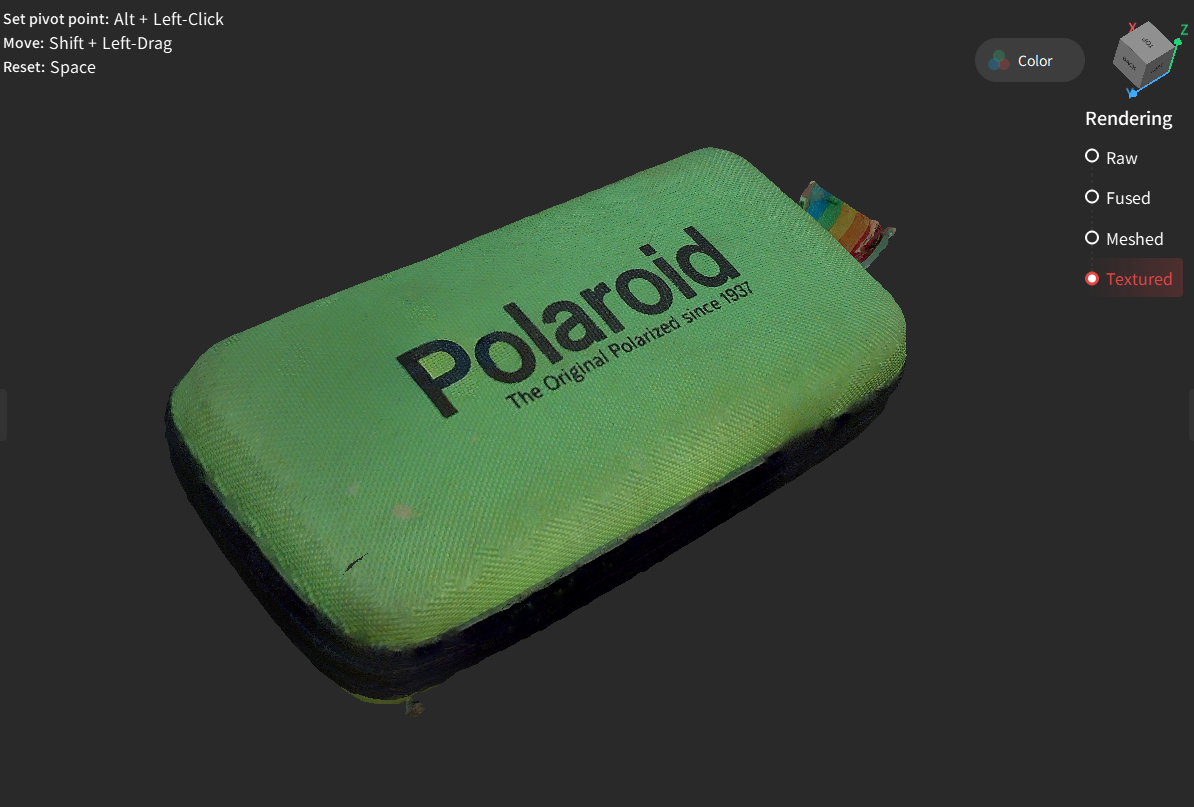
Take a look at 4 – Glasses Case (Colour Scan / Monitoring Scan / Cross Lasers)
When the Trackit was first launched, coloration scanning mode had not but been enabled. The colour scanning replace was made accessible through a firmware replace in September.
As soon as the replace was full, I examined a number of completely different objects to see how effectively it really works in comparison with the MetroX.
First up was a small glasses case. I needed to check a smaller object first simply to get a grasp of it earlier than shifting onto one thing greater.
Colour scanning works like this:
First, you scan the thing in common scanning mode to acquire the purpose cloud.
If you find yourself pleased with the purpose cloud, then you definitely activate coloration (texture) scanning within the software program, and you employ the scanner to take “photographs” from varied angles across the object.
It will be significant to not transfer the thing between taking the purpose cloud and capturing the textures. Each the purpose cloud and textures are positioned almost about the tracker info, so each datasets should match by way of coordinates. Transferring the thing after you scan it and earlier than you’re taking the textures will lead to a blurred, messy texture.
As soon as the purpose cloud and texture information is captured, merely course of the purpose cloud (fusion and mesh) after which click on the feel button within the software program. It would then apply your texture to the cleaned mesh.
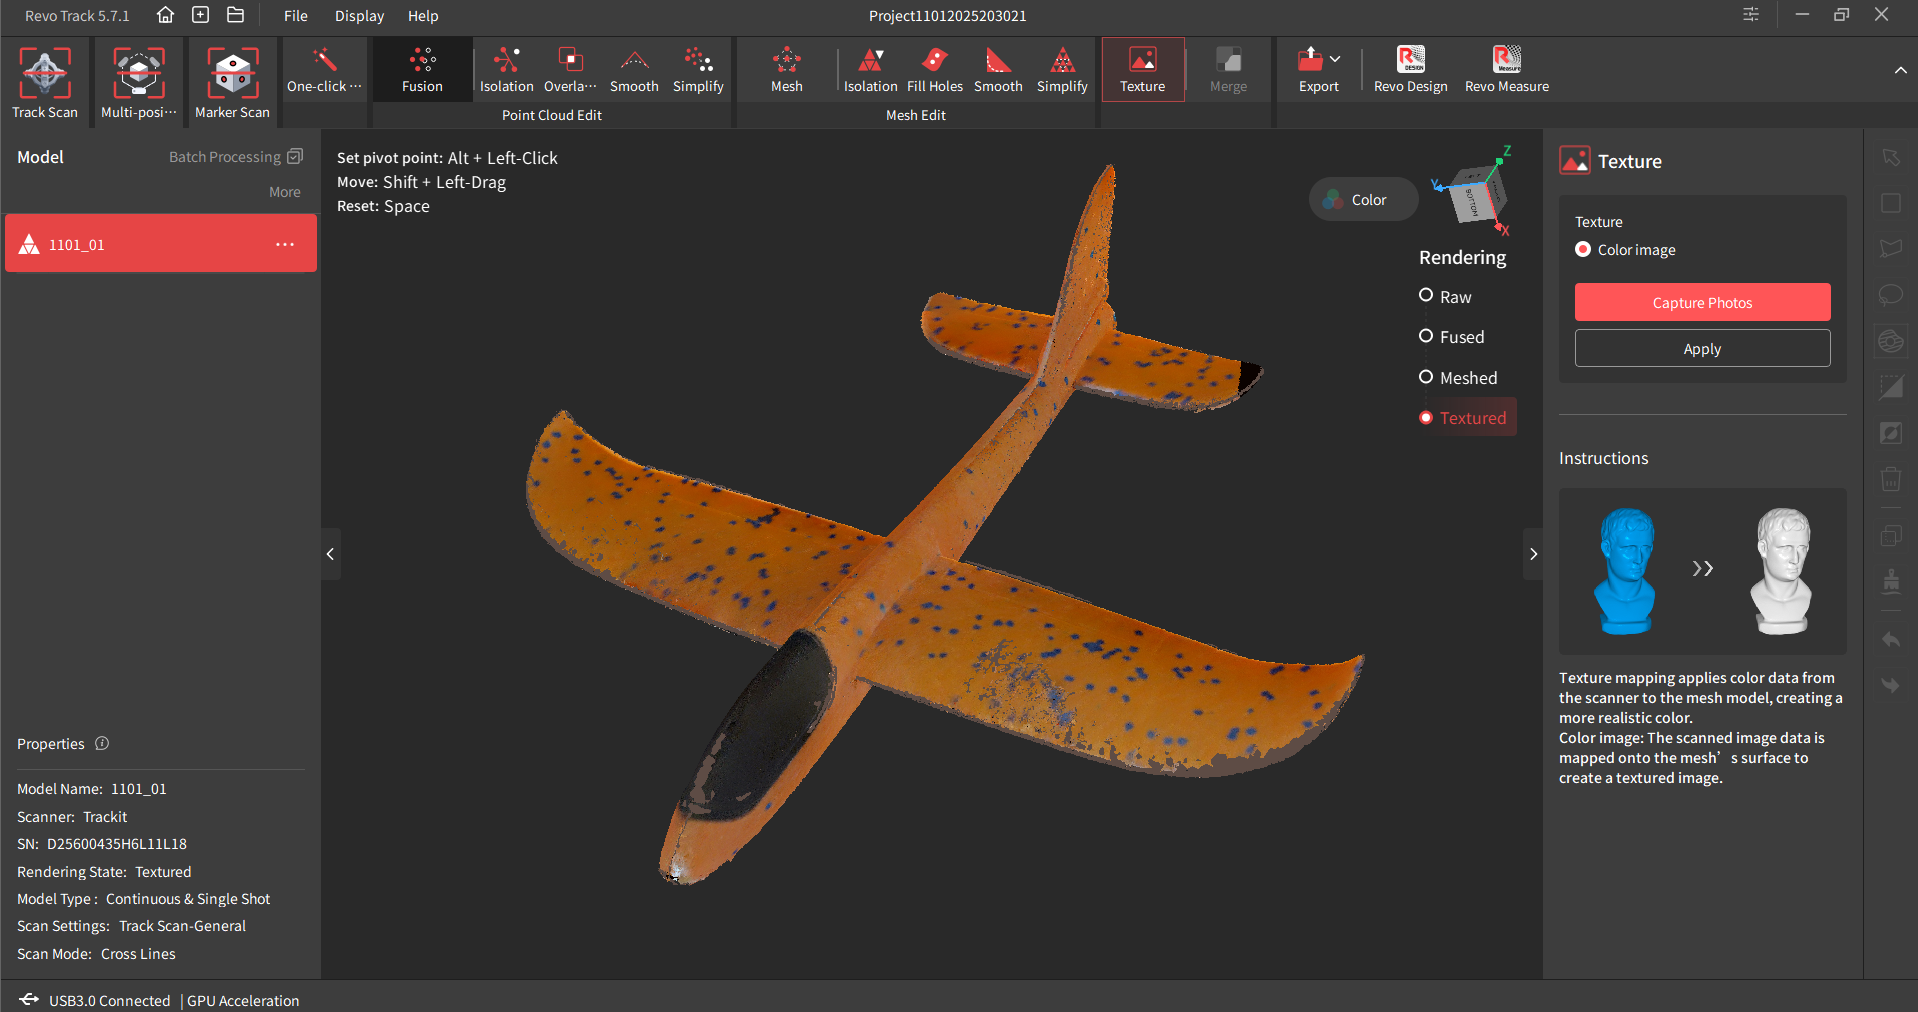
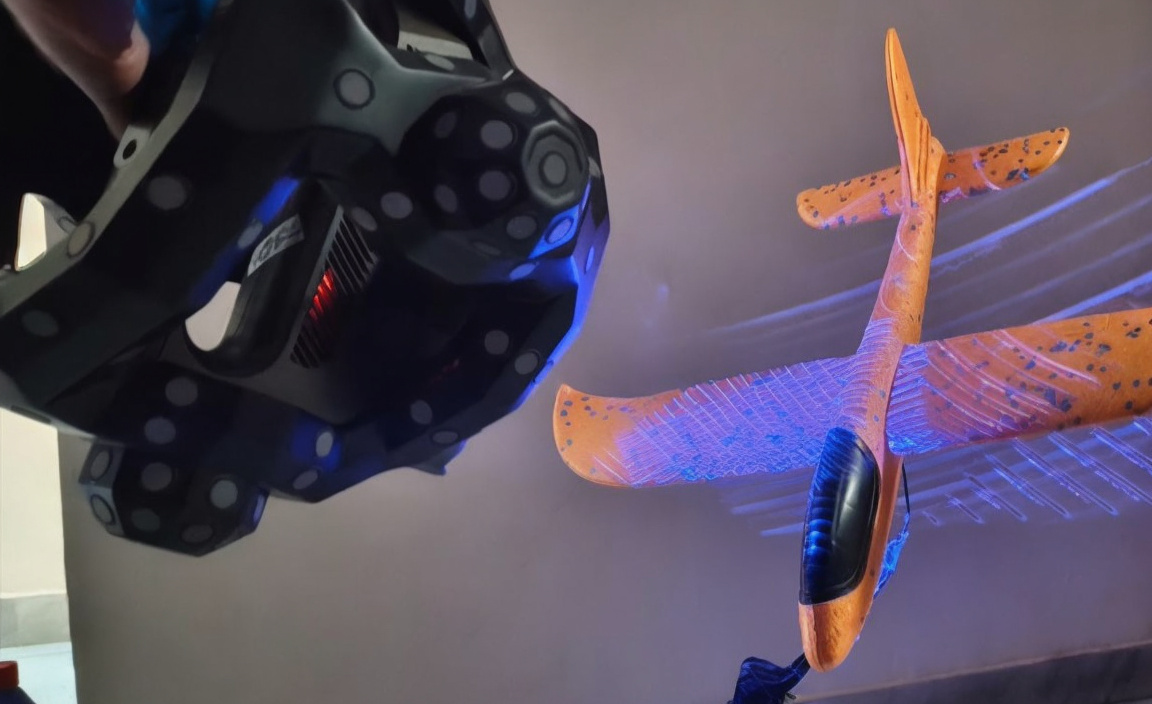
Take a look at 5 – Foam Glider (Colour scan / Monitoring Scan / Cross Lasers + Single Laser)
Reviewing scanners as I do, I typically run out of appropriate issues to scan.
For this take a look at, I bought a colourful foam glider with a wingspan of round 60cm. I figured that the froth could be straightforward to scan, and it might be coloration take a look at of a bigger object. The glider additionally has a cockpit cover product of black plastic, which is someplace between shiny and matte. So the addition of this black mildly reflective part could be take a look at to see if a sprig was wanted.
The primary scan was carried out with the cross lasers, with the froth glider impaled on a wire coat hanger (for straightforward scanning entry from all angles).
Usually, the bigger surfaces scanned with no difficulty, however as you possibly can see within the image under, there have been some gaps on the wings’ vanguard. I attempted rotating the scanner so the middle of each of the sensors have been collinear with the vanguard, however to no avail.
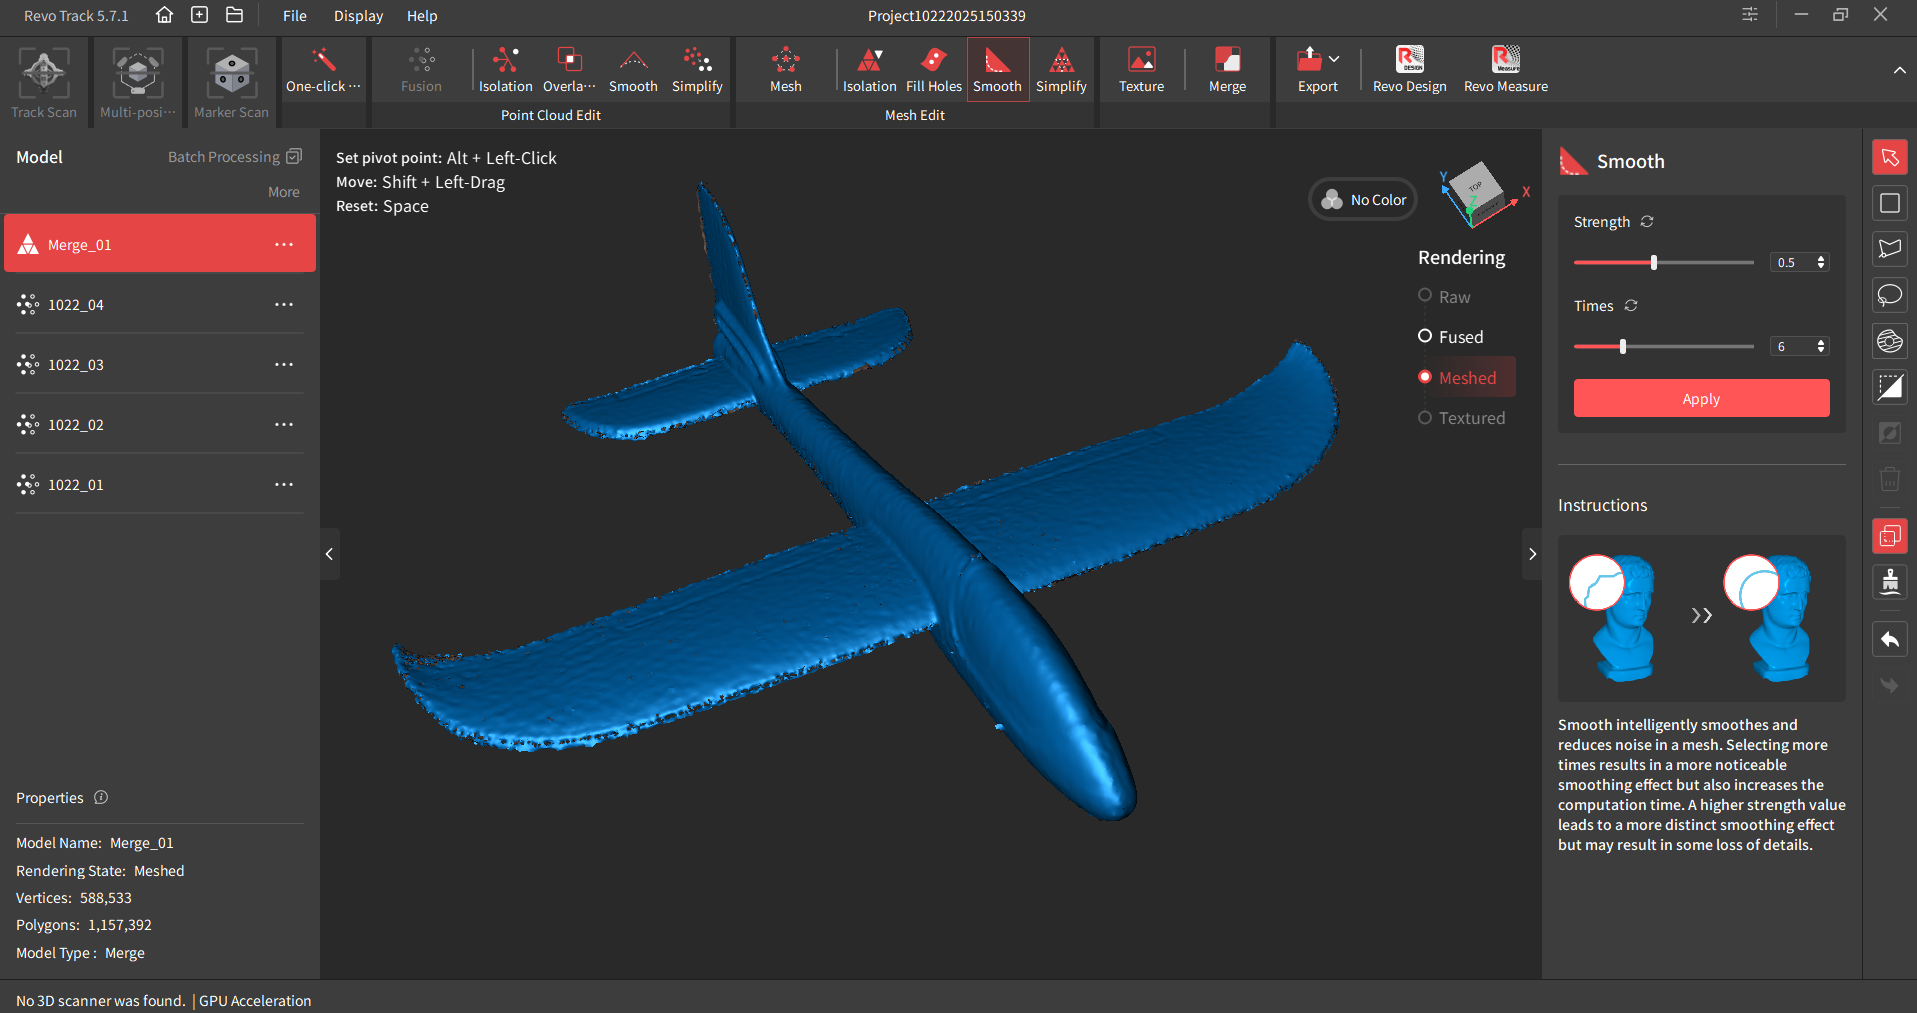
This appeared like alternative to check single line laser mode. Single laser mode is finest for scanning deep holes, or options that the cross laser mode would possibly battle with. It takes lots longer to scan with the only laser mode (naturally) however it appears to supply lots much less noise within the scan. After some minutes going backwards and forwards over the wing vanguard, it appeared to do the trick.
The good factor in regards to the two completely different laser modes is you can pause the scan, change mode mid-scan, then resume within the different mode, so you possibly can mix modes in a single scan.
The picture under exhibits a earlier try at including textures to the glider.
Take a look at 6 – Air Compressor Velocity Run (Monitoring Scan / Cross Lasers)
The air compressor was the ultimate take a look at, constructing on the whole lot discovered from the prior assessments.
I selected this object, as a result of I’ve used it in scanner assessments earlier than, so it might function benchmark by way of scanning time. That is the pace run!
With earlier client grade scanners, this merchandise took round 20 to 25 minutes to get scan utilizing function mode (with out markers). It is because the earlier scanners would typically lose monitoring.
So how lengthy did it take with the Trackit? A ridiculously brief time, that’s how lengthy.
I used to be capable of produce an inexpensive high quality level cloud in simply 5 minutes. You may see the uncooked scan within the picture under. There was a little bit of noise floating round as a result of it was a pace run and I used to be shifting shortly. However this was simply mounted with the modifying instruments within the software program.
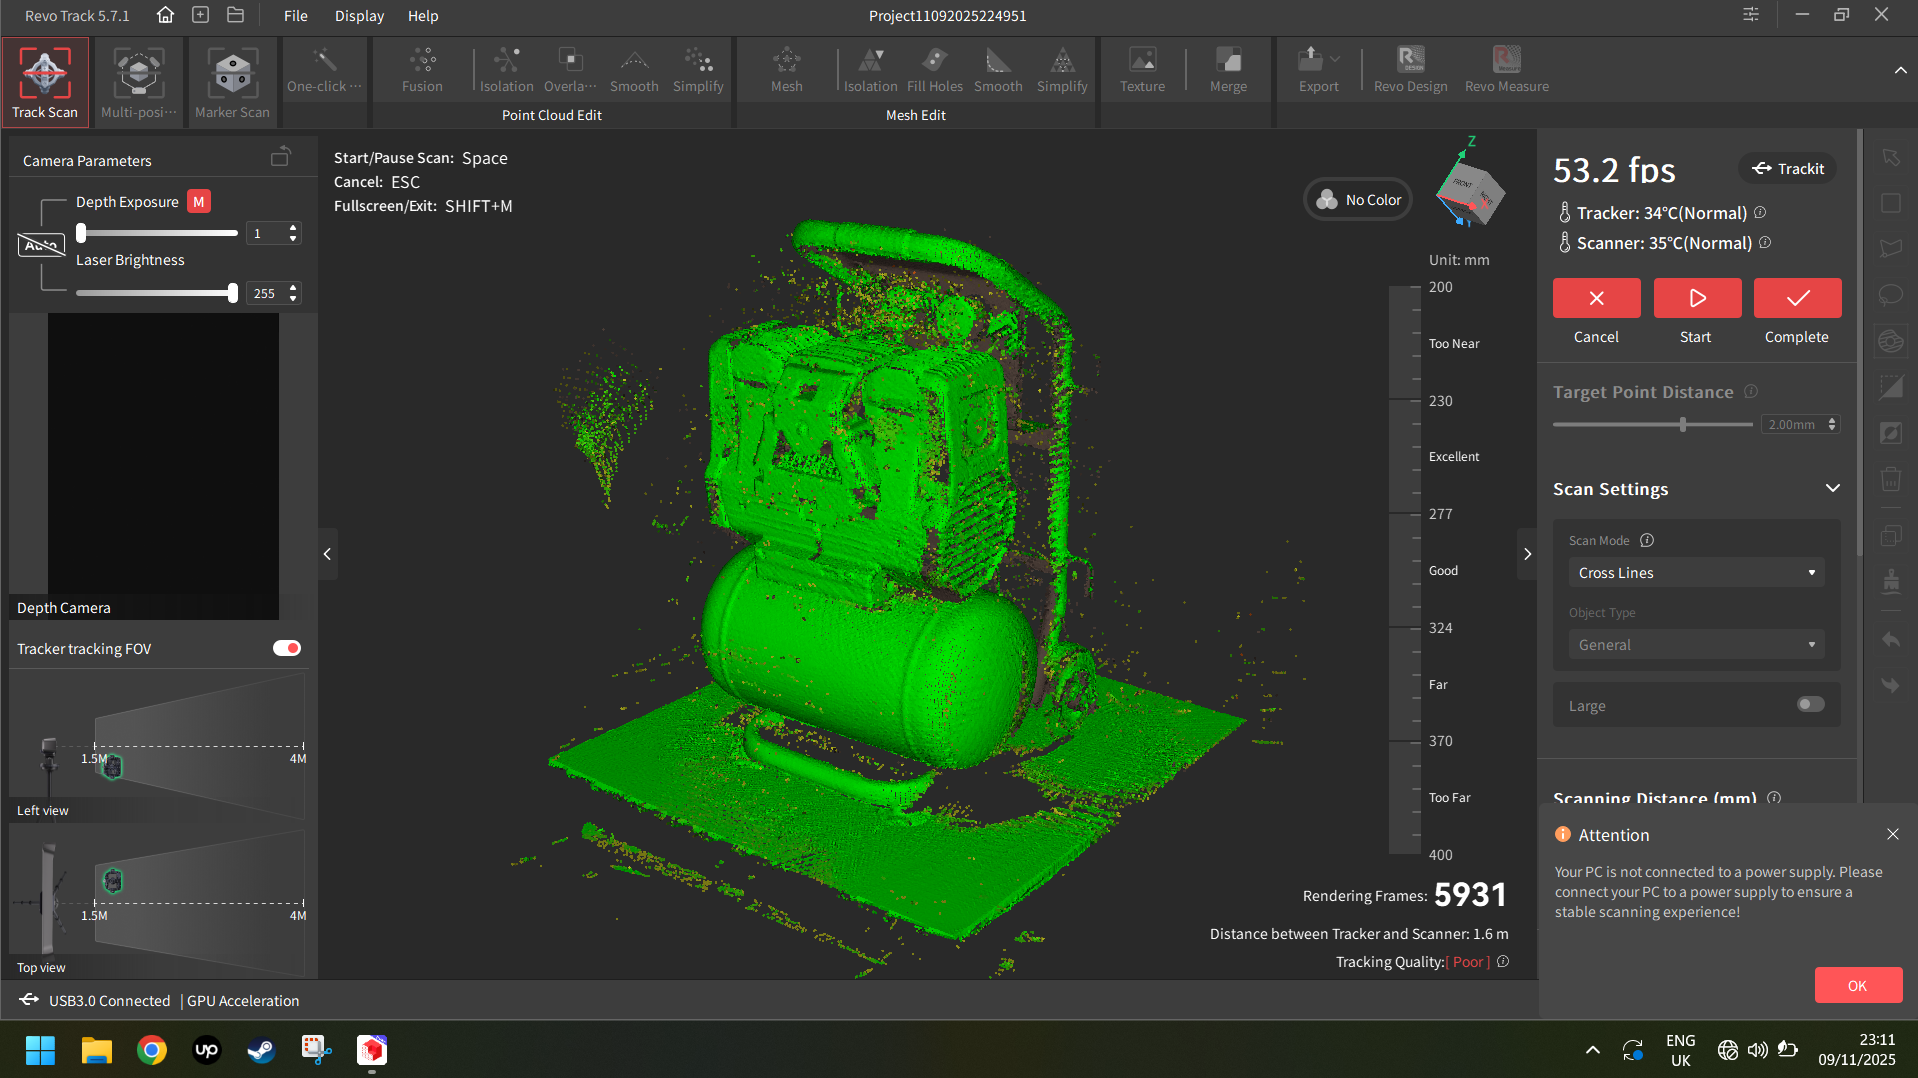
You may see how shortly the Trackit was capable of scan the compressor within the video under.
You’ll discover a number of gaps within the scan. These gaps have been unavoidable as a number of the compressor {hardware} obstructed different components of the compressor and I couldn’t entry these components with the laser. However nonetheless, 5 minutes to get this scan with none markers is pretty spectacular.
With the ultimate take a look at full, let’s check out what the general expertise of the Trackit was like, and attain some type of conclusion.
Issues That We Love About The Revopoint Trackit
Throughout our evaluate of the Revopoint MetroX scanner, there have been a few solutions that we mentioned would possibly enhance the general expertise.
It appears for no matter purpose, Revopoint has truly carried out a few them.
Lengthy Cables
The information cable on the MetroX was pretty tiny, which may very well be problematic in the event you have been utilizing a desktop PC. This isn’t the case with the Trackit – the cables listed below are HUGE. Like a number of meters lengthy (examine how lengthy later). They’re now so lengthy, I didn’t even want to fret about shopping for a brand new extension wire, as I may plug the facility into the kitchen outlet, setup the scanner in the lounge, and have loads of room to maneuver about. So yay! That’s a win!
Revo Measure
One other minor gripe we made within the MetroX evaluate was relating to the shortage of measurement software program included with the MetroX. Certain, you could possibly scan issues properly, however in the event you truly needed to know the gap between two factors, you would need to spend doubtlessly numerous money on some inspection software program, or find yourself utilizing some freeware that appears prefer it was designed in MS DOS.
Effectively, Revopoint mounted this too, and now you will get the Revo Measure software program, Assist level cloud and mesh to CAD comparisons, and supply measurement, parameter extraction,
quantity measurement, GD&T evaluation, and so on.
Issues That May very well be Improved on the Revopoint Trackit
We prefer to be truthful and balanced right here. Whereas the Trackit within reason priced for a tool of this type, it’s nonetheless a good previous chunk of change to drop on a bit of apparatus.
So for you (the buyer) to get each side of the story and make an knowledgeable selection about your buy, we’ll share each the tough and the sleek.
To that finish, right here are some things we predict may very well be improved.
Colour Mode
For sure components, there isn’t a approach to create a texture that absolutely wraps round all sides of the half in Observe Scan mode. For instance, with the cat feeder take a look at, I used to be capable of make a coloration texture of the highest, entrance, again, left and proper sides, but when I needed to scan and texture the underside face (requiring a merge of scans) then this appears to be unattainable for now.
If you wish to scan an merchandise from both sides, then for the second, the one method appears to be to position the merchandise to be scanned on a skinny pole (just like the glider scan). This lets you create a texture from all sides while not having to merge a multi half scan.
USB-C Laptop Cable
The cables connecting the scanner to the tracker and calibration pole are all chunky and sturdy connectors, with screws to lock them securely to the respective items of {hardware}.
The cable from the tracker to the laptop computer, nonetheless, is anchored in place to the tracker with the aforementioned screws, however terminates on the laptop computer aspect with a flimsy USB-C connector.
Provided that the cables have a possible to be dragged throughout the ground, you’d assume that one thing a bit safer would have been chosen because the connector. With a delicate power brought on by shifting the heavy cables round, it is extremely straightforward to tug the USB-C connector out of the laptop computer.
It’s such an odd design selection to make use of a tiny USB-C connector, provided that the connection between the scanner and laptop is so important to working the gadget. Even a USB-A would have supplied some extra grip.
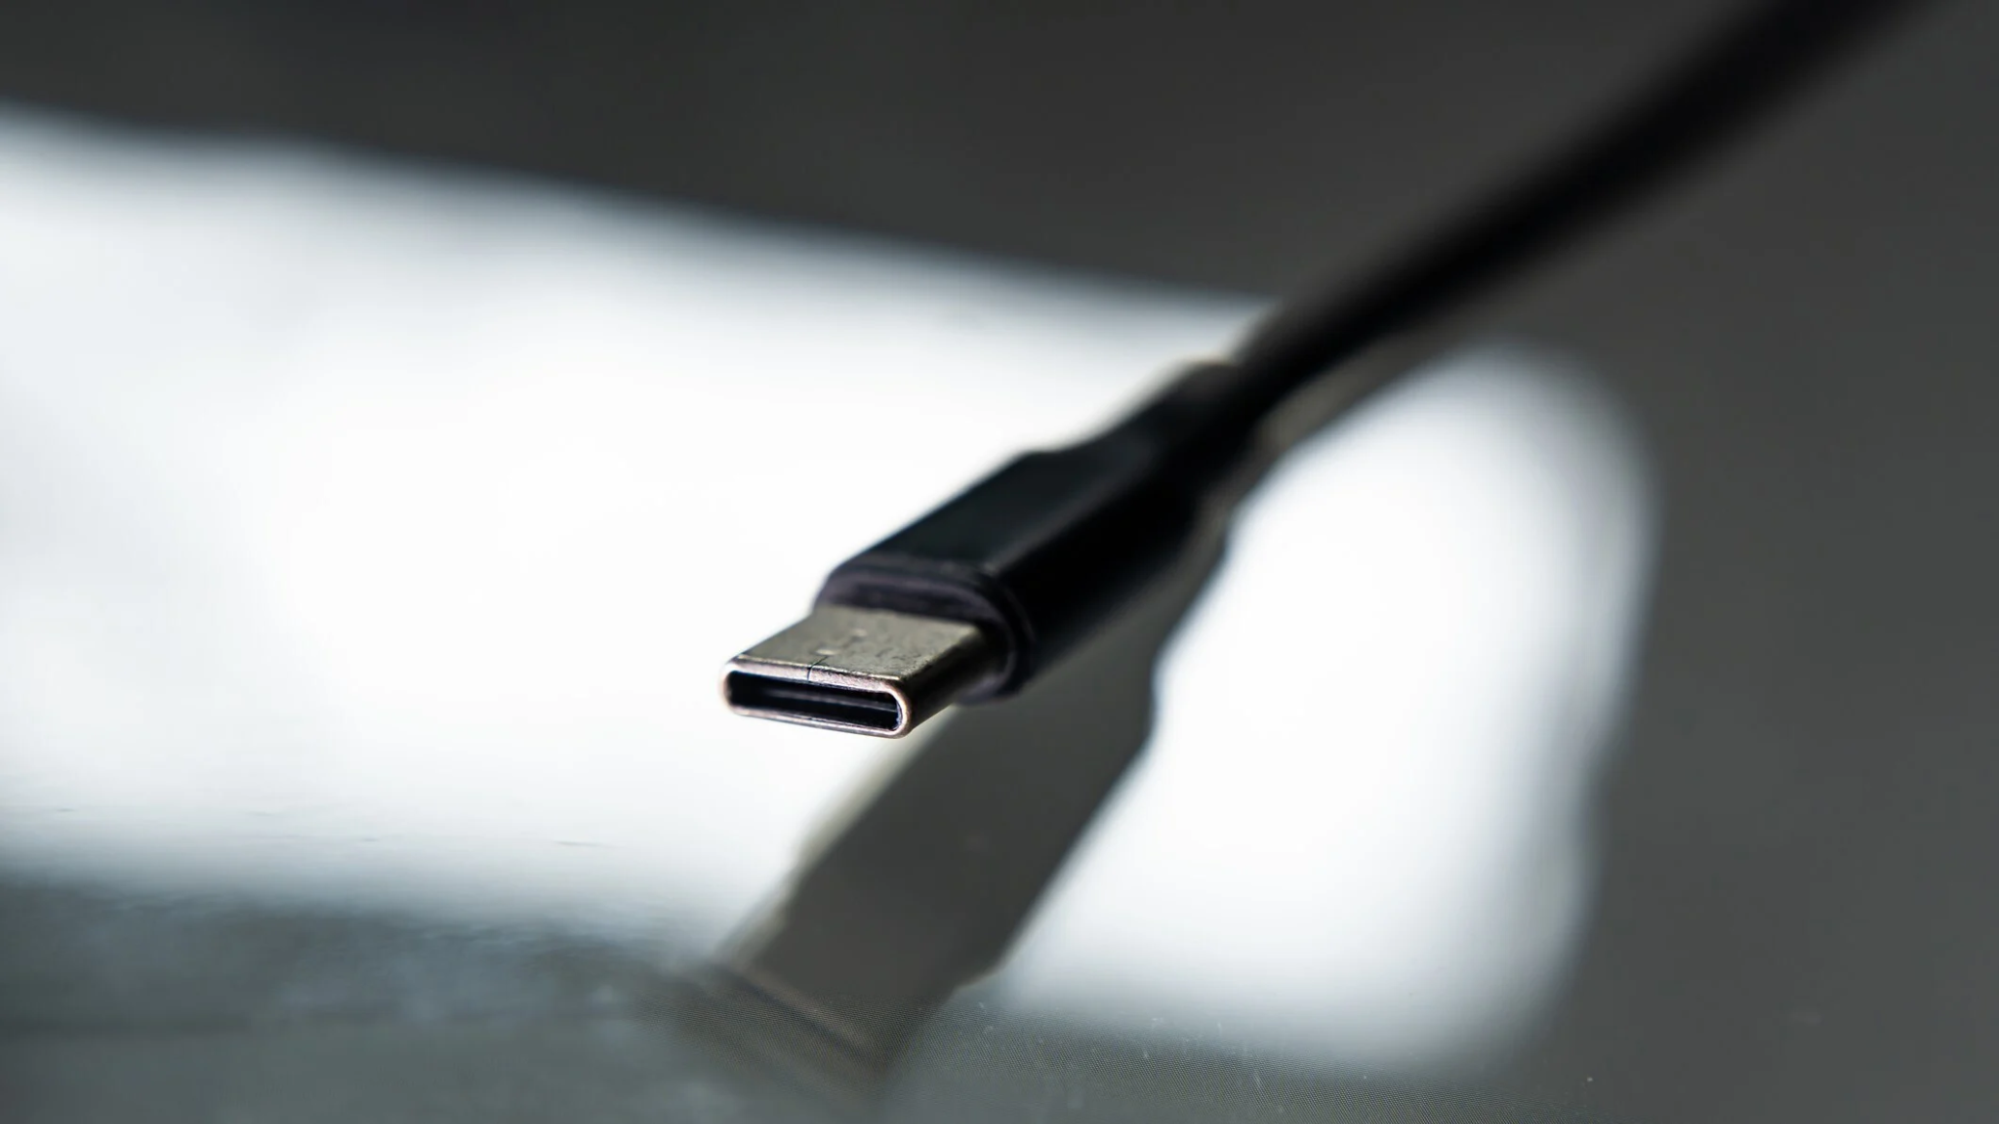
I hope they launch another answer additional down the road. For now, in the event you don’t need your scanner cable coming out of the pc whereas scanning, I might advocate utilizing a USB-C 3.0 hub with an extended cable, and presumably fastening the scanner cable to that hub with tape, or another means.
Calibration
The scanner have to be calibrated, and the tracker itself have to be calibrated, at varied distances from the calibration pole. Additionally, the calibration takes place at a sure temperature too. Each the scanner and tracker have to be at a sure temperature. Fortunately, the tracker options inner heating, so it’ll slowly (very slowly) increase its personal temperature to match that of the scanner.
In case you’re in a temperature-regulated lab or workshop, or in part of the world that isn’t affected by extremes of climate, this isn’t a problem.
However in the event you stay within the desert like I do, on the highest flooring of an house block the place all the warmth from the flooring rise as much as my very own unit, then this half could be difficult.
Documentation
The documentation for the Trackit isn’t particularly detailed. Particularly, there isn’t a reference to paint scanning, or learn how to do it.
Is it doable to scan a bigger object in components, then merge them with the textures intact?
What number of photographs are wanted and the way a lot overlap (if any) is required to make texture?
We don’t know. We needed to guess. Placing this info within the handbook would make life lots simpler.
Conclusion
So, we’ve reached the top, and you’re in all probability asking in the event you ought to spend money on a Revopoint Trackit.
This is determined by your funds and wishes.
As talked about, techniques like this usually price tens of hundreds of {dollars}, so to have the ability to purchase one and get a few of these capabilities at this value level is fairly tempting.
And what it’s, is a really quick scanner that’s able to scanning objects giant and small, with out the headache of including markers all over. Significantly, including markers is a chore, particularly whenever you add all of the markers, set your scanner up, solely to be informed it’s important to add much more markers when you begin scanning. That is widespread among the many cheaper scanners.
And in case you are operating a enterprise, and paying somebody a good hourly wage to faff round inserting and eradicating markers all day, then this wasted time goes to have an effect on your backside line.
And in comparison with cheaper scanners, when you think about the speedy scanning and respectable scanning space of the Trackit, this all contributes to decreasing time and saving money.
Who’s the Trackit For?
So with these issues in thoughts, I might advocate the Revopoint Trackit to these operating small companies who wish to enhance their backside line with environment friendly scanning. If the primary ingredient of what you are promoting entails scanning issues 8 hours a day, the Trackit pays for itself by way of recovered time after simply a few months. It’s enterprise funding, so long as you’re effective with the 0.02 mm single body accuracy. And for many giant scans, that is completely effective.
Would we advocate it for hobbyist use?
In case you’re a hobbyist with disposable revenue to drop on such issues, then why not.
I can’t consider one other scanner on this value vary that may scan bigger objects as shortly proper now, so if you’ll find a use for the Trackit, then go for it.
Certain, the Trackit has a number of idiosyncrasies and issues that may very well be improved (as listed above) however this stuff aren’t the top of the world. And we count on a number of of those points will probably be mounted in firmware updates, or by including new options, and hopefully extra full documentation sooner or later.
Anecdotally, this scanner actually aggravated the heck out of me once I first began utilizing it. However as with most scanners, they’ve a little bit of a studying curve. And as soon as I had discovered the knack of scanning issues, I used to be gained over by the Trackit. A lot so, I’m fairly enamoured with it now, and I’m not trying ahead to going again to my previous scanners with their cumbersome markers and whatnot.
So yeah, give the Trackit a attempt. In comparison with conventional sort scanners, that is fairly a beast, and presents numerous bang for its (very affordable) buck.