

Rising information quantity, selection, and velocity has made it essential for companies to implement architectures that effectively handle and analyze information, whereas sustaining information integrity and consistency. On this put up, we present you an answer that mixes Apache Iceberg, Knowledge Construct Software (dbt), and Amazon EMR to create a scalable, ACID-compliant transactional information lake. You need to use this information lake to course of transactions and analyze information concurrently whereas sustaining information accuracy and real-time insights for higher decision-making.
Challenges, enterprise imperatives, and technical benefits
Conventional information lakes have lengthy struggled with basic limitations. For instance, the shortage of ACID compliance, information inconsistencies from concurrent writes, complicated schema evolution, and the absence of time journey, rollback, and versioning capabilities. These shortcomings instantly battle with rising enterprise calls for for concurrent learn/write help, sturdy information versioning and auditing, schema flexibility, and transactional functionality inside information lake environments. To handle these gaps, fashionable options use ACID transactions at scale, optimized storage codecs via Apache Iceberg, model management for information on Amazon Easy Storage Service (Amazon S3), and cost-effective, streamlined upkeep—delivering a dependable, enterprise-grade information lake structure that meets each operational and analytical wants.
Answer overview
The answer is constructed round 4 tightly built-in layers that work collectively to ship a scalable, transactional information lake.
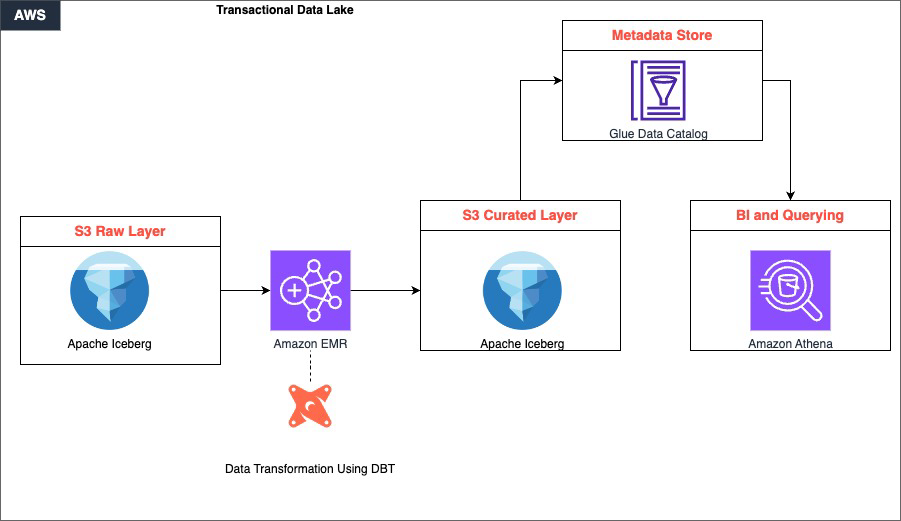
Uncooked information is ingested and saved in Amazon S3, which serves because the foundational storage layer. This layer helps a number of information codecs and permits environment friendly information partitioning via Apache Iceberg’s desk format. This ensures that information is organized and accessible from the second it lands. Then, Amazon EMR takes over because the distributed computing engine, utilizing Apache Spark to course of large-scale datasets in parallel, dealing with the heavy lifting of studying, remodeling, and writing information throughout the lake.
Sitting inside the processing layer, dbt drives the transformation logic. It applies SQL-based, version-controlled transformations that convert uncooked, unstructured information within the S3 uncooked layer into clear, curated datasets saved again in S3. This maintains ACID compliance and schema consistency all through.
Lastly, the curated information is out there for consumption via Amazon Athena, which gives a serverless, one-time querying functionality instantly on S3. With this, analysts and enterprise customers can run interactive SQL queries with out managing any infrastructure. Collectively, these elements kind a steady pipeline: information flows from ingestion via distributed processing and structured transformation, finally surfacing as dependable, query-ready insights.
Amazon EMR is a cloud-based large information service that streamlines the deployment and administration of open supply frameworks like Apache Spark, Hive, and Trino. It gives a managed Apache Hadoop surroundings that organizations can use to course of and analyze huge quantities of information effectively.
Knowledge Construct Software is an open supply instrument that information groups can use to remodel and mannequin information utilizing SQL. It promotes greatest practices for information modeling, testing, and documentation, streamlining upkeep and collaboration on information pipelines.
Apache Iceberg is an open desk format designed for large-scale analytics on information lakes. It helps options like transactions, time journey, and information partitioning, that are important for constructing dependable and performant information lakes. Through the use of Iceberg, organizations can keep information integrity and allow environment friendly querying and processing of information.
When mixed, these three applied sciences present a strong answer for constructing transactional information lakes. Amazon EMR gives the scalable and managed infrastructure for working large information workloads, dbt permits environment friendly information modeling and transformation, and Apache Iceberg gives information consistency and reliability inside the information lake.
Stipulations
Earlier than continuing with the answer walkthrough, guarantee that the next are in place:
- AWS Account – An lively AWS account with adequate permissions to create and handle EMR clusters, S3 buckets, Athena workgroups, and AWS Glue Knowledge Catalog assets
- IAM Roles – The next IAM roles should exist and have acceptable permissions:
- EMR_DefaultRole – Service position for Amazon EMR
- EMR_EC2_DefaultRole – Amazon Elastic Compute Cloud (Amazon EC2) occasion profile for EMR nodes
- AWS Command Line Interface (AWS CLI) – Put in and configured with credentials on your goal AWS account and AWS Area (seek advice from Step 1.1 for setup directions)
- Python 3.8+ – Put in in your native machine or workspace for establishing the dbt digital surroundings
- Pip – Python bundle supervisor accessible for putting in dbt and its dependencies
- Git – Put in on the EMR main node or native surroundings for model management and dbt bundle administration
- Amazon Athena – Athena question editor entry with a configured S3 output location for question outcomes
- AWS Glue Knowledge Catalog – Enabled because the metastore for Amazon EMR and Athena (no further setup required if utilizing the default AWS Glue integration)
- S3 Bucket Naming – Put together a singular identifier to suffix S3 bucket names, making certain world uniqueness throughout all three buckets created in Step 1.3
- Community Entry – Make it possible for your native machine can attain the Amazon EMR main node’s DNS over port 10001 (Thrift/HiveServer2) for dbt connectivity; configure safety teams accordingly
Answer walkthrough
Step 1: Setting setup
- Set up the AWS CLI in your workspace by following the directions in Putting in or updating the newest model of the AWS CLI. To configure AWS CLI interplay with AWS, seek advice from Fast setup.
- Create EMR cluster.
Create the next JSON file with the next contents
emr-config.json:Run the next command in your AWS CLI, updating the popular AWS Area:
- Arrange S3 buckets.
Create the next S3 bucket utilizing the AWS CLI after updating the bucket title.
Step 2. Uncooked layer implementation
The uncooked layer serves as the inspiration of our information lake, ingesting and storing information in its unique kind. This layer is vital for sustaining information lineage and enabling reprocessing if wanted. We use Apache Iceberg tables to retailer our uncooked information, which gives advantages equivalent to ACID transactions, schema evolution, and time journey capabilities.
On this step, we create a devoted database for our uncooked information and arrange tables for patrons, merchandise, and gross sales utilizing Amazon Athena. These tables are configured to make use of the Iceberg desk format and are compressed utilizing the ZSTD algorithm to optimize storage. The LOCATION property specifies the place the info will likely be saved in Amazon S3 in order that information is organized and accessible.
After creating the tables, we insert pattern information to simulate real-world eventualities. We use this information all through the remainder of the implementation to show the capabilities of our information lake structure.
Replace the respective bucket title in every create desk bucket title from the earlier step:
- Create database and tables
- Insert pattern information
Step 3: dbt setup and configuration
Establishing dbt includes putting in the mandatory packages, configuring the connection to the info warehouse (on this case, Amazon EMR), and establishing the challenge construction.
We begin by making a Python digital surroundings to isolate our dbt set up. Then, we set up dbt-core and the Spark adapter, which permits dbt to connect with the EMR cluster. The profiles.yml file is configured to connect with the EMR cluster utilizing the Thrift protocol, whereas the dbt_project.yml file defines the general construction of the dbt challenge, together with mannequin materialization methods and file codecs.
- Set up stipulations
- Configure dbt profiles
- Venture configuration
Step 4: dbt fashions implementation
On this step, we implement dbt fashions, which outline the transformations that we are going to apply to uncooked information. We begin by configuring information sources within the sources.yml file, which permits dbt to reference uncooked tables simply.
We then create dimension fashions for patrons and merchandise, and a reality mannequin for gross sales.
These fashions use incremental materialization methods to effectively replace information over time. The incremental technique processes solely new or up to date information, considerably lowering the time and assets required for every run.
- Supply configuration
- Dimension fashions
- Product fashions
- Reality fashions
Step 5: Analytics layer
The analytics layer builds upon dimension and reality fashions to create extra complicated analyzes. On this step, we create a day by day gross sales evaluation mannequin that mixes information from fact_sales, dim_customers, and dim_products fashions.
We additionally implement a buyer insights mannequin that analyzes buy patterns throughout totally different Areas and product classes.
These analytics fashions show how we are able to use our remodeled information to generate priceless enterprise insights. By materializing these fashions as Iceberg tables, we guarantee that they profit from the identical ACID transactions and time journey capabilities as our uncooked and remodeled information.
- Day by day gross sales evaluation
The analytics layer introduces a fact_sales_analysis mannequin that consolidates transactional gross sales information with buyer and product dimensions to allow business-ready reporting. Constructed as an incremental mannequin with a merge technique, it effectively processes information by deduplicating information utilizing the newest inserted timestamp per order, enabling dependable downstream consumption with out full desk refreshes.
- Buyer insights
The customer_purchase_patterns mannequin aggregates gross sales exercise throughout buyer Areas and product classes to floor income traits and shopping for habits. Materialized as an Iceberg desk within the analytics schema, it gives a performant and scalable basis for buyer segmentation, Regional efficiency evaluation, and category-level income attribution.
Step 6: Transactional operations and time journey with Apache Iceberg
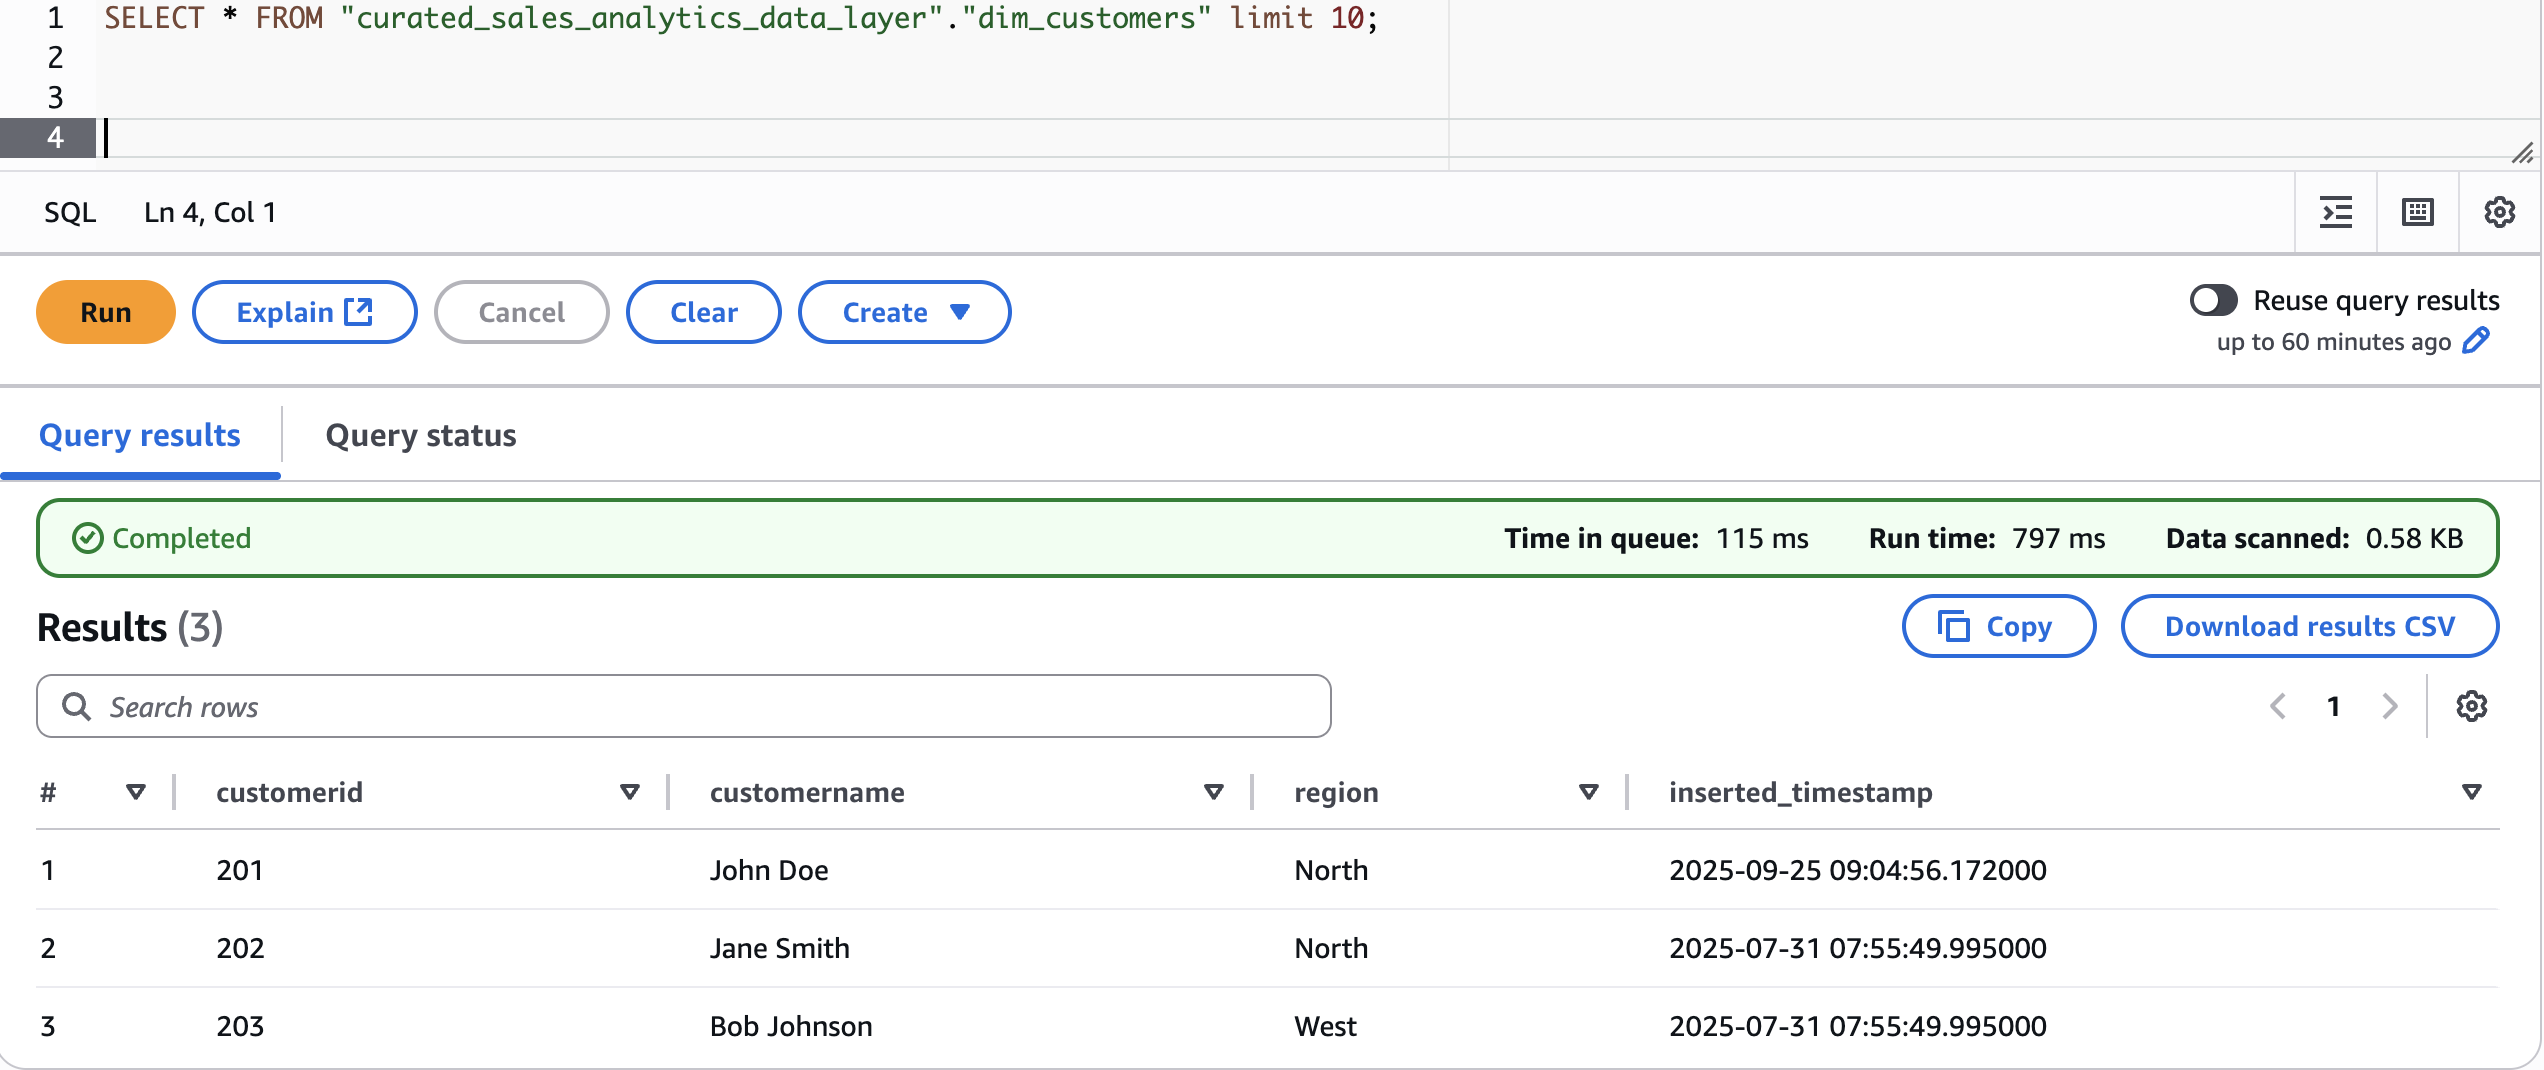
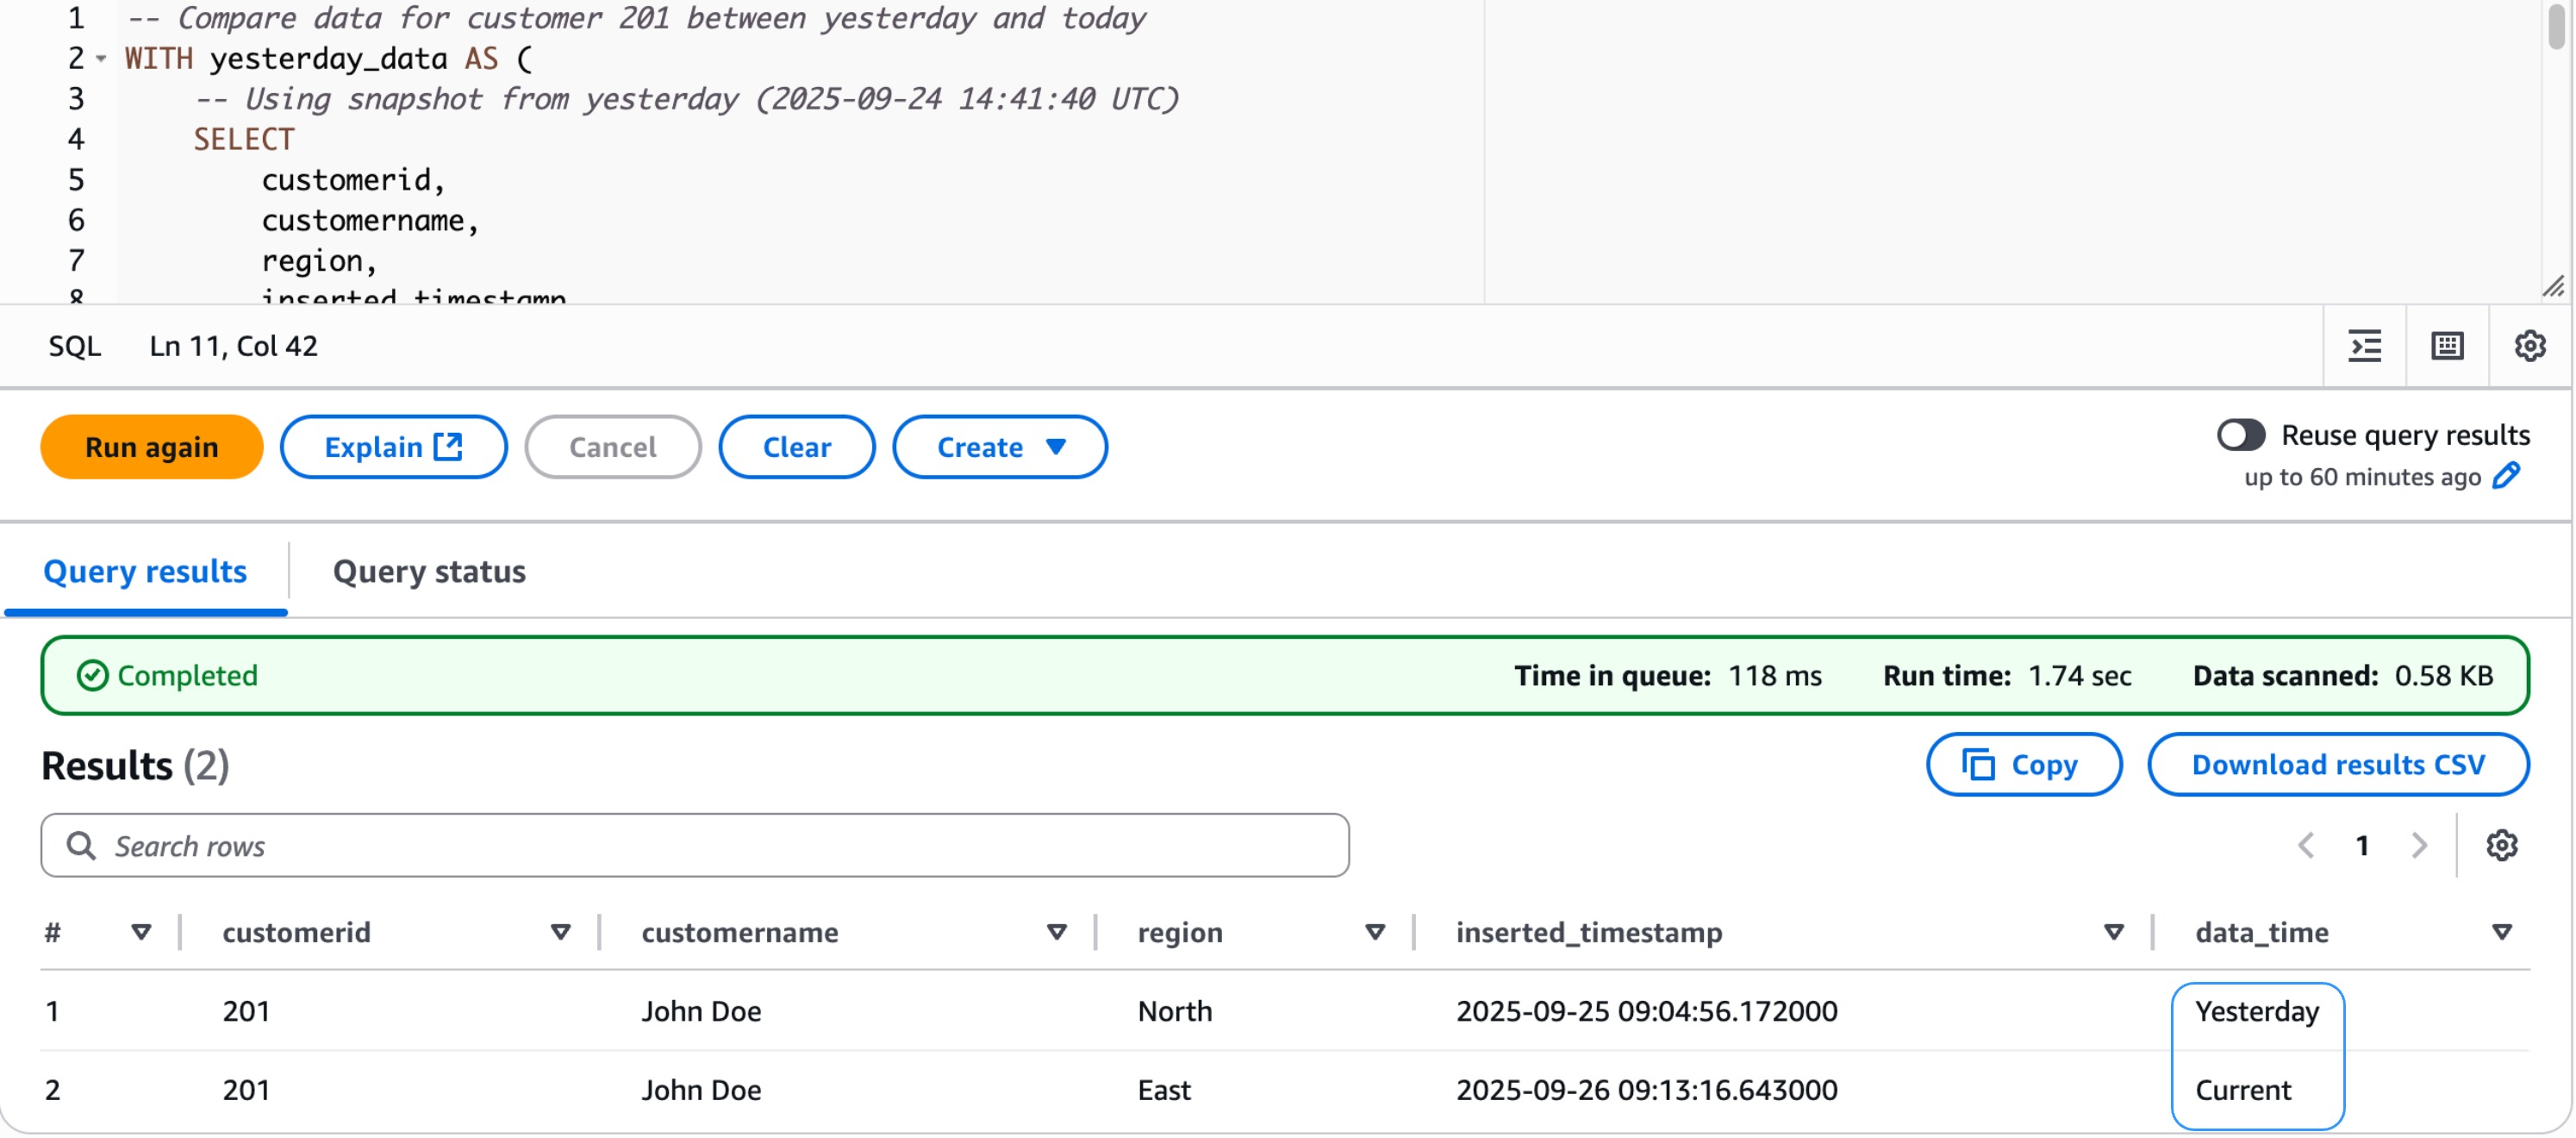
This part demonstrates how you can use Apache Iceberg’s time journey capabilities and transactional operations utilizing precise snapshot information from our dim_customers desk. We stroll via querying information at totally different closing dates and evaluating adjustments between snapshots.
- Transactional capabilities
Let’s first take a look at present information:

Now, modify the uncooked layer information for customerid 201 and alter the Area to East

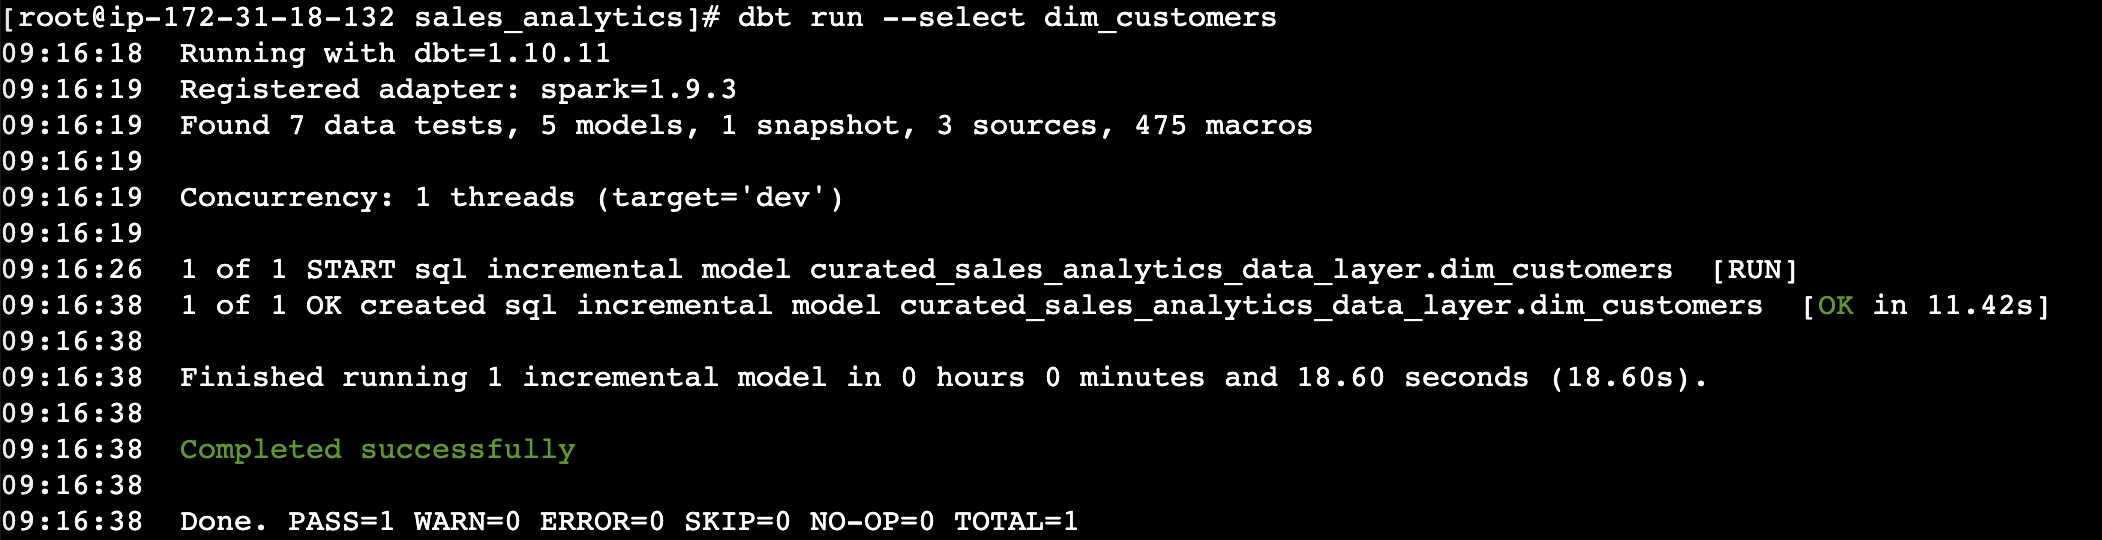
Run the dbt mannequin for dim_customers to sync the adjustments

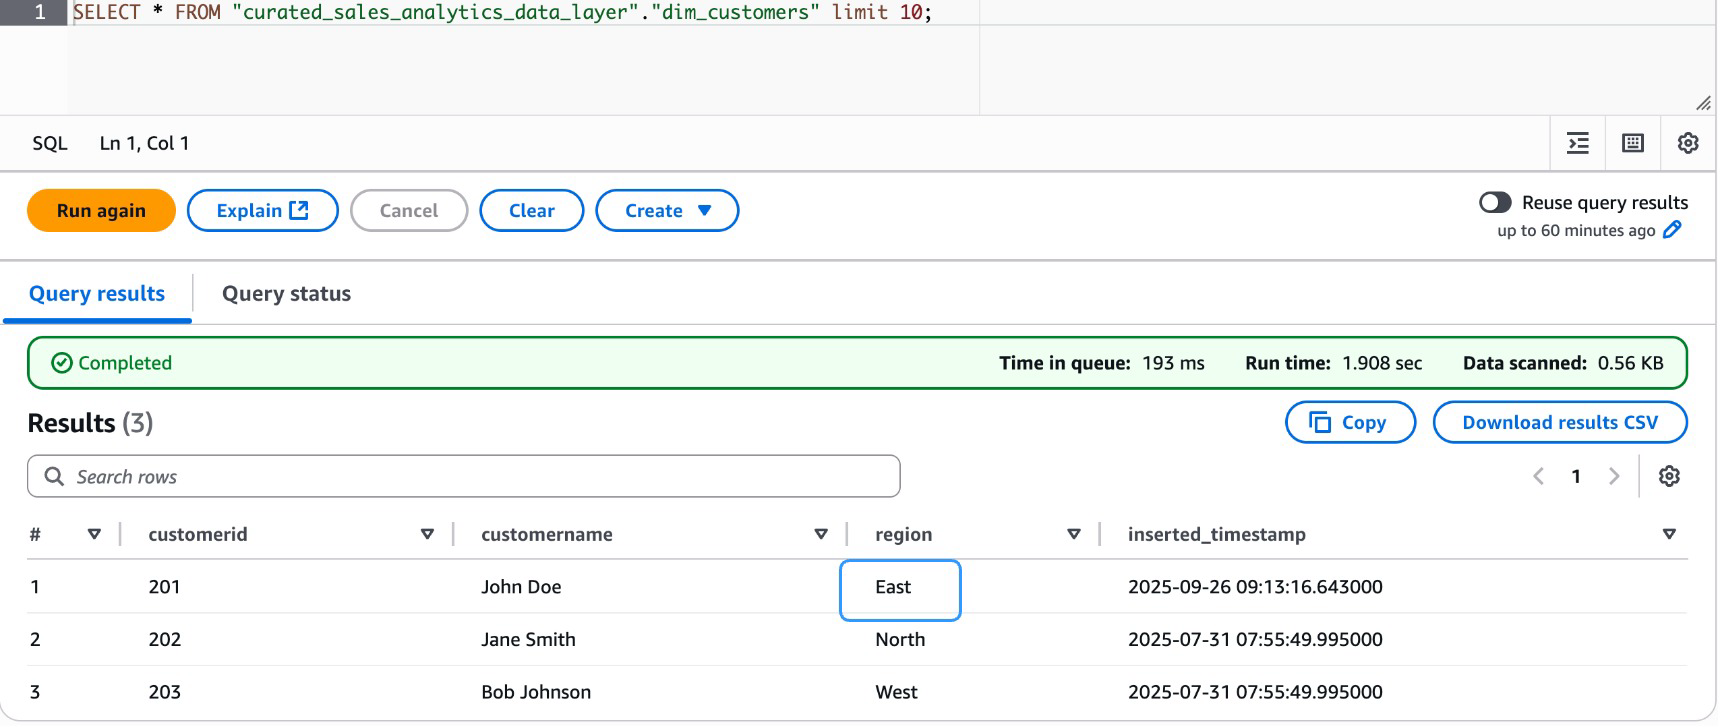
Validate the info in curated layer for dim_customers dimension desk

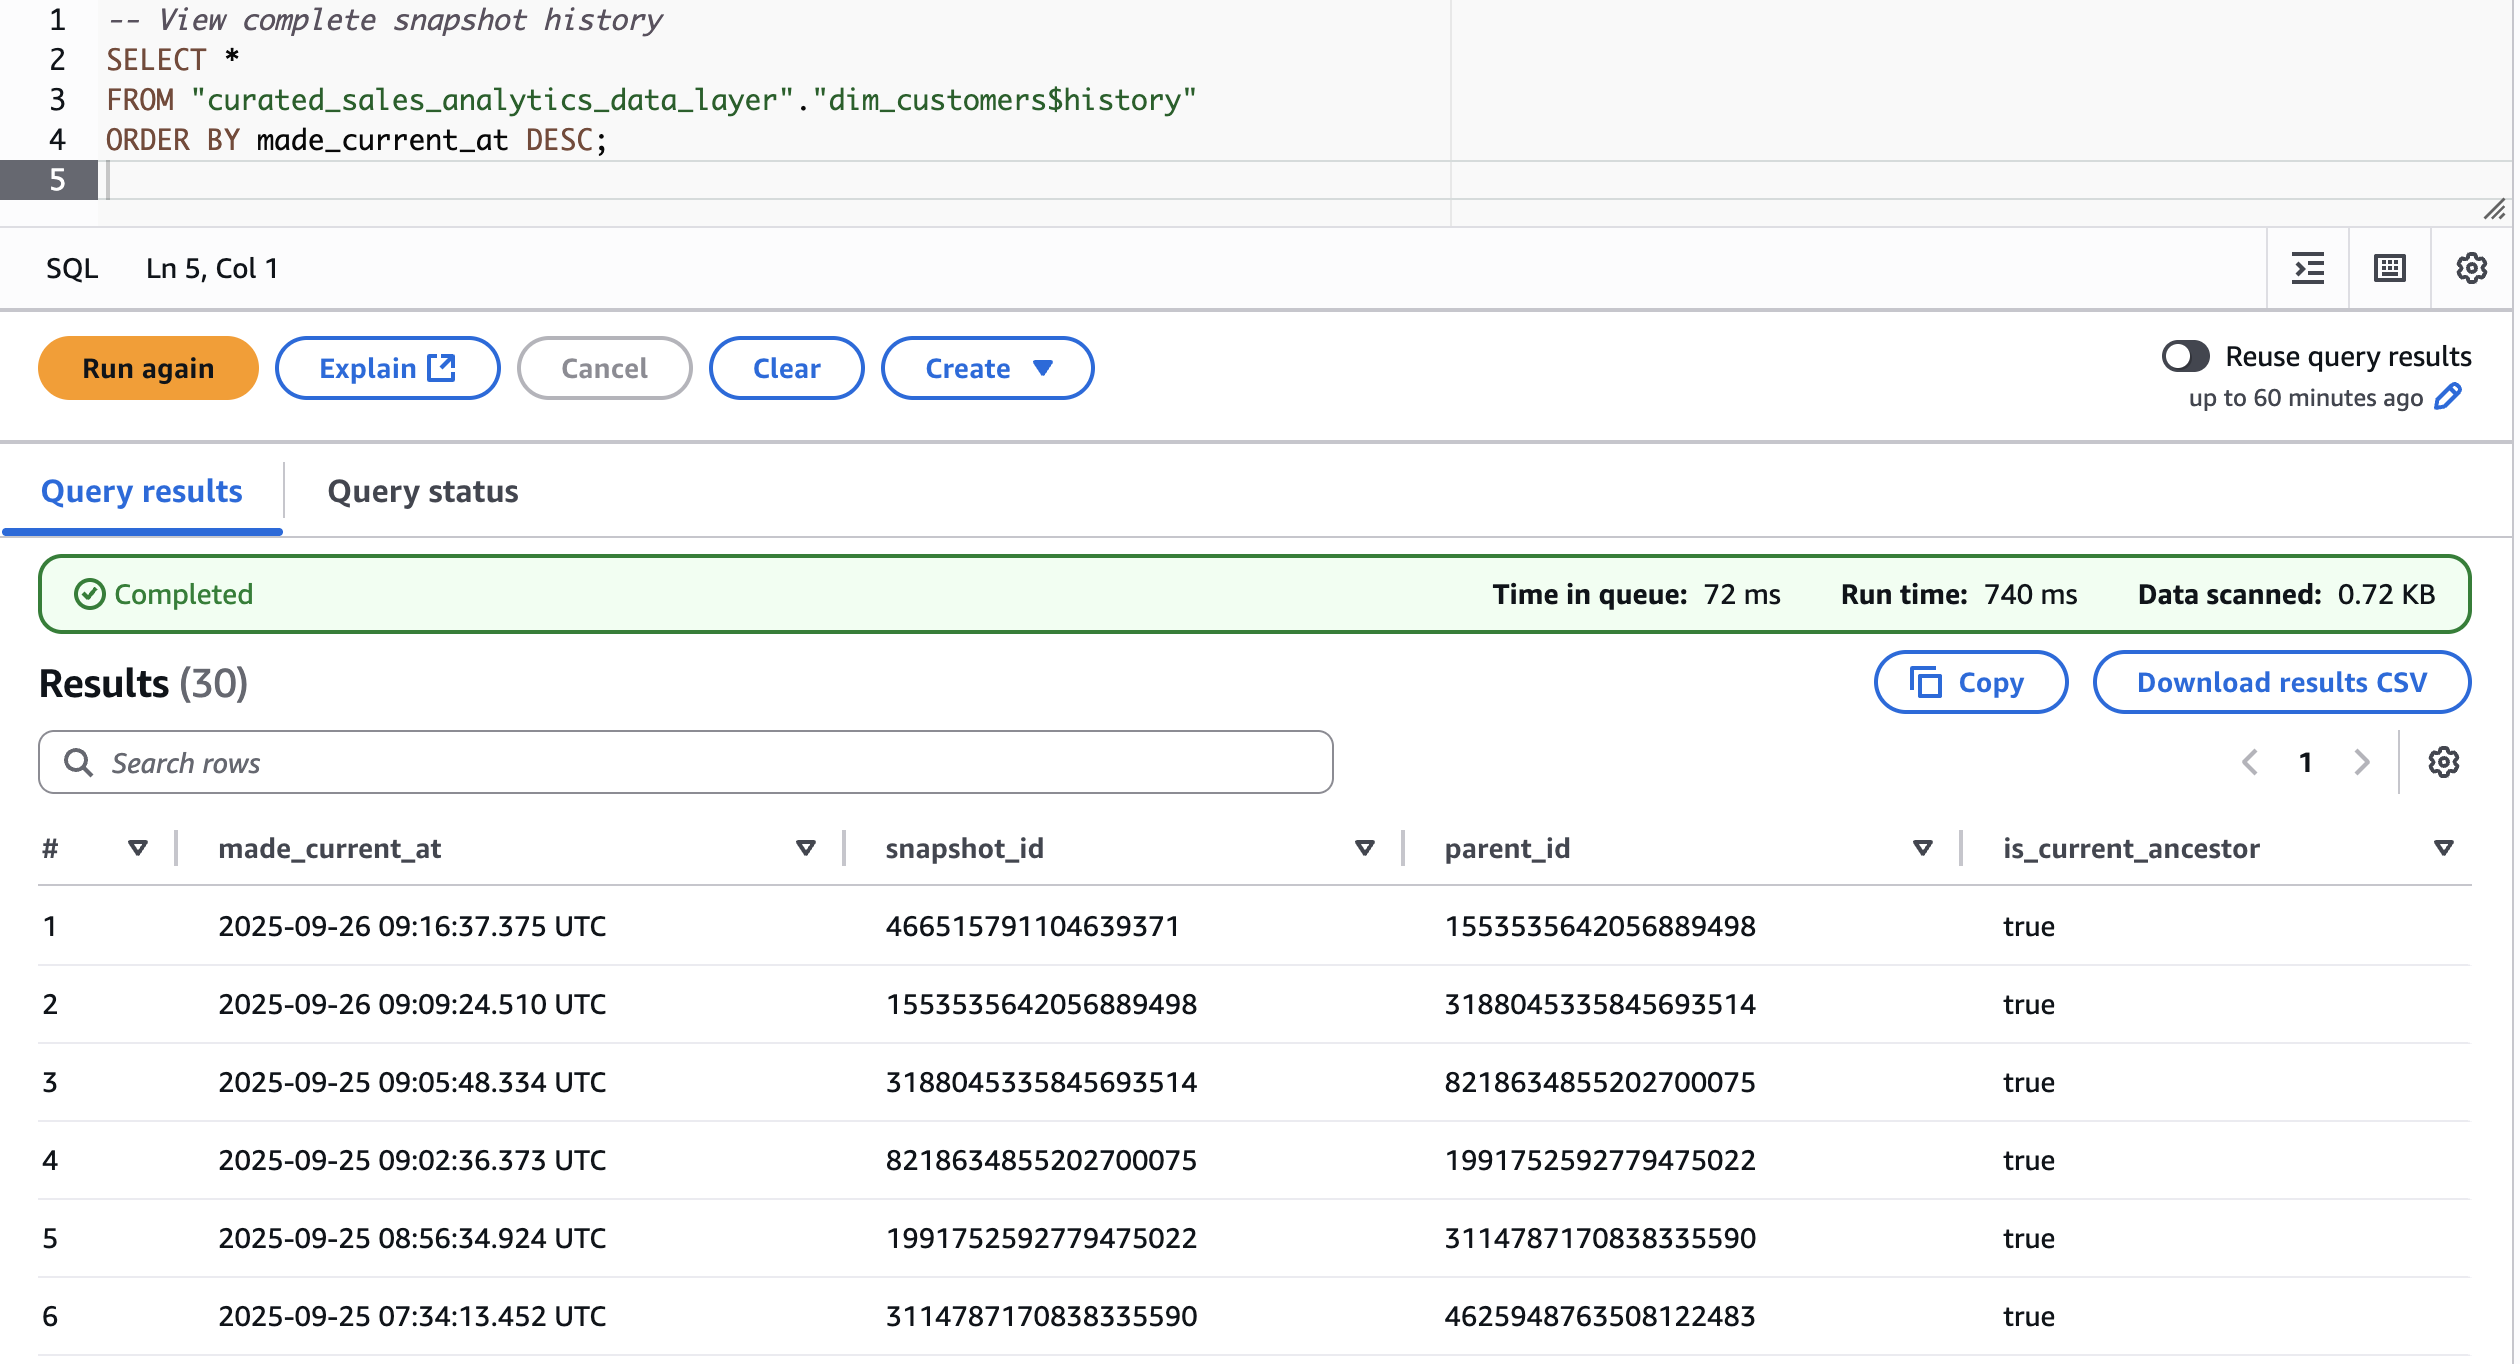
- Time-travel capabilities
First, let’s fetch snapshots for patrons dimension desk in curated layer

Now, discover the info state earlier than and after the modification.


Step 7: Knowledge high quality assessments
Knowledge high quality is a essential pillar of any dependable information pipeline. On this step, we outline and implement high quality checks instantly inside the dbt challenge utilizing schema-level check configurations. Reasonably than counting on one-time validation scripts, with dbt’s built-in testing framework, we are able to declaratively specify expectations on our fashions, making certain that key fields stay distinctive, non-null, and constant throughout the info layer earlier than they attain downstream shoppers.
- Generic assessments configuration
The
schema.ymlfile serves because the central contract for mannequin integrity. Right here, we apply generic assessments on the fact_sales and dim_customers fashions to catch information anomalies early within the pipeline.
Step 8: Upkeep procedures
A well-functioning information pipeline requires ongoing upkeep to stay performant and auditable over time. This step covers two important practices, desk optimization to maintain information storage environment friendly, and snapshot administration to trace historic adjustments in supply information. Collectively, these procedures hold the pipeline dependable, cost-effective, and able to supporting time-based evaluation.
- Desk optimization
As information accumulates in Delta or Iceberg tables, small recordsdata and fragmented storage can degrade question efficiency. The
optimize_tablemacro gives a reusable utility to run Databricks’OPTIMIZEcommand on any goal desk, consolidating small recordsdata and enhancing learn effectivity with out handbook intervention. - Snapshot administration
To take care of a historic report of buyer information adjustments, we use dbt snapshots with a timestamp-based technique. The
customers_snapshotmannequin captures row-level adjustments from the uncooked supply layer and persists them in a devoted snapshots schema, enabling point-in-time evaluation and audit trails.
Step 9: Monitoring and logging
Observability is an important side of any production-grade information pipeline. This step establishes logging and monitoring practices inside the dbt challenge to trace pipeline runs, seize errors, and help debugging. With structured logging enabled, groups achieve visibility into mannequin execution, check outcomes, and runtime habits, streamlining situation prognosis and sustaining operational confidence.
- dbt logging configuration
The
dbt_project.ymllogging configuration directs dbt to jot down logs to a devoted path and outputs them in JSON format. JSON-structured logs are significantly helpful for integration with log aggregation instruments and monitoring dashboards, enabling automated alerting and audit path administration.
Step 10. Deployment and working
With the pipeline totally constructed, examined, and maintained, the ultimate step covers how you can deploy and execute dbt fashions throughout totally different eventualities. Whether or not working a whole refresh, processing incremental updates, or validating information high quality, these instructions kind the operational spine of day-to-day pipeline administration.
- Full refresh
A full refresh rebuilds all fashions from scratch, reprocessing all the dataset. That is sometimes used after important schema adjustments, backfills, or when incremental state must be reset.
- Incremental replace
For routine pipeline runs, incremental updates course of solely new or modified information, considerably lowering compute time and price. The next command targets particular fashions (
dim_customersandfact_sales) permitting selective execution with out triggering the total DAG. - Testing
After fashions are run, information high quality assessments outlined within the schema configuration are executed to validate integrity throughout all fashions. This validates that constraints equivalent to uniqueness and non-null checks are met earlier than information reaches downstream shoppers.
Step 11. Cleanup
- Infrastructure cleanup
- Database cleanup
Conclusion
On this put up, you discovered how you can construct a transactional information lake on Amazon EMR utilizing dbt and Apache Iceberg, from surroundings setup and modeling uncooked information, to high quality implementing, snapshot administration, and incremental pipeline deployment. The structure brings collectively the scalability of Amazon EMR, dbt’s transformation capabilities, and Iceberg’s ACID-compliant desk format to ship a dependable, maintainable, and cost-efficient information platform.
To get began, see the Amazon EMR documentation to deploy this structure in your personal surroundings. Whether or not you’re modernizing a legacy information platform or constructing a brand new analytics basis, this stack offers you the flexibleness to scale with confidence.