

Amazon Redshift is a quick, scalable, and absolutely managed cloud information warehouse that means that you can course of and run your advanced SQL analytics workloads on structured and semi-structured information. Tens of 1000’s of shoppers use Amazon Redshift to course of giant quantities of information, modernize their information analytics workloads, and supply insights for his or her enterprise customers.
The mix of Amazon Redshift and ThoughtSpot’s AI-powered analytics service permits organizations to rework their uncooked information into actionable insights with unprecedented pace and effectivity. By means of this collaboration, Amazon Redshift now helps AWS IAM Id Middle integration with ThoughtSpot, enabling seamless and safe information entry with streamlined authentication and authorization workflows. This single sign-on (SSO) integration is on the market throughout ThoughtSpot’s cloud panorama and can be utilized for each embedded and standalone analytics implementations.
Previous to the IAM Id Middle integration, ThoughtSpot customers didn’t have native connectivity to combine Amazon Redshift with their identification suppliers (IdPs), which may present unified governance and identification propagation throughout a number of AWS companies like AWS Lake Formation and Amazon Easy Storage Service (Amazon S3).
Now, ThoughtSpot customers can natively connect with Amazon Redshift utilizing the IAM Id Middle integration, which streamlines information analytics entry administration whereas sustaining strong safety. By configuring Amazon Redshift as an AWS managed software, organizations profit from SSO capabilities with trusted identification propagation and a trusted token issuer (TTI). The IAM Id Middle integration with Amazon Redshift gives centralized person administration, mechanically synchronizing entry permissions with organizational modifications—whether or not workers be part of, transition roles, or depart the group. The answer makes use of Amazon Redshift role-based entry management options that align with IdP teams synced in IAM Id Middle. Organizations can additional improve their safety posture by utilizing Lake Formation to outline granular entry management permissions on catalog sources for IdP identities. From a compliance and safety standpoint, the combination provides complete audit trails by logging end-user identities each in Amazon Redshift and AWS CloudTrail, offering visibility into information entry patterns and person actions.
Dime Dimovski, a Knowledge Warehousing Architect at Merck, shares:
“The latest integration of Amazon Redshift with our identification entry administration middle will considerably improve our information entry administration as a result of we are able to propagate person identities throughout numerous instruments. Through the use of OAuth authentication from ThoughtSpot to Amazon Redshift, we are going to profit from a seamless single sign-on expertise—giving us granular entry controls in addition to the safety and effectivity we’d like.”
On this put up, we stroll you thru the method of organising ThoughtSpot integration with Amazon Redshift utilizing IAM Id Middle authentication. The answer gives a safe, streamlined analytics surroundings that empowers your staff to concentrate on what issues most: discovering and sharing priceless enterprise insights.
Resolution overview
The next diagram illustrates the structure of the ThoughtSpot SSO integration with Amazon Redshift, IAM Id Middle, and your IdP.

The answer consists of the next steps:
- The person configures ThoughtSpot to entry Amazon Redshift utilizing IAM Id Middle.
- When a person makes an attempt to register, ThoughtSpot initiates a browser-based OAuth movement and redirects the person to their most well-liked IdP (reminiscent of Okta or Microsoft EntraID) sign-in web page to enter their credentials.
- Following profitable authentication, IdP points authentication tokens (ID and entry token) to ThoughtSpot.
- The Amazon Redshift driver then makes a name to the Amazon Redshift enabled AWS Id Middle software and forwards the entry token.
- Amazon Redshift passes the token to IAM Id Middle for validation.
- IAM Id Middle first validates the token utilizing the OpenID Join (OIDC) discovery connection to the TTI and returns an IAM Id Middle generated entry token for a similar person. The TTI lets you use trusted identification propagation with purposes that authenticate exterior of AWS. Within the previous determine, the IdP authorization server is the TTI.
- Amazon Redshift makes use of IAM Id Middle APIs to acquire the person and group membership data from AWS Id Middle.
- The ThoughtSpot person can now join with Amazon Redshift and entry information based mostly on the person and group membership returned from IAM Id Middle.
On this put up, you’ll use the next steps to construct the answer:
- Arrange an OIDC software.
- Arrange a TTI in IAM Id Middle.
- Arrange shopper connections and TTIs in Amazon Redshift.
- Federate to Amazon Redshift from ThoughtSpot utilizing IAM Id Middle.
Conditions
Earlier than you start implementing the answer, you have to have the next in place:
Arrange an OIDC software
On this part, we’ll present you the step-by-step course of to arrange an OIDC software utilizing each Okta and EntraID because the identification suppliers.
Arrange an Okta OIDC software
Full the next steps to arrange an Okta OIDC software:
- Register to your Okta group as a person with administrative privileges.
- On the admin console, below Functions within the navigation pane, select Functions.
- Select Create App Integration.
- Choose OIDC – OpenID Join for Signal-in technique and Internet Utility for Utility sort.
- Select Subsequent.

- On the Common tab, present the next data:
- For App integration identify, enter a reputation to your app integration. For instance,
ThoughtSpot_Redshift_App. - For Grant sort, choose Authorization Code and Refresh Token.
- For Signal-in redirect URIs, select Add URI and together with the default URI, add the URI
https://<your_okta_instance_name>/callosum/v1/connection/generateTokens. The sign-in redirect URI is the place Okta sends the authentication response and ID token for the sign-in request. The URIs should be absolute URIs. - For Signal-out redirect URIs, preserve the default worth as
http://localhost:8080. - Skip the Trusted Origins part and for Assignments, choose Skip group task for now.
- Select Save.
- For App integration identify, enter a reputation to your app integration. For instance,
- Select the Assignments tab after which select Assign to Teams. On this instance, we’re assigning
awssso-financeandawssso-sales. - Select Executed.


Arrange an EntraID OIDC software
To create your EntraID software, observe these steps:
- Register to the Microsoft Entra admin middle as Cloud Utility Administrator (or larger degree of entry).
- Browse to App registrations below Handle, and select New registration.
- Enter a reputation for the applying. For instance,
ThoughtSpot-OIDC-App. - Choose a supported account sort, which determines who can use the applying. For this instance, choose the primary possibility within the record.
- Underneath Redirect URI, select Internet for the kind of software you need to create. Enter the URI the place the entry token is distributed to. Your redirect URL might be within the format
https://<your_instance_name>/callosum/v1/connection/generateTokens. - Select Register.

- Within the navigation pane, select Certificates & secrets and techniques.
- Select New shopper secret.
- Enter an outline and choose an expiration for the key or specify a customized lifetime. For this instance, preserve the Microsoft really useful default expiration worth of 6 months.
- Select Add.
- Copy the key worth.

The key worth will solely be introduced one time; after which you could’t learn it. Be certain that to repeat it now. In the event you fail to reserve it, you have to generate a brand new shopper secret.
- Within the navigation pane, below Handle, select Expose an API.
In the event you’re organising for the primary time, you may see Add to the suitable of the applying ID URI.
- Select Save.
- After the applying ID URI is about up, select Add a scope.
- For Scope identify, enter a reputation. For instance,
redshift_login. - For Admin consent show identify, enter a show identify. For instance,
redshift_login. - For Admin consent description, enter an outline of the scope.
- Select Add scope.

- Within the navigation pane, select API permissions.
- Select Add a permission and select Microsoft Graph.
- Select Delegated Permission.
- Underneath OpenId permissions, select
electronic mail,offlines_access,openid, andprofile, and select Add permissions.


Arrange a TTI in IAM Id Middle
Assuming you might have accomplished the conditions, you’ll set up your IdP as a TTI in your delegated administration account. To create a TTI, seek advice from Learn how to add a trusted token issuer to the IAM Id Middle console. On this put up, we stroll by means of the steps to arrange a TTI for each Okta and EntraID.
Arrange a TTI for Okta
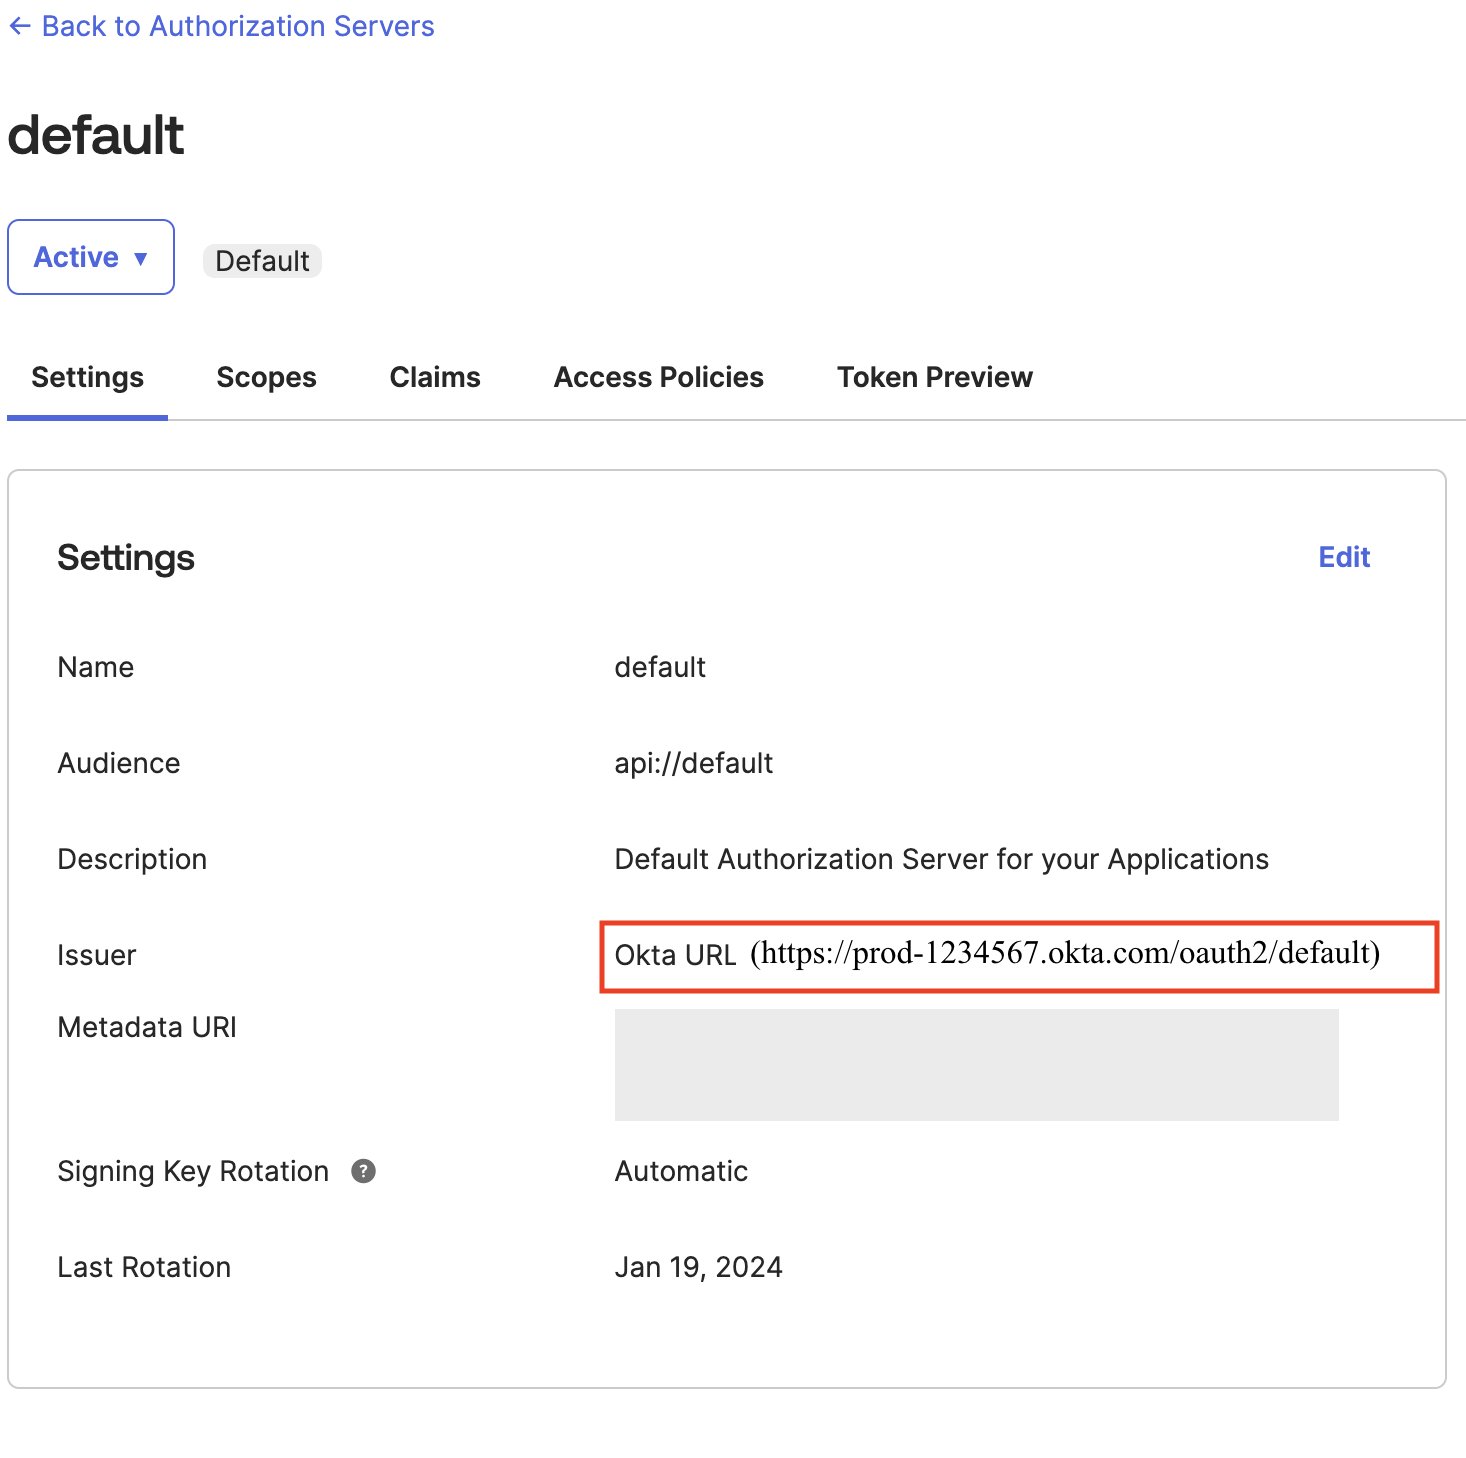
To get the issuer URL from Okta, full the next steps:
- Register as an admin to Okta and navigate to Safety after which to API.
- Select Default on the Authorization Servers tab and duplicate the Issuer
url.
- Within the Map attributes part, select which IdP attributes correspond to Id Middle attributes. For instance, within the following screenshot, we mapped Okta’s
Topicattribute to theElectronic mailattribute in IAM Id Middle. - Select Create trusted token issuer.


Arrange a TTI for EntraID
Full the next steps to arrange a TTI for EntraID:
- To seek out out which token your software is utilizing, below Handle, select Manifest.
- Find the
accessTokenAcceptedVersionparameter:nullor1point out v1.0 tokens, and2signifies v2.0 tokens.


Subsequent, it’s worthwhile to discover the tenant ID worth from EntraID.
- Go to the EntraID software, select Overview, and a brand new web page will seem containing the Necessities
- Yow will discover the tenant ID worth as proven within the following screenshot. In the event you’re utilizing the v1.0 token, the issuer URL might be
https://sts.home windows.web/<Listing (tenant) ID>/. In the event you’re utilizing the v2.0 token, the issuer URL might behttps://login.microsoftonline.com/<Listing (tenantid) ID>/v2.0.
- For Map attributes, the next instance makes use of Different, the place we’re specifying the person principal identify (
upn) because the IdP attribute to map with Electronic mail from the IAM identification Middle attribute. - Select Create trusted token issuer.


Arrange shopper connections and TTIs in Amazon Redshift
On this step, you configure the Amazon Redshift purposes that change externally generated tokens to make use of the TTI you created within the earlier step. Additionally, the viewers declare (or aud declare) out of your IdP should be specified. You’ll want to acquire the viewers worth from the respective IdP.
Purchase the viewers worth from Okta
To accumulate the viewers worth from Okta, full the next steps:
- Register as an admin to Okta and navigate to Safety after which to API.
- Select Default on the Authorization Servers tab and duplicate the Viewers worth.

Purchase the viewers worth from EntraID
Equally, to get the viewers worth EntraID, full the next steps:
- Go to the EntraID software, select Overview, and a brand new web page will seem containing the Necessities
- Yow will discover the viewers worth (Utility ID URI) as proven within the following screenshot.

Configure the applying
After you acquire the viewers worth from the respective IdP, it’s worthwhile to configure the Amazon Redshift software within the member account the place the Amazon Redshift cluster or serverless occasion exists.
- Select IAM Id Middle connection within the navigation pane on the Amazon Redshift console.
- Select the Amazon Redshift software that you just created as a part of the conditions.
- Select the Consumer connections tab and select Edit.
- Select Sure below Configure shopper connections that use third-party IdPs.
- Choose the verify field for Trusted token issuer that you just created within the earlier part.
- For Aud declare, enter the viewers declare worth below Configure chosen trusted token issuers.
- Select Save.
Your IAM Id Middle, Amazon Redshift, and IdP configuration is full. Subsequent, it’s worthwhile to configure ThoughtSpot.
Federate to Amazon Redshift from ThoughtSpot utilizing IAM Id Middle
Full the next steps in ThoughtSpot to federate with Amazon Redshift utilizing IAM Id Middle authentication:
- Register to ThoughtSpot cloud.
- Select Knowledge within the high navigation bar.
- Open the Connections tab within the navigation pane, and choose the Redshift
Alternatively, you may select Create new within the navigation pane, select Connection, and choose the Redshift tile.
- Create a reputation to your connection and an outline (non-obligatory), then select Proceed.
- Underneath Authentication Kind, select AWS IDC OAuth and enter following particulars:
- For Host, enter the Redshift endpoint. For instance,
test-cluster.ab6yejheyhgf.us-east-1.redshift.amazonaws.com. - For Port, enter 5439.
- For OAuth Consumer ID, enter the shopper ID from the IdP OIDC software.
- For OAuth Consumer Secret, enter the shopper secret from the IdP OIDC software.
- For Scope, enter the scope from the IdP software:
- For Okta, use
openid offline_access openidprofile. You should use the Okta scope values shared earlier as is on ThoughtSpot. You’ll be able to modify the scope in line with your necessities. - For EntraID, use the API scope and API permissions. For instance,
api://1230a234-b456-7890-99c9-a12345bcc123/redshift_login offline_access.
- For Okta, use
- For API scope worth, go to the OIDC software, and below Handle, select Expose an API to accumulate the worth.
- For API permissions, go to the OIDC software, and below Handle, select API permissions to accumulate the permissions.
- For Auth Url, enter the authorization endpoint URI:
- For Okta use
https:// <okta-hostname>/oauth2/default/v1/authorize. For instance,https://prod-1234567.okta.com/oauth2/default/v1/authorize. - For EntraID, use
https://login.microsoftonline.com/<Listing (tenantid) ID>/oauth2/v2.0/authorize. For instance,https://login.microsoftonline.com/e12a1ab3-1234-12ab-12b3-1a5012221d12/oauth2/v2.0/authorize.
- For Okta use
- For Entry token Url, enter the token endpoint URI:
- For Okta, use
https://<okta-hostname>/oauth2/default/v1/token. For instance,https://prod-1234567.okta.com/oauth2/default/v1/token. - For EntraID, use
https://login.microsoftonline.com/<Listing (tenantid) ID>/oauth2/v2.0/token. For instance,https://login.microsoftonline.com/e12a1ab3-1234-12ab-12b3-1a5012221d12/oauth2/v2.0/token.
- For Okta, use
- For AWS Id Namespace, enter the namespace configured in your Amazon Redshift IAM Id Middle software. The default worth is
AWSIDCuntil beforehand custom-made. For this instance, we useawsidc. - For Database, enter the database identify you need to join. For instance, dev.
- For Host, enter the Redshift endpoint. For instance,
- Select Proceed.
- Enter your IdP person credentials within the browser pop-up window.
The next screenshot illustrates the ThoughtSpot integration with Amazon Redshift utilizing Okta because the IdP.

The next screenshot reveals the ThoughtSpot integration with Amazon Redshift utilizing EntraID because the IdP.

Upon a profitable authentication, you can be redirected again to ThoughtSpot and logged in as an IAM Id Middle authenticated person.
Congratulations! You’ve logged in by means of IAM Id Middle and Amazon Redshift, and also you’re able to dive into your information evaluation with ThoughtSpot.
Clear up
Full the next steps to wash up your sources:
- Delete the IdP purposes that you just created to combine with IAM Id Middle.
- Delete the IAM Id Middle configuration.
- Delete the Amazon Redshift software and the Amazon Redshift provisioned cluster or serverless occasion that you just created for testing.
- Delete the IAM function and IAM coverage that you just created for IAM Id Middle and Amazon Redshift integration.
- Delete the permission set from IAM Id Middle that you just created for Amazon Redshift Question Editor V2 within the administration account.
- Delete the ThoughtSpot connection to combine with Amazon Redshift utilizing AWS IDC OAuth.
Conclusion
On this put up, we explored how you can combine ThoughtSpot with Amazon Redshift utilizing IAM Id Middle. The method consisted of registering an OIDC software, organising an IAM Id Middle TTI, and eventually configuring ThoughtSpot for IAM Id Middle authentication. This setup creates a sturdy and safe analytics surroundings that streamlines information entry for enterprise customers.
For extra steerage and detailed documentation, seek advice from the next key sources:
Concerning the authors
 Maneesh Sharma is a Senior Database Engineer at AWS with greater than a decade of expertise designing and implementing large-scale information warehouse and analytics options. He collaborates with numerous Amazon Redshift Companions and prospects to drive higher integration.
 BP Yau is a Sr Associate Options Architect at AWS. His function is to assist prospects architect massive information options to course of information at scale. Earlier than AWS, he helped Amazon.com Provide Chain Optimization Applied sciences migrate its Oracle information warehouse to Amazon Redshift and construct its subsequent technology massive information analytics platform utilizing AWS applied sciences.
 Ali Alladin is the Senior Director of Product Administration and Associate Options at ThoughtSpot. On this function, Ali oversees Cloud Engineering and Operations, guaranteeing seamless integration and optimum efficiency of ThoughtSpot’s cloud-based companies. Moreover, Ali spearheads the event of AI-powered options in augmented and embedded analytics, collaborating carefully with know-how companions to drive innovation and ship cutting-edge analytics capabilities. With a sturdy background in product administration and a eager understanding of AI applied sciences, Ali is devoted to pushing the boundaries of what’s doable within the analytics house, serving to organizations harness the complete potential of their information.
 Debu Panda is a Senior Supervisor, Product Administration at AWS. He’s an business chief in analytics, software platform, and database applied sciences, and has greater than 25 years of expertise within the IT world.