

Correct present and voltage readings are crucial for FPV drones. They let you know your battery degree, how a lot capability has been used, and the way a lot is left. An incorrectly calibrated voltage and present sensor can result in untimely landings or, worse, over-discharging your LiPo. Present sensor can even present how a lot present the motors are drawing in actual time. On this information, I’ll stroll you thru the step-by-step calibration course of for each voltage and present sensors in Betaflight.


All of our advisable FC/ESC stack comes with present sensor: https://oscarliang.com/flight-controller/#The-Greatest-FC-Suggestions
Methods to Calibrate Voltage
Normally, voltage sensor is pretty correct out of the field on a Betaflight flight controller, and you might not have to calibrate it. Nevertheless, it’s all the time a good suggestion to test.
- Merely take a battery and test its voltage utilizing both a battery checker or a multimeter.
- Then join it to your drone. Ensure you take away the propellers first for security.
- In Betaflight Configurator, if the reported voltage (circled in pink within the picture beneath) is considerably totally different out of your measured voltage, you need to calibrate the voltage sensor. A distinction inside 0.1V is mostly acceptable.
In case your voltage sensor isn’t working, be certain Voltage Meter Supply is ready to Onboard ADC within the Energy & Battery tab within the configurator.

To calibrate voltage:
- Click on the Calibrate button on the backside proper.
- Enter the measured voltage.
- Click on Calibrate. Betaflight will then ask to use a brand new voltage scale.
That’s it. Inside 0.1V is correct sufficient.

Now you possibly can put voltage in your OSD. You’ll be able to show Battery Voltage (complete voltage), or Battery common cell voltage, or each.

Why Present Sensor Is Helpful
Having voltage displayed is helpful, however on account of voltage sag, the studying can fluctuate throughout flight, so it’s not all the time essentially the most correct indicator of battery degree. For basic flying equivalent to freestyle and cinematic flying, utilizing voltage alone is often adequate. However for long-range and racing, the place realizing precisely how a lot battery is left and when you need to land is crucial, that’s the place the present sensor is available in.
There are two present sensor-related readings that you need to learn about:
Battery present mAh drawn: This reveals LiPo battery consumption and tells you the way a lot battery capability has been used.Battery present draw: This reveals real-time present draw. It’s a good indicator of how power-hungry your motor and propeller mixture is at totally different throttle positions, and you should utilize it to check totally different setups
Nevertheless, poor calibration may cause incorrect mAh consumption and present draw readings, making them complicated and mainly ineffective. Due to this fact, it’s vital to calibrate the sensor earlier than counting on it.
Methods to Allow Present Sensor and Put It in OSD
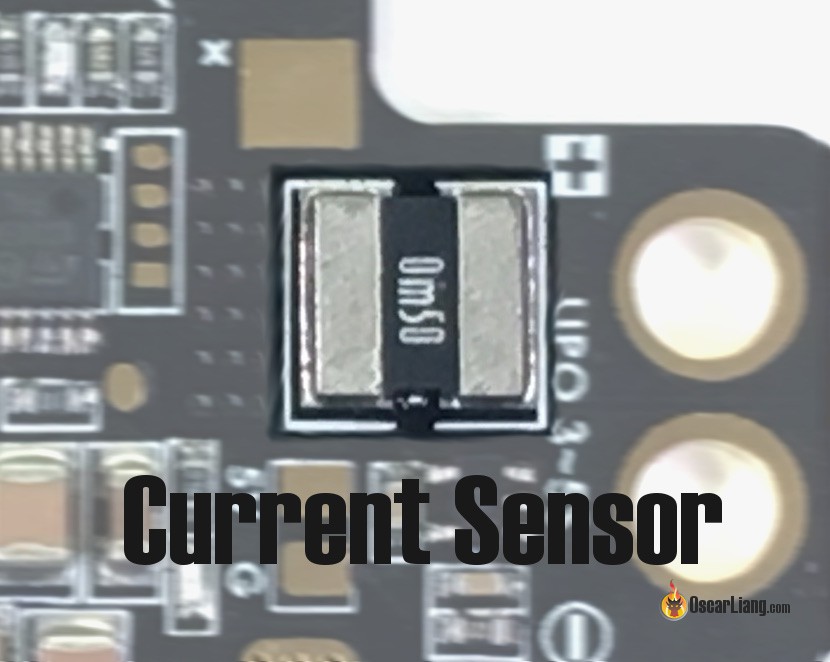
Does your ESC have a present sensor? It often appears to be like like a big resistor close to the ability pads.
If it does, you possibly can allow it by going to the Energy & Battery tab in Betaflight Configurator and deciding on Onboard ADC below Present Meter Supply. Some 32-bit ESCs additionally help ESC Sensor (through ESC telemetry) because the Present Meter Supply, but it surely’s often simpler to simply use the ADC sensor.
In case your ESC doesn’t have a present sensor and you choose Onboard ADC, you’ll get some random present readings.

You’ll be able to then show Battery present draw and Battery present mAh drawn within the OSD.

Methods to Test if Present Sensor Is Correct
The simplest method to confirm in case your present sensor is working accurately, is to fly a battery and see if Battery present mAh drawn matches the capability of the battery pack.
To do that:
- Absolutely cost a LiPo to 4.20V per cell, or 4.35V per cell if it’s LiHV.
- Fly the pack till the voltage drops to three.3V per cell. I often fly till 3.5V per cell, then hover near myself till it reaches 3.3V so I don’t by accident discharge the battery too low.
Battery present mAh drawnought to roughly equal to the precise capability of the pack, or possibly just a few % decrease since you land earlier than the battery is totally empty.- If
Battery present mAh drawnis not any the place near the battery’s capability, then you need to calibrate it.
Methods to Calibrate Present Sensor
To calibrate the present sensor, you mainly want to regulate the scale and offset values.
You will discover these settings within the Energy & Battery tab, below Amperage Meter.

You’ll be able to strap your quad to the bench, and measure present draw utilizing a energy meter, or a clamp meter whereas operating the motors. Nevertheless, as you possibly can think about it’s not the most secure choice, and it additionally requires further tools that most individuals most likely don’t have. Due to this fact I choose the trial and error technique I describe beneath:
Fly a Battery
- Absolutely cost a battery, for instance 4.2V per cell for LiPo or 4.35V per cell for LiHV.
- Put the OSD factor
Battery present mAh drawnin your display screen. - Fly the battery till it’s almost empty. For LiPo and LiHV, that might be round 3.5V per cell.
- After touchdown, word the
Battery present mAh drawnworth proven within the OSD.

Recharge That Battery
- Recharge the battery absolutely to 4.2V per cell.
- See how a lot mAh your charger places again into the battery.

Replace Present Scale
- Join your flight controller to Betaflight Configurator.
- Go to the Energy & Battery tab and write down the
Amperage Meter Scaleworth.
Use this components to calculate the brand new present sensor scale:
new_scale = old_scale x (OSD_mAh_consumed / mAh_charged)
I made this software to simplify issues. Simply enter the numbers to get the brand new scale:
https://oscarliang.com/js/current_scale.html

On this instance:
- OSD_mAh_consumed = 1520
- mAh_charged = 1703
- old_scale = 400
- new_scale = 357
Necessary: When coming into the brand new scale in Betaflight, solely enter a complete quantity. Spherical it if the result’s a decimal.
You may need to repeat this course of 2 or 3 extra occasions to attain an correct scale.
You’ll be able to often go away the offset at zero.
Calibration within the Subject
You may as well calibrate the present sensor with out entry to a charger or pc by utilizing trial and error. It could take just a few extra tries, however it may possibly nonetheless be very efficient.
- Convey 3 to 4 absolutely charged batteries with you.
- Fly one till it’s almost empty, then write down the
Battery present mAh drawnworth proven within the OSD. - Evaluate that quantity to the battery capability. To make the present sensor learn decrease, it’s essential enhance the size quantity.
- For instance, if
Battery present mAh drawnis 10% greater than the battery capability, enhance the size by 10%. - Or you possibly can merely use the calculator if this feels too sophisticated.
- For instance, if
- Repeat with one other absolutely charged battery till you might be pleased with the accuracy.
Let me provide you with an instance:
- Proper now, your present sensor scale is 400.
- You fly a totally charged battery, a 1000mAh pack, till it’s empty (e.g. 3.3V per cell).
- The OSD reveals 900mAh drawn.
- So that you need the OSD to learn 10% greater (or a bit greater to account for the small quantity of cost left within the pack), which implies it’s essential cut back the size by 10%.
- New scale = 400 × 90% = 360
- Repeat till you might be pleased with the accuracy.
You may as well enter the brand new scale worth within the OSD menu (Options -> Energy -> IBAT Scale) in the event you do not need entry to Betaflight Configurator.

Professional tip: When calibrating present sensor, it’s greatest to make use of a battery in good situation. Outdated or abused batteries usually have degraded capability, which may throw off your calibration.
Digital Present Sensor Setup
In case your quad doesn’t have a bodily present sensor, you possibly can nonetheless arrange a digital present sensor. This can be a function in Betaflight the place present consumption is estimated based mostly on throttle place. It isn’t essentially the most correct technique, however when it’s setup correctly, it’s higher than nothing.
Tutorial: http://intofpv.com/t-virtual-current-sensor-with-cleanflight-betaflight
Closing Ideas
Calibrating voltage and present in Betaflight is a type of small setup steps that makes an enormous distinction in real-world flying.
As soon as dialed in:
- Your battery warnings turn out to be dependable
- Your flight time turns into predictable and you may maximizing flight time with out risking overdischarging battery
- You’ll be able to higher perceive the ability demand of your motors and propellers and evaluate totally different combos
Should you’ve by no means accomplished this earlier than, take 10–quarter-hour and do it—it’s completely price it.
Edit Historical past
- Apr 2017 – Tutorial created
- Nov 2022 – Up to date for Betaflight 4.3
- Apr 2026 – Up to date for Betaflight 2025.12, with extra deal with the trial-and-error technique since it’s safer and doesn’t require further tools