

Apple Software program Restore permits you to clone your Mac even with a Signed System Quantity. Here is learn how to use it to repeat your Mac’s storage.
For a wide range of causes, you could wish to make a clone of your Startup Disk in your Mac. This may embody software program testing, backups, configuration, or many different causes.
Prior to now on macOS this was comparatively straightforward, however that modified with macOS Massive Sur as a result of Apple added what is named a Signed System Quantity to every macOS Startup Disk. Signed System Volumes are encoded with a particular cryptographic marker for that one set up.
For those who attempt to clone a Signed System Quantity or copy it, the copy will fail. Apple does this on objective to stop theft of Startup Disk volumes – and to stop malicious software program (malware) from hacking the macOS put in on Startup Disks.
Ever since Apple added Signed System Volumes, most third-party clone software program additionally will not work. Or at the least they will not work when attempting to create a bootable clone of a macOS system quantity.
There may be, nevertheless, one strategy to nonetheless clone macOS drives since macOS Massive Sur that does work: Apple Software program Restore (ASR).
Utilizing ASR, you should utilize part of macOS to repeat a Startup Disk quantity, then set it as a certified (signed) quantity, which is able to boot efficiently.
You can even use ASR to revive disk picture (.dmg) recordsdata to bodily disk volumes. The truth is, once you do a Restore from inside macOS’s Disk Utility, it makes use of ASR below the hood to carry out the Restore.
How you can clone your Startup Disk utilizing ASR
This information covers macOS Catalina or later. For earlier variations of macOS, the method is barely completely different.
To make a clone on an Apple Silicon Mac, you need to have a replica of macOS put in on the goal. You will want it to make the clone bootable to your Mac, as this course of would not work when you attempt to clone onto an empty drive on a Mac.
For cloning on an Apple Silicon Mac, you have to be utilizing macOS Monterey or later. macOS Massive Sur or earlier will not work.
You can also’t cross-boot a cloned drive, i.e., you’ll be able to’t boot a clone made on an Intel Mac on an Apple Silicon Mac or vice versa.
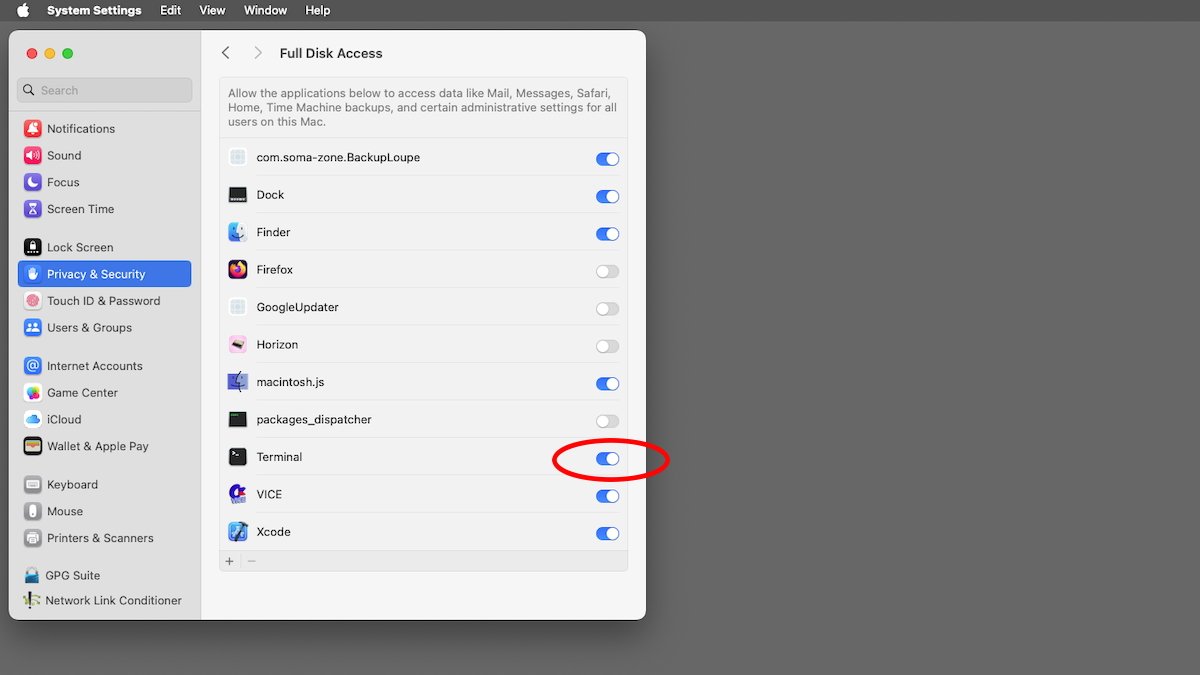
Grant full disk entry to the Terminal app in System Settings.
Additionally, remember that any FileVault encryption your supply drive makes use of is not going to be copied to the goal. If you wish to use FileVault on the goal after cloning, you need to boot into the cloned drive, re-enable FileVault, and permit it to re-encrypt the drive.
You will additionally have to be snug utilizing macOS’s Terminal app and in utilizing disk volumes and the macOS Finder. A system administrator password is required to carry out the cloning.
The Terminal app additionally must be granted Full Disk Entry in System Settings->Privateness & Safety->Full Disk Entry to ensure that the cloning course of to work. If Terminal would not seem within the checklist of apps to grant entry to, click on the + button and add it to the checklist from the /Functions/Utilities folder in your Startup Disk.
Select supply and vacation spot volumes
The disk quantity you wish to clone known as the supply quantity, and the drive you wish to clone it to known as the vacation spot. The vacation spot ought to be an Apple File System (APFS) Container, but it surely will also be a single quantity.
The supply and vacation spot might be on the identical drive, but it surely’s not beneficial in case one thing goes improper or in case errors happen throughout cloning.
Both or each the supply and vacation spot drives might be an inside drive inside your Mac or an exterior drive. You can even clone from a Disk Utility disk picture if it was additionally beforehand made utilizing ASR.
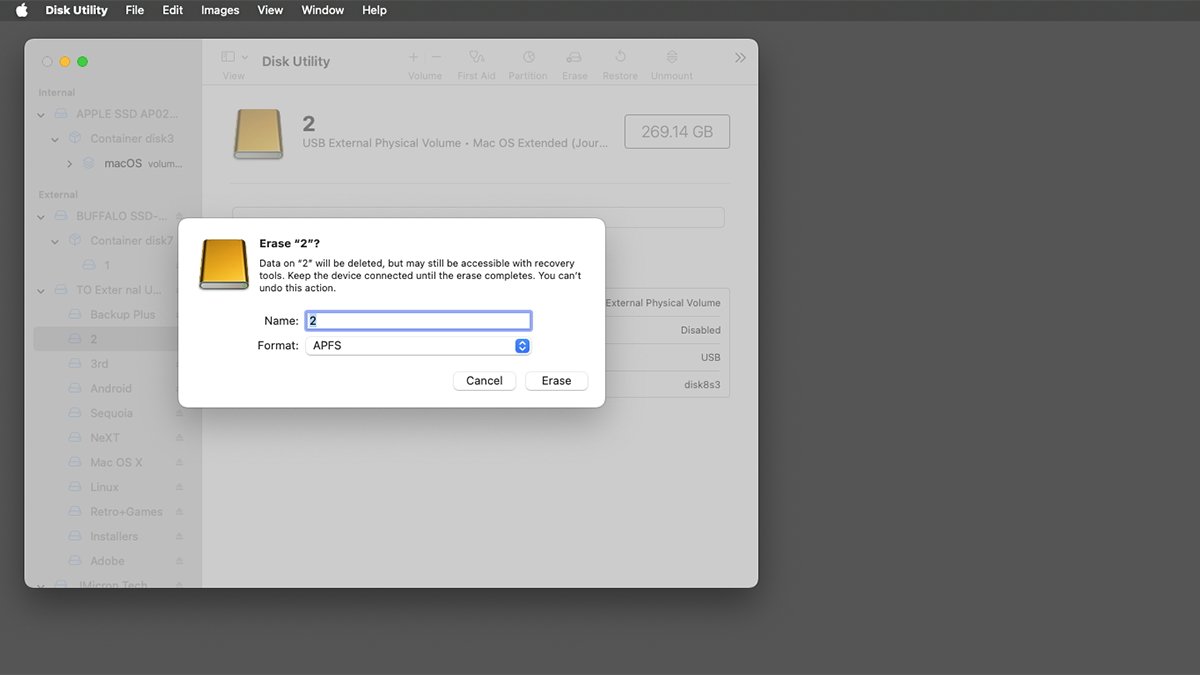
If you wish to arrange an unformatted exterior drive to make use of for the clone, first erase it utilizing macOS’s Disk Utility app positioned in your Startup Disk at /Functions/Utilities.
Warning: Remember that utilizing Disk Utility makes it straightforward to erase drives and destroy information. You could wish to unplug any further exterior drives linked to your Mac first.
At all times again up your information earlier than erasing any drive.
After you have Disk Utility working in your Mac, choose View->Present All Gadgets within the menu bar, then click on the disk drive you wish to erase from the checklist on the left. Remember to choose a top-level bodily drive from the checklist, and never a quantity or container on a drive.
While you’ve confirmed that is the drive you wish to erase, click on the Erase button in Disk Utility’s principal window. It will erase all volumes and software program on the disk, together with any different volumes current. You can not undo this motion, so make sure you select the machine to erase rigorously.
Use Disk Utility to erase a brand new drive to be used as an ASR goal.
Within the Erase sheet, give the brand new quantity a reputation, and set the Format: pop-up menu to APFS. If there is a Scheme: pop-up menu current, set it to GUID Partition Map, and click on the Erase button. This Erases the disk.
As soon as the Erase course of completes, you may see a single new empty disk quantity mount on the Finder’s Desktop. Stop Disk Utility.
View disk and quantity data in Terminal
For this subsequent step, you could wish to first eject and unplug all storage units out of your Mac apart from those containing the supply and vacation spot disks. Doing so makes this step simpler.
Subsequent, you may must view the specifics of your supply and vacation spot drives in macOS’s Terminal app to collect some information wanted for ASR. To take action, open the Terminal app in your Startup Disk at /Functions/Utilities.
Then, in Terminal kind:
diskutil checklist and press Return in your keyboard.
This shows data about all storage units linked to your Mac, together with their BSD (UNIX) machine entries. Every drive entry listed within the /dev listing consists of:
- Drive partition or container scheme
- A listing of volumes on every machine
- The kind, title, ID, and measurement of every quantity on every machine
For instance, the primary machine might need a tool entry of /dev/disk0 and a number of sequentially numbered volumes (partitions) on it, beginning with a partition title akin to disk0s1. Further volumes may have related names with growing partition numbers.
You will additionally be aware that the final part of every machine entry is the BSD disk title, and it at all times matches the disk title of the partition scheme listed below the IDENTIFIER column. For instance, /dev/disk0 at all times has a partition scheme with an ID of disk0. The identical is true for added drives.
This helps you bear in mind which volumes belong to which units.
Subsequent, be aware down the machine entries and quantity (partition) names and identifiers of the supply and vacation spot volumes you wish to use for the cloning operation.
That is actually necessary to do. For those who specify an incorrect quantity identifier because the vacation spot disk throughout cloning, all its information could also be destroyed, and there is not any strategy to undo it.
Take your time and watch out.
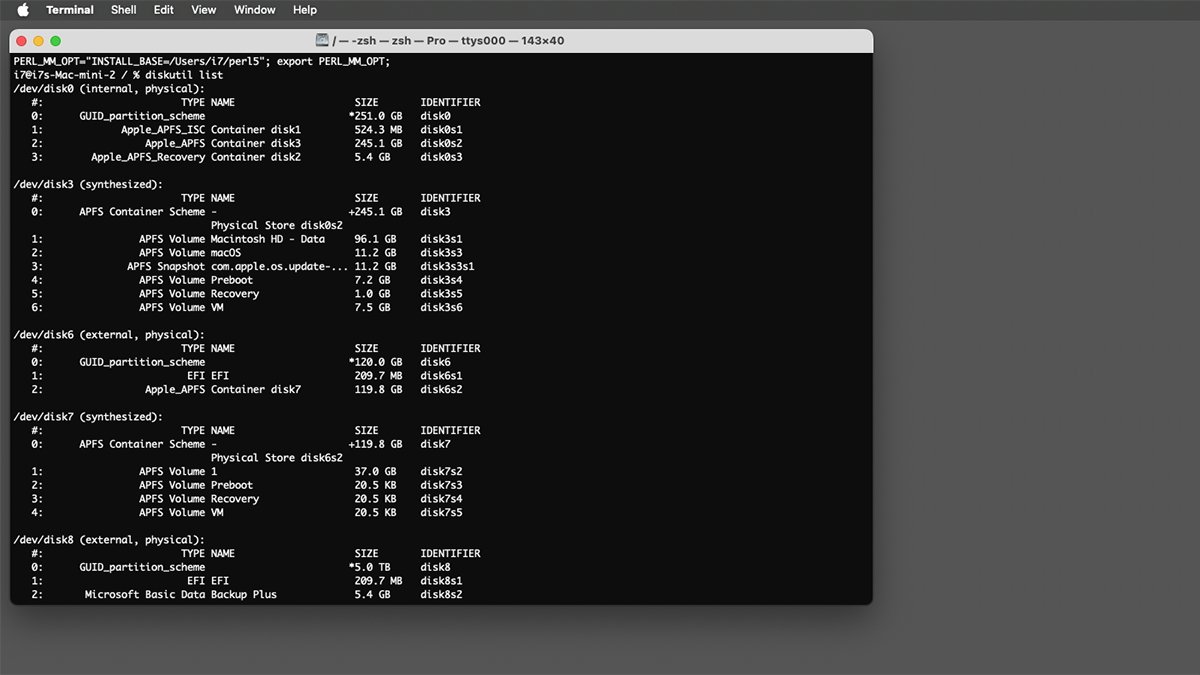
Viewing machine data on the Mac utilizing the diskutil command in Terminal.
You might also discover within the disk checklist a number of partitions with names akin to Apple_APFS_ISC and Apple_APFS_Recovery. These are particular hidden volumes utilized by macOS, and also you should not contact them. Doing so could render your Mac unbootable.
System and quantity confusion
Apple File System (APFS) generally is a bit complicated typically.
That is due primarily to 2 ideas: container disks (normally of kind Apple_APFS) and synthesized or digital volumes. Container disks can include different volumes.
A container works as a kind of wrapper round a number of different volumes, all of which might be of various sorts.
Containers are helpful as a result of they permit the manipulation of a number of volumes without delay, akin to copying, cloning, and repairing. Containers additionally present some further inside data in case there’s an issue with a number of of the volumes they include.
While you broaden a container, it may well then be handled as a tool and the volumes it incorporates might be manipulated individually.
Additionally remember that partitions of kind Apple_APFS are completely different than partitions of kind APFS Quantity and APFS Snapshot. It’s because in APFS, containers might be expanded as in the event that they have been bodily units, and their wrapped volumes displayed as in the event that they have been volumes on an actual, bodily machine.
In macOS, Apple_APFS virtually at all times represents a container, and APFS Quantity virtually at all times represents a single, particular person quantity.
When you perceive this, it is easy to see how a Container machine entry within the diskutil checklist might be confused for an actual, bodily machine. Once more – watch out.
Subsequent to every machine entry, you may discover an outline in parentheses to point if the drive is an actual, bodily drive or a synthesized one. So, for instance, you would possibly see (inside, bodily) or (synthesized) subsequent to a tool entry.
All of this may be very complicated and result in potential errors when utilizing the diskutil command and Terminal. It’s because, in some instances, it is doable to have a digital machine entry that’s really a container on an actual, bodily machine.
Such digital units will normally someplace in their quantity checklist include the empty label Bodily Retailer adopted by the partition identifier of the partition on the actual, bodily machine they level again to.
For instance, you might even see a container scheme line in a digital machine entry’s checklist, adopted by a clean line which incorporates solely the label “Bodily Retailer”, akin to:
Bodily Retailer disk0s2
Normally, proper after that line will probably be listed the APFS volumes themselves, for instance:
APFS Quantity Untitled 460.0 KB disk3s1
This means that the container scheme itself factors again to an Apple_APFS Container on a bodily disk. And normally in these instances, a APFS Container Scheme‘s measurement will probably be an identical to the Apple_APFS Container it factors again to.
Tiny APFS Quantity entries listed within the KB measurement vary normally point out the disk was newly erased with a single empty quantity on it. To clone right into a container, you’ll be able to both take away all volumes inside it or merely add your clone as a brand new quantity into it.
Opposite to what you would possibly assume, it is completely doable so as to add a clone into the container that incorporates the quantity macOS is at the moment booted into. We’ll get to this under.
Additionally, earlier than you begin the clone, be certain that the vacation spot has sufficient area to carry the complete measurement of your complete clone. If it would not, the clone will fail.
This consists of any restoration and boot partitions marked with “Preboot” or “Restoration” when you’re cloning a complete machine. You need to most likely permit for a bit additional area in case ASR wants to maneuver issues round. A couple of GB ought to be sufficient.
To summarize the above instance:
disk0– an actual, bodily machine entry with aGUID_partition_schemeon itdisk0s2– anApple_APFScontainer on bodilydisk0disk3s1– anAPFS Quantityon a synthesized machine (disk3) with aAPFS Container Schemeon itBodily Retailer disk0s2– The identifier of theApple_APFSon the bodily machine from whichdisk3was synthesized
Most likely the most important gotcha in attempting to grasp all that is that the IDENTIFIER of the dad or mum Apple_APFS container seems within the textual content of the “Bodily Retailer” label within the NAME column on the synthesized baby machine entry (simply earlier than its quantity checklist).
When you grasp that relationship, understanding APFS turns into a lot simpler.
Don’t be concerned if all that is complicated. APFS takes fairly a while to get used to and perceive. You will get it will definitely.
The upshot of all that is that when working ASR to clone a quantity, it’s important to watch out about which quantity you goal as your vacation spot. For those who make a mistake, it’s extremely straightforward to wipe out a container, which additionally wipes out all of the volumes it references.
You’ll be able to goal a Container because the vacation spot, however it’s important to watch out about the way you do it.
It is simple to find out the supply and vacation spot volumes within the diskutil checklist by in search of the Container or quantity names you need within the NAME column (akin to “Macintosh HD”, for instance). However remember it is doable in macOS to have two volumes with an identical names, however with a unique IDENTIFIER for every.
Put together for cloning
As soon as you have executed all the above and verified all the pieces, it is time to begin the clone operation. For this instance, we’ll assume you are working macOS Monterey or later.
If the vacation spot is an APFS Container and it incorporates the quantity macOS is at the moment booted into, you need to restart your Mac into Restoration Mode.
The steps for doing this are completely different when you’re utilizing an Intel or Apple Silicon Mac. Apple additionally has a Intro to macOS Restoration web page.
That is essential to keep away from restrictions imposed by System Integrity Safety. If the vacation spot would not include the at the moment booted macOS quantity, you’ll be able to run ASR from Terminal with out restarting.
Oddly, subsequent you need to be certain that both FileVault or Discover My Mac is enabled. This ensures Restoration Assistant will seem after a restart and ask you for an admin password.
With out this, ASR will fail.
Restart utilizing the directions from Apple above in addition into Restoration Mode. As soon as in Restoration Mode, choose Utilities->Terminal from the menu bar.
As soon as in Terminal, run diskutil checklist as you probably did above. Notice that the IDs for containers and volumes could have modified.
If the supply has FileVault enabled, you may must unlock its information quantity it with two instructions in Terminal:
diskutil apfs listvolumegroups
diskutil apfs unlock
For those who’re working ASR with out working in Restoration Mode, you may must as a substitute unlock utilizing the diskutil apfs unlock command adopted by the information quantity. For instance:
diskutil apfs unlock disk2s2
The info quantity is a separate quantity that resides subsequent to the precise bootable macOS quantity. So, for instance, in case your bootable Mac quantity is called “Macintosh HD”, you may additionally see a second quantity subsequent to it named “Macintosh HD – Information”.
Put together snapshots for cloning
Signed System Volumes include a sealed snapshot of the copy of macOS that’s on the Startup Disk. These snapshots are used to protect the safety of the put in OS to ensure it hasn’t been tampered with.
In an effort to use these snapshots on the vacation spot, they have to be copied over as-is. To ensure that ASR to make the snapshot copy, it has to know what the snapshot’s title or distinctive ID (UUID) is.
To get the snapshot UUID or title in Terminal, be aware the diskutil ID of the supply’s system quantity (for instance ‘disk2s1’) within the IDENTIFIER column with:
diskutil mount disk2s1
This forces the quantity to be mounted by macOS. Notice that is the quantity with macOS on it – not the Information quantity.
Terminal will show the mounted quantity title and echo again the ID when it does.
Subsequent run:
diskutil apfs listsnapshots disk2s1
This shows the sealed snapshot’s title and UUID on this quantity. For those who get an error, return and ensure the quantity or Container ID you specified matches the one containing the macOS set up.
You need to see one thing like:
i7@i7s-Mac-mini ~ % diskutil apfs listsnapshots disk2s1
Snapshot for disk2s1 (1 discovered)
|
+— E3D1AF2D-7182-3217-BC82-2874219DAB48
Title: com.apple.os.update-52F3A2F592F324F6AC5DE35D538FA237771DB7715C76582E51C5C432D80587DD
XID: 42
Purgeable: No
The brief string subsequent to the “+— ” is the snapshot UUID, and the longer string under it’s the title. You should utilize both, however the UUID is less complicated.
You can even view the snapshot title/UUID for the supply in Disk Utility from the menu bar by deciding on View->Present APFS Snapshots.
Notice, you need to have an precise macOS quantity chosen within the sidebar in Disk Utility for this menu merchandise to be enabled. Deciding on the bodily machine or the Container will not work.
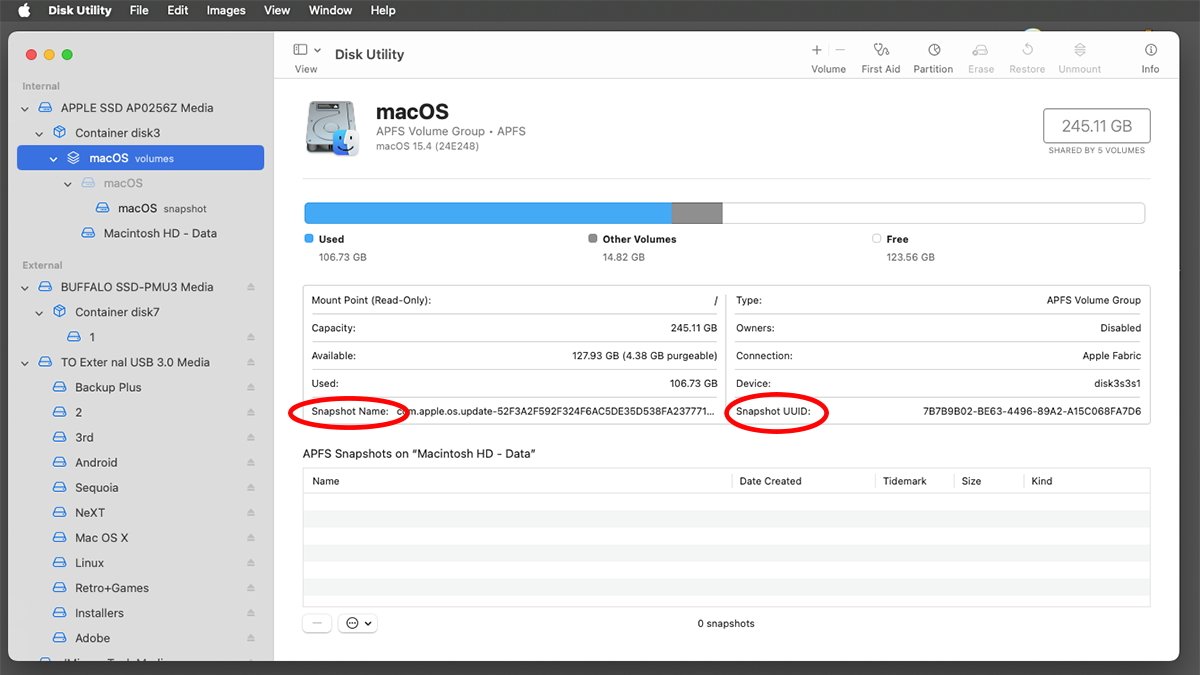
Viewing snapshot UUID and title in Disk Utility.
Begin the cloning operation
The command for beginning the ASR cloning course of is simple, however your complete command line is sort of complicated.
The primary command is:
asr restore
There are a number of choices and parameters that go together with it. The three most necessary doable choices are:
- — supply
- — goal
- — erase
You can even use the --file choice to focus on a file because the vacation spot. There are different choices for skipping verification and warnings and controlling output.
There’s additionally a cool server choice to multicast a clone over a community, but it surely requires the --erase flag. ASR may also learn multicast .dmg recordsdata over a community by utilizing the asr:// protocol. However usually, asr:// is not used a lot.
For a whole checklist of choices and utilization, in Terminal kind:
man asr and press Return in your keyboard. There’s additionally an on-line model at ss64.com.
The person web page has sections that debate restoring from filesystems, snapshots, and volumes. To exit the person system in Terminal, kind Management-Z or q in your keyboard.
You will get verbose output whereas cloning with the --verbose and --debug flags.
An instance of the only clone command line would possibly appear like this:
sudo asr restore --source /Volumes/supply --target /Volumes/dest
To do the identical as above but in addition erase and destroy all information (together with volumes) on the vacation spot when cloning, additionally add the --erase flag on the finish of the command line earlier than beginning.
The --erase flag destroys all present information on the goal, so use it rigorously. It is simple to wipe out a number of volumes without delay inadvertently when you’re not cautious.
To incorporate the above snapshot when you’re working in Restoration Mode, additionally add the --toSnapshot flag adopted by an area, then the snapshot title or UUID you obtained above. It will make the vacation spot clone look and behave precisely like your supply quantity.
Usually, when you goal a container and omit the --erase flag – and in case your supply is a single quantity, the quantity will probably be added to the container and the opposite volumes will probably be left alone.
However once more, use warning and at all times again up all of your volumes and information first, simply in case one thing goes improper.
When working in Restoration Mode, you’ll be able to normally omit the sudo in the beginning of the command since you entered an admin password when Restoration Mode began.
When ASR begins, it would immediate to ask when you’re certain until you used the --noprompt flag above. Press y in response and press Return.
ASR will run a number of steps to execute the clone, and if all the pieces labored, on the finish you may see the message “Restore accomplished efficiently.”. If a clone fails, you may must open Disk Utility and search for a quantity with “ASR” in its title after which Erase it from the toolbar.
Once more, proceed with warning. Do not by accident erase the improper quantity.
Make the clone bootable
When a clone operation succeeds, the vacation spot nonetheless is not bootable. You will must do a couple of further steps to make it so.
After ASR runs, the vacation spot volumes all have the identical names because the originals (or one quantity when you did not clone a Container). You will must rename these volumes with distinctive names so they do not battle with the originals.
If multiple quantity with an an identical title is mounted on the Finder’s Desktop, macOS will change one of many volumes’ names silently however solely within the background. The “actual” title the filesystem sees for every quantity will probably be completely different than the duplicate(s)’ names proven within the Finder, which might be complicated.
I’s finest to ensure all volumes have distinctive names.
You’ll be able to rename unlocked quantity names within the Finder by clicking on their names and typing new ones. Alternately, you’ll be able to rename them in Disk Utility by deciding on them within the sidebar, then Management-clicking each and deciding on Rename from the popup menu.
At any fee, it is best to restart your Mac after renaming volumes to ensure the system picks up all the brand new names and discards any ones it could have created within the background.
Notice that this renaming additionally needs to be executed for the vacation spot’s Information quantity. For instance:
- Macintosh HD
- Macintosh HD – Information
would possibly develop into:
- NewExternal HD
- NewExternal HD – Information
Do not rename the particular volumes on the clone named:
- Preboot
- Restoration
- VM
- Replace
For those who do, the clone could not boot.
For those who’re nonetheless in Restoration Mode, you may must restart again into your regular set up of macOS to finish the following steps.
When you’re again in macOS, open System Settings, go to Normal->Startup Disk and set your clone because the boot quantity. This causes macOS to bless the quantity for booting by setting some particular flags on it.
Now you can restart into the cloned quantity by clicking the Restart button.
For those who see the message “This quantity doesn’t have any approved customers for this laptop”, click on Authorize Customers and comply with the directions. You could must enter an admin password a number of instances.
You might also wish to run First Support in Disk Utility on the clone or its Container first earlier than rebooting, simply to ensure all the pieces is okay on the vacation spot.
If, for any cause after restarting, you’ll be able to’t boot from the clone and might’t get again to your unique Startup Disk, you’ll be able to choose which quantity to begin from by resetting your Mac after which holding down a key:
- Energy button (Apple Silicon)
- Choice key (Intel Macs)
This preempts the boot course of and shows a display that offers you the choice to pick out which quantity in addition from.
Now you know the way to make clones of your Startup Disk in varied methods. Watch out when making clones since it’s extremely straightforward to destroy information.
Apple Software program Restore is not meant for mass deployment of macOS to a number of machines. It’s doable to take action, but it surely’s not a good suggestion.
As a substitute, it’s best to use Apple’s MDM expertise to deploy to a number of units without delay. See the macOS Deployment Information for more information.
ASR might be harmful if not used rigorously. Because of this, it’s best to solely use it once you’re certain you’ve sufficient time to do a restore with out speeding.
One single mistake can wipe out a number of drives without delay and destroy all the information on them straight away.
It may also be a good suggestion to arrange a check Mac with some additional drives on it and apply earlier than utilizing ASR in a real-world atmosphere. You should utilize cheap USB thumb drives as check drives, though they are going to be a bit slower.
Additionally see Apple’s technote (102655) How you can reinstall macOS.