

This overview will efficiently information you thru smoothing and sharpening the tough edges of any design.
Posted on February 10, 2017
by
Alec Richter & Tyler Anderson
As beforehand mentioned, fashions taken from video video games aren’t the identical bodily as they’re visually. They appear easy, have a ton of element, and seem to be the right mannequin to print on your costume, and then you definately obtain it and discover a sharp, primary, and far too easy mannequin to even contemplate your completed mannequin. You are not fairly able to make the dedication to noxious chemical substances and respirators you would wish to make use of Bondo physique filler, however with this technique, you will not must.

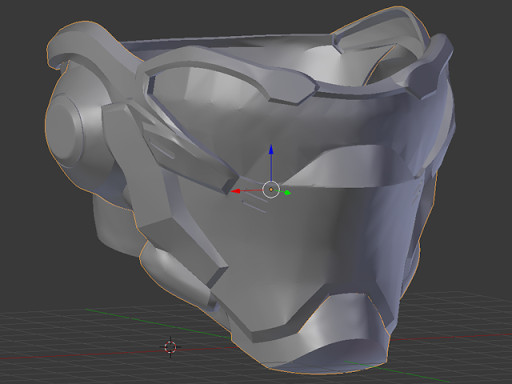
The entire household of 3D printed Soldier 76 masks.
Tyler launched me to the free 3D modeling program Blender, one thing he had expertise utilizing when modifying Pepakura recordsdata for his Iron Man costume. In the event you’ve by no means used any 3D modeling software program, do not be discouraged from utilizing it. Earlier than writing this text, I had no expertise with Blender.
With a purpose to get your mannequin to a degree the place you possibly can modify it and have a printable file in the long run, observe steps 1-7 of How To Carry Video Sport Characters To Life, then observe these directions.
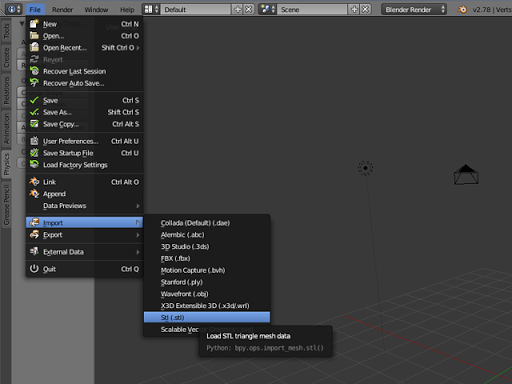
Step 1: Import into Blender
- Delete all of the objects in Blender’s default scene, this features a digicam, a light-weight supply, and a dice. The simplest means to do that is to press “A” till every part is chosen, then press “X” or “Delete” to delete them.
- To import your mode, STL or in any other case, discover it within the following drop down menus:
Step 2: Navigating in Blender
Listed below are the fundamentals of getting round in Blender:
- Drag + MMB (Center Mouse Button): Rotate view
- Shift + Drag + MMB: Pan view
- Scroll Wheel: Zoom in/out
- RMB (Proper Mouse Button): Choose an object
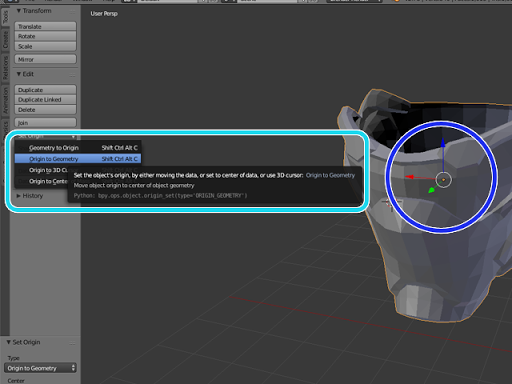
Step 3: Middle the Objects
When your mannequin is imported, odds are it is not close to the middle, so let’s transfer it nearer.
- Choose the group by proper clicking on it.
- Transfer it to the middle by dragging the arrows on every axis. (Blue circle).
- You can even transfer issues by urgent G.
- To make issues simpler, it’s possible you’ll need to reset the item’s origins. To do that, go to Set Origin > Origin to Geometry. (Cyan field).
- At this level you’ll most likely additionally need to save the mannequin with Ctrl-S
Step 4: Separate Objects
Some 3D fashions or sport fashions even have a number of items as the identical object. While you import them into Blender, all of them come collectively as one group. We have to separate them with a view to work on them individually.
- Choose the group and change to Edit Mode (Yellow Field).
- Press “A” till nothing is chosen, then proper click on on one piece to pick considered one of its vertexes.
- Press “Ctrl-L” to pick your complete piece (all linked vertices).
- Press “P” then select “Choice” to separate that piece from the the group.

The way to enter Edit Mode

Separate by Choice

Tip: You possibly can cover the items you are not engaged on by clicking the eyeball icon subsequent to them within the Outliner.
Step 5: Thicken
Like I discussed within the first article of this sequence, sport fashions, Pepakura fashions, and so on, aren’t designed to be 3D printed, so they’re solely a floor mannequin. They don’t have any thickness or quantity and there’s not truly something to print.
The simplest means so as to add thickness to a mannequin is to make use of the “Solidify” modifier.
- Choose your object, then go to the Modifiers tab of the Properties editor.
- Click on “Add Modifier” after which select “Solidify” from the Generate part (Blue field).
- Enhance the thickness to nonetheless thick you need. 3.0 is an effective place to begin.
- If you wish to make these adjustments everlasting you possibly can hit “Apply.” This isn’t mandatory although, and leaving it as it’s will assist you to edit the modifier later.

Step 6: Extrude (Non-obligatory)
You would possibly discover some fashions which are tubular and want some thickness, resembling Iron Man’s thigh armor. There may be an alternative choice to utilizing the “Solidify” modifier, and that’s utilizing “Extrude”.
- Enter Edit Mode and press “A” to pick every part.
- Press “E” to extrude. This can make a duplicate of the mesh that’s linked to the unique across the edges. You possibly can transfer this copy round with the mouse, however on this case we need to preserve it in place, so press “Esc.”
- Press “S” to scale down the copy. We need to make this the within floor.
- We would like the within to be simply as tall as the surface, so press “Shift + Z” to inform Blender no to scale alongside the Z axis. Conversely, you might press Z in case you solely need to scale alongside the Z axis. The identical could be completed for the X and Y axis.
- Transfer the mouse till the tube is the best thickness, then press “Esc” when you’re completed.

Extruding the faces of an Iron Man thigh.
Step 7: Splitting Hairs. Or Helmets
You could need to cut up fashions into a number of items. As an example, if you wish to print sections in several colours or if the entire piece is just too massive on your printer. On this case I’d need the helmet cut up alongside the faceplate, the visor, the primary physique, and the again panel.
- We have to choose the road the place the lower might be made. Choose one edge after which preserve deciding on extra utilizing “Shift” or “Ctrl.” (Determine 1).
- Holding Ctrl makes it simple by deciding on the shortest path between the primary line and the subsequent you click on on. (Determine 2).
- Press “V” and “Esc” to tear the mesh alongside the road you chose.
- Press “Ctrl + L” to pick your complete linked part, then transfer it away from the remainder.
- Press “P” to ungroup it from the unique. (Determine 3).

Determine 1

Determine 2

Determine 2

Determine 3
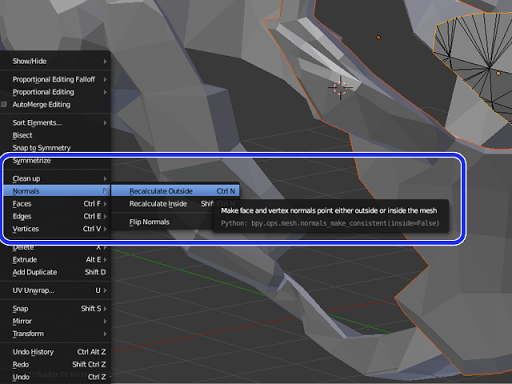
Step 8: Clear Up the Mesh
Earlier than we easy the mannequin, we have to make it possible for by this stage it is printable. A 3D mannequin has what is named “normals” and these decide which facet of a face is the within and which is the surface. If these are reversed, it may possibly trigger slicing errors.
- Choose all then go to “Mesh > Normals > Recalculate Exterior.” In the event you see any faces change colour barely, it means they had been reversed earlier than. (Blue field).
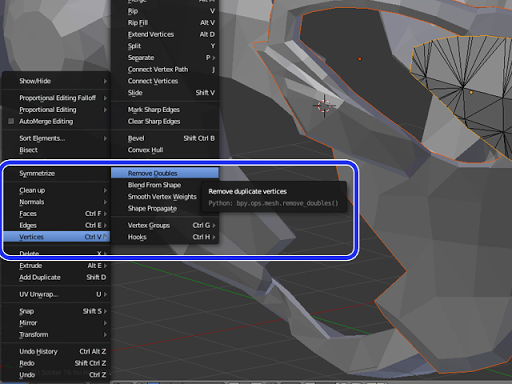
Now we have to test for non manifold geometry. These are components of the mesh that both have holes or are intersecting with itself.
- Go to “Choose > Choose All by Trait> Non Manifold.” (Blue Field).
Any components of the mesh that at the moment are chosen have points. You will want to manually repair these. One of the simplest ways to repair these downside faces is to delete them outright and reconstruct the realm.

One factor that usually results in non manifold geometry is vertices that are very shut to one another however not truly linked. To repair these, choose all after which go to “Mesh > Vertices > Take away Doubles” (Blue field).
Step 9: Clean the Floor
We now have a printable mesh, however the primary level of this was to make there be much less ending work.
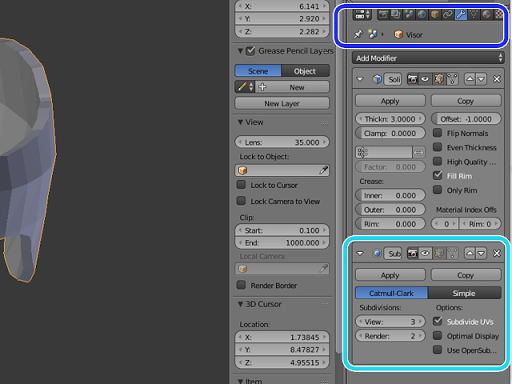
- To easy issues out we’re going to use Blender’s Subdivision Floor Modifier. Open to the Modifiers tab after which go to “Add Modifier > Subdivision Floor.” (Wrench within the Blue Field).
- Set the variety of subdivisions (“View” not “Render”) to your choice. I discover 3 or 4 is usually sufficient to have a very good mannequin. The extra subdivisions, the smoother the floor, the extra polygons, the bigger the file dimension. (Cyan Field).
Blender’s smoothing algorithm will, by default, spherical off all edges. Even edges it’s possible you’ll need to preserve sharp. To stop this, we have to inform it which edges we need to protect by creasing them.
- Begin off by quickly disabling the Subdivision Floor modifier. You are able to do this by clicking the eyeball icon.
- Now choose the sides you need to crease. A simple means to do that is by going to “Choose > Sharp Edges.” This can choose all edges with a pointy angle.
- Play with the sharpness threshold till it appears to be like prefer it has many of the vital edges. It doesn’t must be excellent as we are able to add or take away extra in a second. It is a good place to begin earlier than handbook choice.
- You probably have edges marked “sharp” that you don’t need chosen, whereas holding “Shift” click on on them to deselect them. You probably have edges that are not chosen that you really want creased, maintain “Shift” and click on them to pick them.
- Crease the sides by urgent “Shift + E” then kind “1.0” and press “Enter”
- To uncrease an edge, you would choose it and kind “-1.0” as an alternative
- Unhide the modifier to see the way it appears to be like, then return and crease/uncrease extra edges as wanted.

Visor with the sides smoothed out.

A number of hours of labor to avoid wasting a dozen or two later.
Now you can say you’ve expertise utilizing Blender and that you just cleaned up and made a mannequin even higher. The extra you tinker with Blender, the extra particulars you possibly can add to your mannequin.
With a whole lot of trial and error, I used to be in a position so as to add within the ear channels and the cheek divots, which for a primary time modeler was a problem. I will not be going into methods to do it, however within the briefest phrases, I modeled the form I needed subtracted from the helmet, positioned it how I needed on one facet, mirrored it, and Boolean subtracted it from each side.

Left, the completed print. Proper, the unique sport mannequin.