

Once you need to make giant 3D prints as a result of STL recordsdata are of the best high quality, like those you could find on Gambody market, and let you upsize your undertaking to life-size or much more, you need to uncover the principle secrets and techniques of large-scale 3D printing. Do you need to set up a large Millennium Falcon in your lounge? Do you dream of hanging a life-size Tyrannosaur Rex bust in your little one’s bed room?
No matter your goals are, preserve studying to be taught the steps you’ll should take to realize them.

Massive-Scale 3D Printing
Increasingly more hobbyists take pleasure in giant 3D printing and work on big fashions that received’t match on a shelf and infrequently don’t match on the common printer mattress. The Premium sector on Gambody 3D printed market is stuffed with unbelievable affords, and every one has been examined to print with out errors and boasts such superb particulars that upscaling most figures and fashions for 3D printing is an enormous should!
To start working in your giant 3D prints, you don’t have to change your printer instantly and purchase a large-format machine. As a substitute, you need to be taught extra about 3D printing giant objects on a regular desktop printer construct plate. One of many strategies is slicing or splitting the mannequin in Fusion 360, Blender, Autodesk Maya 3D, Bambu Studio, Meshmixer, or a distinct software program. Let’s look them up extra carefully.
Learn additionally: Over 100 Enjoyable 3D Printer Initiatives.
Break up STL Software program
Once you don’t have a 3D printer for giant objects, reminiscent of gMax 2 or extra reasonably priced FLSUN V400 3D printer, you could learn to break up STL recordsdata to suit in your printer’s mattress.

You may attempt Fusion 360, Meshmixer, Tinkercad, Blender, Cura break up mannequin methodology, and so forth. Completely different slicers have distinctive options and instruments that require time to develop into conversant in and lots of follow to develop into a professional. In large-scale 3D printing, by splitting STL recordsdata, you need to be taught to make straight cuts to separate an enormous half into smaller items or add aligners to comply with the undertaking’s creases. Irrespective of what number of elements you propose to create, it’s best to establish them with numbers or letters that can assist you with mannequin meeting.
Is it a sophisticated job? Nothing is unimaginable if you need to work on huge 3D prints with no matter machine model you personal. Let’s element how precisely you possibly can break up a 3D mannequin for printing.
Learn additionally: Noble Life-Dimension Groot 3D Print by Jose Antonio.
Tips on how to Break up a 3D Mannequin for Printing
Take a better have a look at the STL file you want to break up (Gambody will display the steps in a number of slicers utilizing the Cloud Strife 3D printing mannequin, which STL recordsdata it’s also possible to obtain to recreate in life-size).
Common recommendation. In case your undertaking has many intricate particulars, keep away from slicing by means of them or too near them as a result of you possibly can harm the design. Keep in mind the potential splits and the way they will have an effect on the variety of helps you’ll have to make use of. The much less is one of the best.

It’s additionally finest to separate with angles or planes, contemplating the structural integrity of the 3D printing determine or mannequin. Don’t reduce on the thinnest factors, that are normally weak. The realm the place you narrow has to have sufficient floor, particularly if you must assemble the elements after the break up.
As you consider one of the best methods to separate STL, guarantee every bit can take essentially the most of your 3D printer mattress. This fashion, it can save you time, filament (or resin), and your nerves.
Learn additionally: Distinctive Life-Dimension Paul the Alien 3D Print: Interview with Michael Shaw on Making a Collectible Piece.
Shortly About Gambody Fashions
Once you flick thru Premium 3D Printing Fashions on gambody.com, you could find the exact measurement of each determine and mannequin, from the smallest elf to the most important demons and spacecraft. Thus, you possibly can upscale them to your wants. The fashions’ description pages and pictures have a grid and scale that may assist you determine your undertaking’s life-size dimensions.

To make giant 3D prints in an accurate life-size model, you could upscale all elements of your mannequin to the identical scale. In our case, it’s important to upscale the Cloud Strife determine to eight instances its authentic measurement (we use the FDM model). Gambody recommends you upscale FDM fashions to life-size variations until you want to obtain ready-to-print life-size initiatives reminiscent of Spider-Man Sport Suite or Robotic Maria.
It’s best to make use of a 3D printer with a minimal print quantity of 8.6 x 8.6 x 9.8 inches (220 mm x 220 mm x 250 mm) and work out the utmost measurement you possibly can print at a time.
Learn additionally: Fabulous Life-Dimension 3D Printed Mannequin for Sport of Thrones Followers: Interview with Tatiana Rizou.
Autodesk Fusion 360
Autodesk Fusion (previously Autodesk Fusion 360) may be very common amongst hobbyists. You may perceive the steps you usually must take to separate STL in Fusion within the instance beneath. Let’s slice the hand of Cloud Strife, pretending you want to flip this determine into a big 3D print (life-size would look nice on this character, by the way in which!).
Step 1. Launch Autodesk Fusion and import the half as mesh. Place it on the mattress.

Step 2. Upscale it to eight instances its authentic measurement by selecting the “Scale Mesh” parameter from the “Mesh” menu. Use the “Scale Issue” 8.


Step 3. Gambody advises you to create a stable field with the utmost measurement of your 3D printer mattress to keep away from upscaling the 3D printing figures method an excessive amount of.


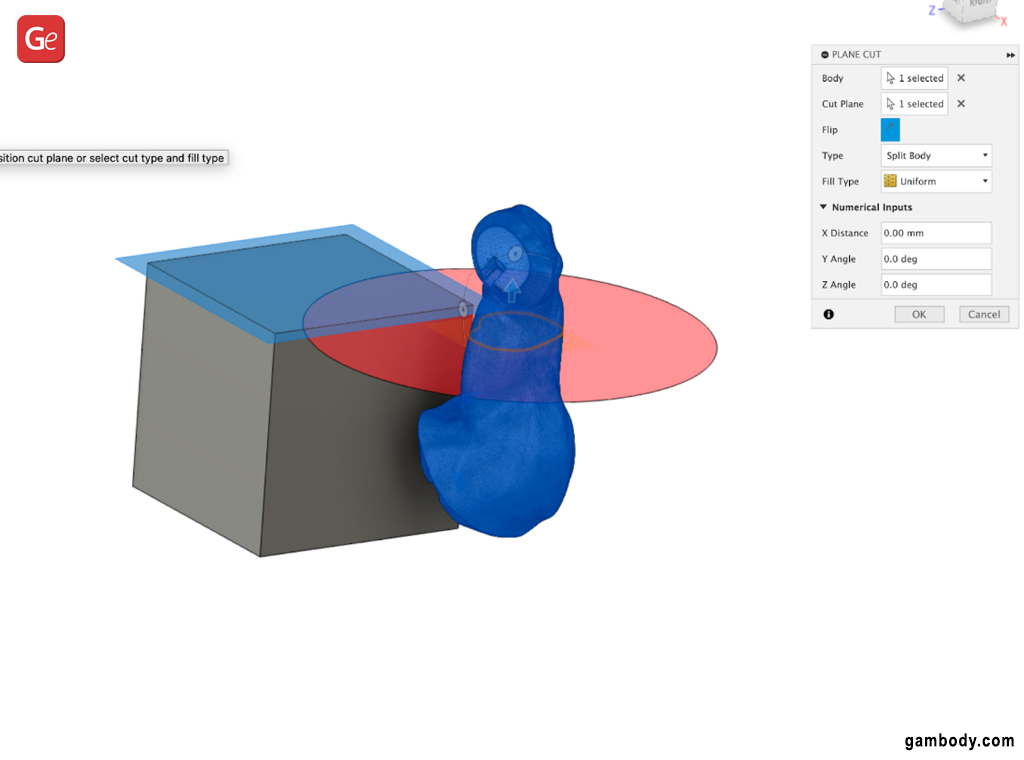
Step 4. Choose the aircraft you want to use to separate STL. It will likely be simpler when you select one of many dice faces for this job and make your offset aircraft about 5 p.c smaller than the utmost measurement of the mannequin you possibly can match in your 3D printer mattress.

Step 5. Choose the 3D printing half and the reduce aircraft. Fill out the parameters similar to within the picture beneath:
Step 6. Congratulations! You’re prepared to start out 3D printing giant elements, and you should use Fusion 360 to chop an STL file in half.

Learn additionally: Free STL Editor: Tips on how to Edit and Restore STL Information (3D Fashions).
Bambu Studio
Let’s now break up STL into elements utilizing Bambu Studio. This open-source slicer has many nice options. Cloud Strife’s hand is as soon as once more used for example of what you need to do to make life-size figures and fashions.
Step 1. Open the STL file in Bambu Studio and upscale it by 800 p.c.

Step 2. Place the mannequin in essentially the most compact place.

Step 3. Choose the reduce aircraft, contemplating the place for 3D printing and the ultimate look.

Step 4. Add pins (if you’d like).

Step 5. Repeat the steps above till all of your 3D printing elements match the printer mattress. Make sure that the pins you add don’t intrude with one another however provide help to with future mannequin meeting.

Step 6. Use 4 to five outer partitions and a couple of to three p.c infill to make sure the half energy and minimal use of filament.

Learn additionally: Tips on how to 3D Print Life-Dimension Iron Man Statue: Interview with David Maeseele.
Autodesk Maya 3D
When you find yourself 3D printing giant elements and want to break up STL with Autodesk Maya 3D, put together for extra steps than when utilizing Bambu Studio or Fusion 360.
Step 1. Import your undertaking into Maya 3D and place it.

Step 2. Utilizing “Channel Field,” scale up your mannequin to life-size by altering the “Scale” parameters for X, Y, and Z, the place 1 = 100%.

Step 3. Create a dice matching the utmost construct quantity of your 3D printer to keep away from upscaling a much bigger mannequin than you possibly can probably print.


Use the “Channel Field” and a “T” key to create a polyCube with a peak of 0.12 mm. Different parameters don’t matter as a lot.

Step 4. Place the blade the place you want to break up STL. Maintain “Shift” whereas choosing the 3D printing half you want to break up after which the dice and select “Booleans” for slicing.

- Technique 1. Press and maintain “Shift” and RMD and select the “Distinction (A-B)” in “Booleans” or choose the elements and go to “Mesh” – “Boolenas” – “Distinction (A-B). Keep in mind to make use of the Shift+Alt+D mixture to clear the cache, and your object remains to be thought of as “stable” despite the fact that with a reduce. Use the “Separate” possibility to separate it.

")

- Technique 2. Choose the 3D printing half you want to break up and press-hold Shift+RMD whereas selecting “Mesh” – “Separate.”


- Choose all of the elements and use the “Mesh” – “Triangulate” possibility (by holding Shift+ RMB or by means of the Mesh menu) to export them accurately.


Now you possibly can work in your big 3D prints!
Learn additionally: Strolling Terminator Endoskeleton (How a Humanoid Robotic Grew to become a Nightmare Animatronic).
Blender
This open-source software program for 3D modeling may be very common. It helps designers sculpt figures and work on complicated fashions, though studying and bettering your abilities takes time. Its fundamental benefit is that it’s free, and you could find lots of tutorials on-line to help you with printing giant objects and provide help to break up STL recordsdata in accordance with your wants.
Blender is likely one of the most difficult STL splitter strategies however affords numerous helpful instruments to finish this job. Bender choices for the way to break up giant 3D prints embrace including angles (vertical or horizontal) or planes that may be angled nevertheless you want.
When making giant 3D prints by upscaling a mannequin reminiscent of Cloud Strife, comply with this fast information to splitting STL recordsdata.
Step 1. Import the file and place your object.

Step 2. Use the “actual Dimension” to upscale the mannequin by 800 p.c. You are able to do this by clicking the “S” (Scale) key and coming into the quantity 8 or by clicking the “N” to entry the menu and coming into “8.000” for “Scale” within the “Merchandise.”

Step 3. Create a dice that’s just like your mattress measurement. You may go to “Add” – “Mesh” and press “Dice” or use Shift+A mixture and select “Mesh” – “Dice.”


Now you possibly can enter the “Dimension” parameters in your Dice or change the “Dimension” in “Merchandise.”


Step 4. Create the blade. Use the Dice Z dimension as 0.00012 m.

Step 5. Place the blade the place you want to slice your 3D printing half, however be certain to not exceed the utmost 3D printer quantity. Choose the 3D printing half and select “Add Modifier” – “Generate” – “Boolean.”

Step 6. Choose the “Blade” in “Object” in “Modifiers” and click on “Apply” to proceed.

Step 7. Your object remains to be thought of a stable one however with a slice. To finish slicing this STL, you must “Separate” it. How is it doable to realize this? Go to “Edit Mode” by choosing the article and urgent “TAB.”

Step 8. Choose all of the vertices of one of many object halves by shifting the cursor and urgent the “L” key.

Step 9. Now press the “P” key and select “Choice” within the pop-up menu.

Step 10. Return to the “Object Mode” by urgent “TAB” or by means of the menu.


Step 11. Choose the 3D printing mannequin and go to “Modifiers” – “Add Modifier” – “Generate” – “Triangulate” – “Apply” to export the elements accurately.


Step 12. Choose the break up elements and select “File” – “Export,” the place you possibly can export them as STL recordsdata.

Step 13. Select the right “Operator Presets” possibility. The “Scale” needs to be “1000.000” to accurately export your break up .stl recordsdata.

Learn additionally: Free 3D Printing Software program to Create 3D Prints.
Meshmixer
Meshmixer is likely one of the best methods to separate STL into smaller elements. Autodesk stopped supporting this software program, however you possibly can nonetheless use it until you determine to change to Fusion 360 or another choice. It’s simpler to make use of on Microsoft computer systems as a result of Mac house owners have to put in Parallels visualization to work round. We’ll usually describe how you should use Meshmixer simply to provide you an thought of the way it will help you with making huge 3D prints.
These are the principle steps for a big 3D printing break up. We received’t present an instance however will define the key issues to concentrate to.
Step 1. Add the STL file you want to break up into Meshmixer.
Step 2. Press the “Edit” button and choose “Airplane Lower.”

Step 3. You will notice a aircraft that you would be able to management and place the way you want. When you break up STL, the pop-up menu from the highest left nook permits you to preserve each elements or one a part of the break up. Because you need to create an enormous 3D print, preserve each.
Step 4. To separate one half from the second, select “Edit” and the choice known as “Separate Shells.” You’ll have two objects.
Step 5. Choose one mannequin’s break up half and export it as STL or a distinct format (when you use OBJ or one thing else). Repeat this for each different half you’ve created.

Working with Locator Pins
In large-scale 3D printing, you break up STL recordsdata to print larger elements and glue the break up objects to create one mannequin. Since Meshmixer has no particular locator pin choices, you possibly can add a form to your undertaking and use it because the pin. It may be a cylinder, dice, and so forth.
You’ll have so as to add this form between the 2 elements (midway by means of), add it to 1 half, and subtract it from the opposite half. This fashion, you’ll have two elements with puzzle-like connections to assist them glue higher and keep away from any shifting.

So, here’s what you do when you break up STL into a number of elements:
Step 1. Double-check that each one the elements of your undertaking are aligned. Conceal one half by clicking the “eye” within the View – Object Browser.
Step 2. Select your pin in a desired form, drag it, and drop it within the approximate center of your break up space. Resize it to make sure it takes sufficient house and would provide help to glue the mannequin higher.
Step 3. As one other browser seems within the higher left a part of Meshmixer, choose a drop-down menu and choose “Create New Object” to not let your pin merge with the break up elements.
Step 4. The pin can be aligned by Meshmixer completely properly between your break up elements. It’s a bonus characteristic! Whereas urgent the “Alt” key, click on on the break up half and your pin by means of the Object Browser.
Step 5. Choose every mannequin’s break up half and export it as STL or a distinct format (when you use OBJ or one thing else). Repeat this for each different half you’ve created. The pin can be contained in the mannequin.
Step 6. Go to the Object Browser and make each break up elements seen together with the pin. With this achieved, choose the pin locater and press “Copy” within the Object Browser. Make the unique pin invisible, however preserve this new copy seen.
Step 7. Within the Object Browser, choose the mannequin, and after this, choose the copy of a locator pin. In a pop-up browser, select “Boolean Distinction” composition mode to subtract the pin out of your mannequin. You will notice a gap within the place the place the pin was, whereas the opposite half will present a protruding cute you created earlier.
Step 8. It’s best to maintain the opening barely larger than the locator pin. As soon as you might be proud of the end result, you possibly can export your mannequin elements as STL recordsdata for 3D printing.
Massive-scale 3D printing is an unbelievable journey that lets you work on huge 3D prints of your favourite characters, spaceships, robots, and different fashions. If the directions on the way to break up a 3D mannequin for printing utilizing common slicers are too difficult or require an excessive amount of time, you could find superb ready-to-print life-size initiatives on Gambody market. Please share the pictures of your completed 3D printed figures on our 3D Printing Neighborhood on Fb.
(Visited 34 instances, 1 visits as we speak)