

Break into 3D carving and make a personalized wood slicing board to step up your culinary sport and woodworking expertise.
Posted on October 18, 2017
by
Dave Gaylord
Who does not need a customized slicing board? And with the vacations proper across the nook, it is time to begin considering of issues that earn you severe brownie factors together with your family members – enter your Inventables Carvey and the personalized slicing board venture.
Take a look at another weekend builds right here.
MatterHackers is situated in California, and as a surfer, I’ve an amazing quantity of California satisfaction, so for this venture, I’m going to create a California inlay on a 12-inch walnut slicing board. Right here is how i make the slicing board:
Step 1 – Select Your Supplies
I like walnut. It is simply my favourite wooden to work with and appears superb, particularly after some sanding and an oil end. For the inlay, I’m going to make use of onerous maple, each for energy and coloration distinction. Additionally to finish this venture you’ll need to have some wooden glue, mineral oil, 100 grit sandpaper, and a clear rag. Here’s what I used:
- Walnut wooden
- Maple wooden
- 100 grit sandpaper
- Sort II wooden glue
- Mineral oil
- Clear rag

There are quite a lot of choices for wooden on the market – choose one you want!
Step 2 – Create the Slicing Board Design
I cheated – the Carvey’s program, Easel, created by Inventables has just a few ‘inventory’ slicing board shapes to make use of, which I took benefit of. Right here is a hyperlink to the one I used for this demo [12” x 6” rounded cutting board]. While you click on the blue ‘Open venture in Easel’ you are able to go.

Choose the ‘Inlay App’ and set the depth of minimize for the inlay to the thickness of your inlay wooden
Step 3 – Design the Inlay
I in all probability sound like a damaged report, however that is tremendous simple additionally. Easel permits you to import any image and it turns it into an inlay by utilizing the ‘Inlay App’ (from the Apps tab). I selected a California and used a tolerance of 0.004”. The inlay wooden I used was a Onerous Maple that’s 0.125” thick, so I made the inlay on the slicing board that deep. The outside of the slicing board goes by my total 0.75” walnut wooden clean.

Designing the slicing board California inlay
Step 4 – Structure the Workpieces
For this slicing board I used 2 workpieces: one for the slicing board which minimize out the outside of the cuttingboard in addition to the California pocket, and one for the inlay itself.
You should definitely set:
- Materials Dimensions
- Walnut slicing board base: 0.75″ x 6″ x 12″
- Onerous Maple inlay: 0.125″ x 6″ x 8″
- Depth of minimize for every function
- Exterior: 0.75 inches (full thickness of slicing board)
- Califonia Pocket: 0.125 inches (thickness of inlay wooden)
- California Inlay: 0.125 inches (Full thickness of inlay wooden)
- Bit used for every minimize (Store Carving Bits)
- Verify the ‘Use Tabs” for the inlay minimize – they make sure the inlay doesn’t break away earlier than the carving is full
I used a ⅛” up-cutting bit, which created some tear-out (tough edges that kind when carving towards the grain of the wooden) that wanted to be sanded – subsequent time I am going to use a straight minimize bit to cut back the cleanup wanted.

The Structure of the slicing board design – discover the a number of workpieces for the slicing board and inlay
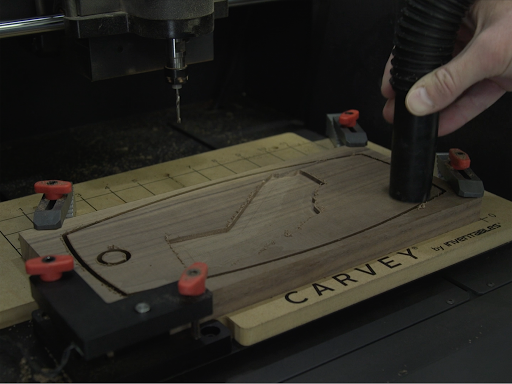
Step 5 – Begin Slicing with the Carvey
You’ll need to seize a cup of espresso for this step as a result of your involvement could be very passive. After getting the board clamped within the machine and the Carvey plugged into your laptop (should be linked to speak with Easel) – hit the massive inexperienced button and sit. When the 3D Carving for the slicing board is completed, unload the walnut and throw within the onerous Maple. Clamp, begin, and repeat.
Cleansing up after slicing on the Carvey
Step 6 – Assemble Your Slicing Board
The inlay might have a little bit of sanding to suit simply proper. Use 100 grit sandpaper – that ought to do the trick. Be sure you sand down the tabs used for the inlay nicely. Clear the within of the pocket and use just a few dabs of wooden glue to bond the inlay into the pocket. If there are any gaps, use a combination of wooden glue and a few of the leftover sanding mud to fill them.
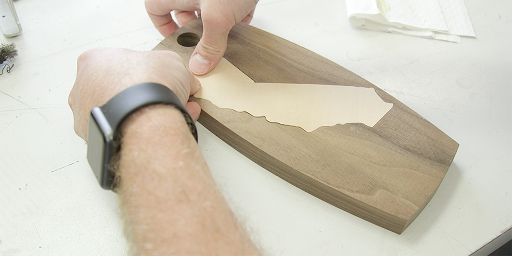
Gluing and setting the inlay into the board.
Step 7 – Sanding the Customized Slicing Board
You’ll need to be sure you sand the highest flush (the inlay with the slicing board base high floor) and customarily contact the complete exterior floor with 100 grit sandpaper. Ease the perimeters so they don’t seem to be sharp. For this step, I used a random orbital sander with 100 grit sane paper, however a few of the ultimate touches I did by hand.
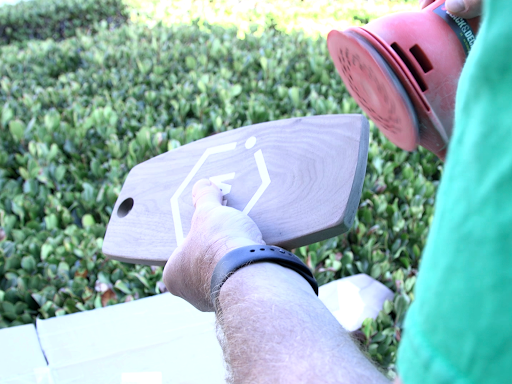
Sanding the perimeters of the slicing board
Step 8: Coat the Slicing Board with Mineral Oil
Use Mineral Oil (it’s meals protected and doesn’t spoil, so is ideal for slicing boards) and apply a beneficiant coating, wipe off the surplus. You could need to do that twice, wooden likes to drink up that oil.
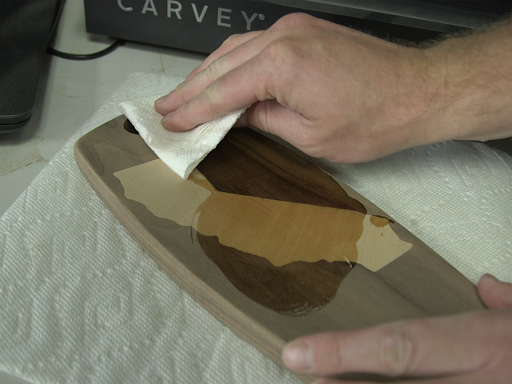
Coating the slicing board in mineral oil
Step 9 – Take pleasure in Your New Customized Slicing Board
Now you’ve got a rad, personalized slicing board to make use of for your self or give as a present. This may impress family members and associates, particularly after they discover out you made it your self.
If you’re concerned with studying extra about 3D Carving, be at liberty to electronic mail assist@matterhackers.com – we might love that will help you get began!